- Page 1 and 2:
REMEDIAL ACTION WORK PLAN W=-F/y OP
- Page 3 and 4:
-.., DRAFT FINAL REMEDIAL ACTION WO
- Page 5 and 6:
-’ ., 2.2.4 Haul Roads . . . . .
- Page 7 and 8:
,/-. 2.12 Restoration of Permanent
- Page 9 and 10:
List of Figures Figure 1-1 1-2 2-1
- Page 11 and 12:
--., . . ~,\ List of Definitions AS
- Page 13 and 14:
’-. List of Acron yms and Abbrevi
- Page 15 and 16:
,--- .,,----- 7.0 Introduction This
- Page 17 and 18:
T ,... ,,.-, - &&Q~ .. .- .._. —.
- Page 19 and 20:
F- - . 1.2 Remedial Action Objectiv
- Page 21 and 22:
2.0 Work Plan The MWP has been prep
- Page 23 and 24:
,,. - with painted lath on the grou
- Page 25 and 26:
f EXISTING COVER SOIL - CLEAN Compa
- Page 27 and 28:
,,-- /“-.., ‘, Area A will be c
- Page 29 and 30:
-- 2.2.7.4 Road Closure - . A 72-ho
- Page 31 and 32:
,,.------ ,.—. L, —>, PHOTOGRAP
- Page 33 and 34:
,,7-.. -. PHOTOGRAPH 5 Entry tube i
- Page 35 and 36:
“Y 2.2.5 Security Plan The projec
- Page 37 and 38:
- Warning signs will be posted at 1
- Page 39 and 40:
Page # 39 This is an oversized docu
- Page 41 and 42:
.-. Issue No. 2: Solution: Issue No
- Page 43 and 44:
previous field studies. Additional
- Page 45 and 46:
,, . ~----- ● Safe conduct of the
- Page 47 and 48:
Page # 47 This is an oversized docu
- Page 49 and 50:
page # This is an oversized documen
- Page 51 and 52:
.. ,/- -.,, A concern associated wi
- Page 53 and 54:
,.— ● Grubbed material will be
- Page 55 and 56:
,= ,.., ... hidden as a result of p
- Page 57 and 58:
---- ● Haul trucks will transport
- Page 59 and 60:
● Trucks will transport material
- Page 61 and 62:
,-- other Fort Ord sites. Field tes
- Page 63 and 64:
.,-. . ‘~. /-—-.., 2.7.3 Gas Pr
- Page 65 and 66:
---, 2.9.7.7 Grading .. The 0U2 sit
- Page 67 and 68:
~ to the maximum density obtainable
- Page 69 and 70:
---- \ Interface Friction Testinq C
- Page 71 and 72:
,/” “--- The AGTEK program shou
- Page 73 and 74:
... . \ 10-foot setback required by
- Page 75 and 76:
● Drip irrigation systems will be
- Page 77 and 78:
., /-. .. ● Maintaining haul road
- Page 79 and 80:
.- / ~, ,-- \ Reference~ American S
- Page 81 and 82:
... 7, .... ,=- 4.0 Quantity Survey
- Page 83 and 84:
,- \ ● A mechanism for briefing t
- Page 85 and 86:
—. 7.0 Construction The construct
- Page 87 and 88:
,. ,. —- .,... References America
- Page 89 and 90:
,.;,.:. .,, - ,.,,, -“” :: ‘:
- Page 91 and 92:
Table 2-2 Demolition Methods and Eq
- Page 93 and 94:
Table 6-1 Constructability Improvem
- Page 95 and 96:
--- Table 6-1 Constructability Impr
- Page 97 and 98:
Table 7-1 Major Construction Equipm
- Page 99 and 100:
Doz*m .M:, ,,.,, J ,,, J ~.. ,,s ,
- Page 101 and 102:
I 1°1 z ~ - . - . . . n : “ “
- Page 103 and 104:
... Item 1. 2. 3. 4. 5. 6. 7. 8. 9.
- Page 105 and 106:
905.9.91
- Page 107 and 108:
v XlClN3ddY
- Page 109 and 110:
. ASBESTOSSURVEYREPORT CORPS OF ENG
- Page 111 and 112:
, BLOW ATC RATINW ASBESTOSSURVEYREP
- Page 113 and 114:
,—--- II !J!wA m ASBESTOS SURVEY
- Page 115 and 116:
. .—. BUILDING P06012 ROOF PLAN N
- Page 117 and 118:
.,. . - ASBESTOS SURVEY REPORT CORP
- Page 119 and 120:
.-.. . ASBESTOS SURVEY REPORT CORPS
- Page 121 and 122:
=-, “-7 ASBESTOSSURVEYREPORT mws
- Page 123 and 124:
~ H ~K TEM P 06013 i p 06013 2 p 06
- Page 125 and 126:
, 0.1% ● = NONE DETECTED o N y,39
- Page 127 and 128:
ASBESTOS SURVEY REPORT CORPS OF ENG
- Page 129 and 130:
,, AsBESTOS SURVEY REPORT coRPs OF
- Page 131 and 132:
—.-” -- — ASBESTOSSURVEY REPO
- Page 133 and 134:
ASBESTOSSURVEYREPORT CORPS OF ENGIN
- Page 135 and 136:
-., ~ I I GARAGE GARAGE GARAGE ASBE
- Page 137 and 138:
.>-. \ -.. BUILDING P06014 ROOF PLA
- Page 139 and 140:
, —-.. BLDGI ASBESTOS SURVEY REPO
- Page 141 and 142:
. . ASBESTOS SURVEY REPORT CORPS OF
- Page 143 and 144:
,=--., APPENDIX B INDUSTRIAL HYGIEN
- Page 145 and 146:
. Industrial Hygiene Survey No. 55-
- Page 147 and 148:
91A-9-91
- Page 149 and 150:
‘EE3 REVIBIONS DATE /- .- B MA 1%
- Page 151 and 152:
,,— - 0 2000 4mo FEu FIGURE G-1 T
- Page 153 and 154:
Worksheet 4. BMPs for Contractor Ac
- Page 155 and 156:
Worksheet 5. BMPs for Erosion and S
- Page 157 and 158:
.. Worksh*t 6. Post-Construction BM
- Page 159 and 160:
Certification I cer(ify under penal
- Page 161 and 162:
● ● ● ✎ ● ● ● ● ●
- Page 163 and 164:
,. ACTIVITY MATERIALUSE (Continue)
- Page 165 and 166:
ACTIVITY: SPILL PREVENTION AND CONT
- Page 167 and 168:
. If a container dws spill, cleanup
- Page 169 and 170:
-. ---- iCTIVITY: VEHICLEAND EQUIPM
- Page 171 and 172:
,--7 II ACTIVITY: VEHICLEANDEQUIPME
- Page 173 and 174:
L~ATIONS Thereareno significant lim
- Page 175 and 176:
I Additional Information — Preser
- Page 177 and 178:
. ... ,... BMP: SEEDING AND PIANTIN
- Page 179 and 180:
Additional Information — ~ing(md
- Page 181 and 182:
I ..- I Additional hformation — M
- Page 183 and 184: .—---- /’-- Construction Handbo
- Page 185 and 186: ,/--- Additional Information — Du
- Page 187 and 188: . TABLE ESC 21.2 COMMONLY USED CHEM
- Page 189 and 190: Additional Information — construc
- Page 191 and 192: Additional Information — Stabiliz
- Page 193 and 194: II Additional Information — silt
- Page 195 and 196: ..—. II Additional Information
- Page 197 and 198: —. ,.. , ..- Construction Handboo
- Page 199 and 200: ..-, ,.—-+ BMP: STORM DRAIN INLET
- Page 201 and 202: .-.. ,- Additional Information —
- Page 203 and 204: ,..-. Additional Information — st
- Page 205 and 206: ,-. , Additional Information — st
- Page 207 and 208: 91A-9-91 o
- Page 209 and 210: 7.0 Introduction This Quantity Surv
- Page 211 and 212: Table D-1 Quantity Survey Unit of s
- Page 213 and 214: .. .. APPENDIX E ADDENDEUM TO SITE
- Page 215 and 216: ,- “ 7.0 Introduction This addend
- Page 217 and 218: 3.0 TechnicalApproach The excavatio
- Page 219 and 220: the item to determine if it is UXO.
- Page 221 and 222: 7 91A-9-91
- Page 223 and 224: ,-. , --- General Procedures These
- Page 225 and 226: ,,-- \ ● Following the site walkd
- Page 227 and 228: —. as 40mm projectiles or CBU sub
- Page 229 and 230: -. UXO Safety Escort A UXO flashing
- Page 231 and 232: Because of this the managers of the
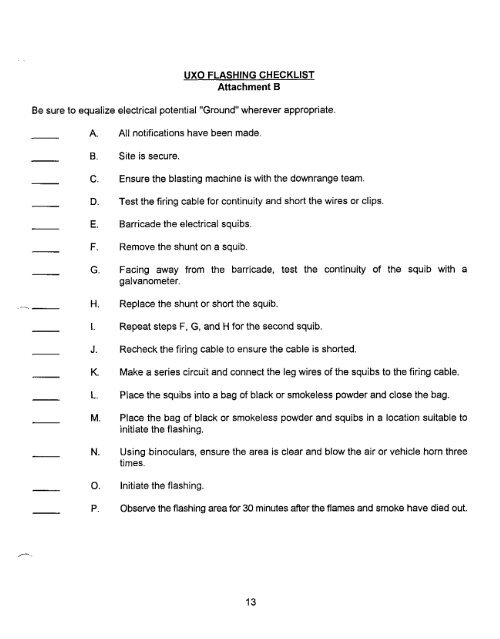
- Page 233: .— ,,--, A. B. c. D. E. F. G. H.
- Page 237 and 238: ““-”””When the detonation
- Page 239 and 240: explosives are normally pink in col
- Page 241 and 242: .— Date: EXCAVATION CATALOG FORM
- Page 243 and 244: -. .-’ 97A.9-91
- Page 245 and 246: - . CONSTRUCTION SPECIFICATIONS Sec
- Page 247 and 248: ., 1.4 1.5 PART 2 PART 3 1.3.3 Samp
- Page 249 and 250: 1.4.3 Accuracy 1.4.3.1 Permanent mo
- Page 251 and 252: .- SECTION 01090 /--- PART 1 GENER4
- Page 253 and 254: 1.4 DOCUMENT FORMATS AND METHODS 1.
- Page 255 and 256: --- 1.7 REFERENCE STANDARDS 1.7.1 F
- Page 257 and 258: .,,. . . PART 1 GENERAL 1.1 SECTION
- Page 259 and 260: 1.3.2 1.3.3 1.4 SCHEDULES Disapprov
- Page 261 and 262: 1.6 DRAV71_NGS 1.6.1 Submit one rep
- Page 263 and 264: ..... PART 1 GENERAL 1.1 SECTION IN
- Page 265 and 266: . . PART 3 EXECUTION 3.1 LABORATORY
- Page 267 and 268: US ARMY COKE’ OF ENGINEERS (USACE
- Page 269 and 270: 3,4.1 Preparato~ Phase This phase w
- Page 271 and 272: 3.5 TESTS 3.4.4 Additional Preparat
- Page 273 and 274: 3.6 COMPLETION INSPECTION 3.6.1 Pre
- Page 275 and 276: 3.8 SAMPLE FORMS Sample forms will
- Page 277 and 278: , 1.3.2 Identification of Employees
- Page 279 and 280: 1.5.1 General The Subcontractor wil
- Page 281 and 282: ..... 1.9 CLEANUP Any dirt or mud w
- Page 283 and 284: ., PART 1 GENERAL 1.1 1.2 1.3 1.4 S
- Page 285 and 286:
1.6.2 Substitutions may be consider
- Page 287 and 288:
PART 1 GENERAL 1.1 SECTION INCLUDES
- Page 289 and 290:
1.6.3 Store record documents separa
- Page 291 and 292:
PART 1 GENERAL 1.1 SECTION INCLUDES
- Page 293 and 294:
3.2 3.3 3.4 3.5 3.6 UTILITIES 3.2.1
- Page 295 and 296:
SECTION 02052 DESTRUCTION OF GROUND
- Page 297 and 298:
,/- -- 2.1.1 ,- 2.1.2 2.1.3 Cement-
- Page 299 and 300:
3.5.2 Debris 3.6 CLEANUP Excess slu
- Page 301 and 302:
--. , 3.2.4 Protect vegetation desi
- Page 303 and 304:
1.2 REFERENCES AMERICAN SOCIETY FOR
- Page 305 and 306:
-. concentrations of chemicals whic
- Page 307 and 308:
,---- 3.4.4 Hauling and Placing: Ha
- Page 309 and 310:
3.8.4 Subgrade Fill for Roadways: C
- Page 311 and 312:
Table 02200-1- EARTEWORK TESTING RE
- Page 313 and 314:
ASTMD3017 Water Content of Soil and
- Page 315 and 316:
PART 3- EXECUTION 3.1 EXCAVATION Du
- Page 317 and 318:
. ,...~ 3.3.2 3.3.3 3.3.4 Water Lin
- Page 319 and 320:
PART 1 GENERAL 1.1 SECTION INCLUDES
- Page 321 and 322:
. 1.3.2.3 s Copy of QC certificates
- Page 323 and 324:
4, 1.4.6 QA Personnel Responsibilit
- Page 325 and 326:
PART 3 EXECUTION 3.1 INSTALLATION 3
- Page 327 and 328:
THICKNESS Table 471-1 GEOMEMBRANE P
- Page 329 and 330:
ASTM D2216 Laboratory Determination
- Page 331 and 332:
. 3.2.2.3 3.2.2.4 3.2.2.5 3.2.2.6 3
- Page 333 and 334:
. 1.2 REFERENCES AMERICAN SOCIETY F
- Page 335 and 336:
,. ..+ PART 2 PRODUCTS 2.1 WATER PD
- Page 337 and 338:
PART 3 2.5.6 2.5.7 2.5.8 2.5.9 Serv
- Page 339 and 340:
. The duration of each pressure tes
- Page 341 and 342:
PART 1 GENEl&4L 1.1 1.2 1.3 SECTION
- Page 343 and 344:
2.4 PROTECTIVE COVER 2.4.1 Landfill
- Page 345 and 346:
PART 1 GENERAL 1.1 SECTION INCLUDES
- Page 347 and 348:
2.2 2.3 2.4 ACCESSORIES 2.2.1 Fitti
- Page 349 and 350:
PART 1 GENERAL 1.1 SECTION INCLUDES
- Page 351 and 352:
#- 1.3 SUBMITTALS .- “> Prepare s
- Page 353 and 354:
+-- 3.1.2 Lay pipe with bells facin
- Page 355 and 356:
AMERICAN WELDING SOCIETY (AWS) AWS
- Page 357 and 358:
.-m - PART1 GENEIk+L 1.1 SECTION IN
- Page 359 and 360:
___ 2.3 SEEDMIXTURES ChapamalOpenin
- Page 361 and 362:
3.3.3 Addpaper fiber mulch attherat
- Page 364 and 365:
APPENDIX H RESPONSES TO AGENCY COMM
- Page 366 and 367:
Changes such as the perimeter berm
- Page 368 and 369:
,—., Response: Waste will not be
- Page 370 and 371:
Attachment B UnHed States Environme
- Page 372 and 373:
... Response: concur. Action: The T
- Page 374 and 375:
training exercise and, as the fire
- Page 376 and 377:
.—. , 12. Comment: This section d
- Page 378 and 379:
measured by truck scales. There are
- Page 380 and 381:
-, 20. Comment: This activity repre
- Page 382 and 383:
‘> ‘. ,._ , :— . SJ/6-24-96/S