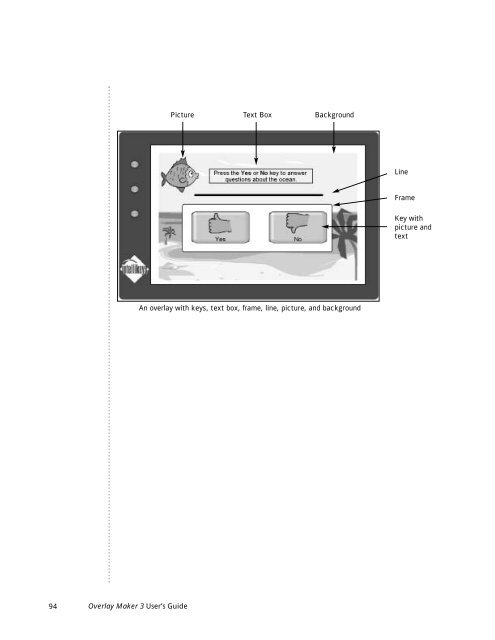
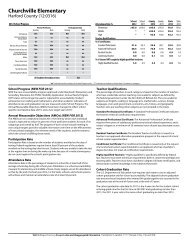
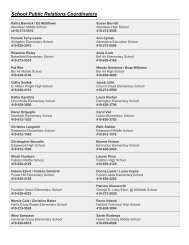
Picture Text Box Background Line Frame Key with picture and text An overlay with keys, text box, frame, line, picture, and background 94 Overlay Maker 3 User’s <strong>Guide</strong>
09: Working with Text Boxes, Frames, Lines, Pictures, and Backgrounds Working with Objects: General Information In addition to keys (the interactive, touch-sensitive areas of an overlay), Overlay Maker 3 enables you to include text boxes, frames, lines, pictures, and a background on a printed overlay. Although a printed overlay with only keys on it is completely functional, these noninteractive objects are typically added to an overlay for identification, informative, and/or decorative purposes. Including these objects on the printed overlay can make it easier for an IntelliKeys user to understand, and interact with, what he or she sees on-screen. For instance, you might include text in text boxes for instructions, titles, or captions. Brightly-colored lines and shapes could be added to attract a child’s attention to specific parts of an overlay. Groups of related keys might be framed in a colored box. Pictures of onscreen images could be included to create a visually interesting overlay. Working with Text Boxes (i.e., Free Text) Text Boxes: General Information Text is added to an overlay by drawing a text box using the Text Tool, and typing the desired characters (letters, symbols, numerals, etc.) in the text box. Each text box has appearance properties—you can select a border color, border width, a fill color, and/or a fill pattern. If you make the text box transparent, only the text within the text box will show. The text within a text box also has properties—you can select a font, size, style, and color. Why add text boxes to an overlay? In addition to any text that shows on overlay keys, it is often useful to add text to an overlay for informative and/or decorative purposes (e.g., instructions, titles, captions, etc.). Is the text in a text box the same as “free text?” Yes. User manuals for previous versions of Overlay Maker defined free text as, “text which is not contained within a key.” A text box was referred to as a “free text rectangle.” How does an Overlay Maker 3 text box compare to a text box used in IntelliTools Classroom Suite? Similarities: Both types of text boxes contain editable text that the activity author (e.g., the teacher) types in. In addition, both are created using the Text Tool, have Properties dialog boxes, have borders and a background that can be filled with color, can be selected and resized, can be selected and repositioned, and can contain multiple fonts and different text sizes and colors. Differences: Overlay Maker 3 text boxes are not interactive—the IntelliKeys user cannot press the text box on a printed overlay and hear its contents read aloud. IntelliTools Classroom Suite text boxes are created to be part of on-screen activities (though the IntelliTools Classroom Suite document could be printed). Use the Arrange feature to Tip position a text box behind or in front of keys and other objects. 09: Working with Text Boxes, Frames, Lines, Pictures, and Backgrounds 95
- Page 1 and 2:
User’s Guide Copyright 2004, Inte
- Page 3 and 4:
Table of Contents Package Contents.
- Page 5 and 6:
Overlay Activity Kits: Language Art
- Page 7 and 8:
What’s New and Different? For tho
- Page 9 and 10:
01: IntelliKeys, Overlays, and Over
- Page 11 and 12:
Working with Overlay Maker 3 After
- Page 13 and 14:
Using Overlay Maker 3 with IntelliT
- Page 15 and 16:
02: Getting Started System Requirem
- Page 17 and 18:
Uninstalling Overlay Maker 3 From a
- Page 19 and 20:
03: Beginners Tutorial - Creating a
- Page 21 and 22:
Part 4: Creating, Copying, and Past
- Page 23 and 24:
Part 6: Adding Pictures to Keys Man
- Page 25 and 26:
If you accidentally delete the acti
- Page 27 and 28:
“Delete key.” Non-Repeating sto
- Page 29 and 30:
Part 13: Using Your Overlay with Ot
- Page 31 and 32:
03: Intermediate Tutorial - Modifyi
- Page 33 and 34:
Part 4: Deleting Unnecessary Keys N
- Page 35 and 36:
Part 7: Modifying a Key Picture A p
- Page 37 and 38:
Part 12: Trying Your Overlay with t
- Page 39 and 40:
03: Advanced Tutorial - The Parts o
- Page 41 and 42:
Part 4: Adding a Picture to the Bac
- Page 43 and 44:
To help you place keys, see the dia
- Page 45 and 46:
Overlapping a Text Box on the Pictu
- Page 47 and 48:
Part 9: Drawing a Frame Frames can
- Page 49 and 50:
Part 12: Trying The Parts of a Fish
- Page 51 and 52: 04: Using the Navigation Screen Aft
- Page 53 and 54: New Folder Contents Clicking the Ne
- Page 55 and 56: Managing Folders and Files in the O
- Page 57 and 58: Navigation Screen: FAQ Here are som
- Page 59 and 60: 05: Working with Overlay Files Find
- Page 61 and 62: Saving Overlay Files Using Overlay
- Page 63 and 64: Saving Overlay Files: Using the Sav
- Page 65 and 66: Printing an Overlay Due to the size
- Page 67 and 68: 06: Working with Menus, Toolbars, a
- Page 69 and 70: Flip Horizontally Flips selection a
- Page 71 and 72: Overlay Maker Menu Options Select T
- Page 73 and 74: Toolbars and Tools Many Overlay Mak
- Page 75 and 76: Toolbars: Authoring Buttons These t
- Page 77 and 78: Toolbars: Identifying Advanced Tool
- Page 79 and 80: 07: Working with Settings and Prefe
- Page 81 and 82: Shift Key Action: Latch When Latch
- Page 83 and 84: effect when you switch to a Standar
- Page 85 and 86: Preferences: Default Switch Content
- Page 87 and 88: 08: Working with Keys and Setting K
- Page 89 and 90: Key: Adding a Picture It is useful
- Page 91 and 92: Key: Editing Appearance Properties
- Page 93 and 94: How do I fill a key with a solid co
- Page 95 and 96: Setting Key Content (i.e., What a K
- Page 97 and 98: Key Content: Creating a Key That Pe
- Page 99 and 100: To enable a user to navigate on-scr
- Page 101: keys latch down until you press ano
- Page 105 and 106: Text Box: Resizing How do I resize
- Page 107 and 108: Text Box: Changing Appearance Using
- Page 109 and 110: Frame: Changing the Shape of Frames
- Page 111 and 112: Frame: Changing Appearance Using On
- Page 113 and 114: Line: Repositioning How do I reposi
- Page 115 and 116: Working with Pictures (i.e., Free P
- Page 117 and 118: Picture: Repositioning How do I rep
- Page 119 and 120: Working with Backgrounds Background
- Page 121 and 122: 2. Select Stretch, Center, or Tile.
- Page 123 and 124: 10: Making Overlays Making a New Ov
- Page 125 and 126: Making a New Overlay: Using a Prede
- Page 127 and 128: What if the program I’m using req
- Page 129 and 130: 11: Using Overlay Maker 3 with Inte
- Page 131 and 132: IntelliTools Classroom Suite: Inclu
- Page 133 and 134: IntelliTools Classroom Suite: Progr
- Page 135 and 136: IntelliTools Classroom Suite: Attac
- Page 137 and 138: IntelliTools Classroom Suite: Print
- Page 139 and 140: IntelliTools Classroom Suite: Addit
- Page 141 and 142: 12: Working with Multilevel Overlay
- Page 143 and 144: An overlay with three levels. The n
- Page 145 and 146: 13: Working with Overlay Activity K
- Page 147 and 148: Overlay Activity Kits: Language Art
- Page 149 and 150: Overlay Activity Kits: Language Art
- Page 151 and 152: Overlay Activity Kits: Braille Acce
- Page 153 and 154:
Overlay Activity Kits: Off-Computer
- Page 155 and 156:
14: Troubleshooting Troubleshooting
- Page 157 and 158:
Troubleshooting - Problems Printing
- Page 159 and 160:
Troubleshooting - Problems Using Ov
- Page 161 and 162:
Command (Macintosh) to Control (Win
- Page 163 and 164:
Index Advanced Toolbar ............
- Page 165 and 166:
IntelliTools Classroom Suite Additi
- Page 167 and 168:
BrailleNote GPS....................
- Page 169 and 170:
Shift Key Action: Latch ...........