User's Guide
User's Guide
User's Guide

Create successful ePaper yourself
Turn your PDF publications into a flip-book with our unique Google optimized e-Paper software.
11: Using Overlay Maker 3 with IntelliTools Classroom Suite<br />
This chapter explains how Overlay Maker 3 is used with IntelliTools Classroom Suite. Once<br />
installed on a computer with IntelliTools Classroom Suite, Overlay Maker 3 launches<br />
automatically when a user selects the IntelliTools Classroom Suite Make Overlay or<br />
Edit/Attach Overlay feature.<br />
Using IntelliTools Classroom Suite with IntelliKeys and overlays is an ideal solution<br />
for students who have difficulty using a standard mouse or a standard keyboard.<br />
IntelliTools Classroom Suite: Making a New Overlay Using<br />
Overlay Maker 3<br />
If you are working with an IntelliTools Classroom Suite document(for instance, if you are<br />
designing an activity) and want to create an overlay, Overlay Maker 3 must be installed on<br />
your computer. Once installed, Overlay Maker 3 launches automatically when you select<br />
Make Overlay from the IntelliTools Classroom Suite IntelliKeys menu options.<br />
Make Overlay<br />
With Overlay Maker 3 installed, the Make Overlay feature displays as a three-step wizard—<br />
complete a step and click the Next button to proceed. The Make Overlay feature enables<br />
you to create an overlay file based on an open document.<br />
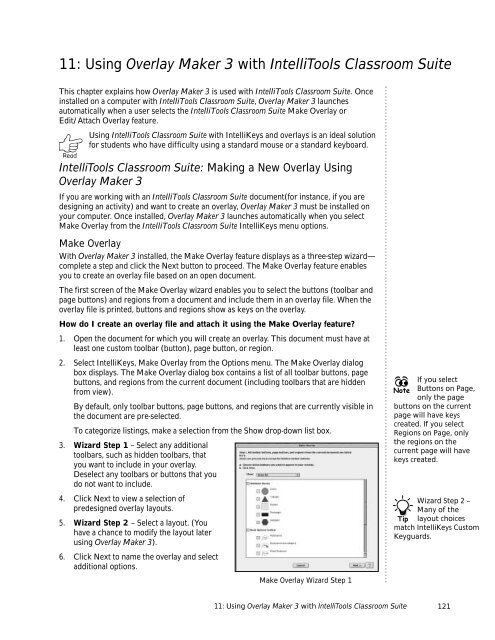
The first screen of the Make Overlay wizard enables you to select the buttons (toolbar and<br />
page buttons) and regions from a document and include them in an overlay file. When the<br />
overlay file is printed, buttons and regions show as keys on the overlay.<br />
How do I create an overlay file and attach it using the Make Overlay feature?<br />
1. Open the document for which you will create an overlay. This document must have at<br />
least one custom toolbar (button), page button, or region.<br />
2. Select IntelliKeys, Make Overlay from the Options menu. The Make Overlay dialog<br />
box displays. The Make Overlay dialog box contains a list of all toolbar buttons, page<br />
buttons, and regions from the current document (including toolbars that are hidden<br />
from view).<br />
By default, only toolbar buttons, page buttons, and regions that are currently visible in<br />
the document are pre-selected.<br />
To categorize listings, make a selection from the Show drop-down list box.<br />
3. Wizard Step 1 – Select any additional<br />
toolbars, such as hidden toolbars, that<br />
you want to include in your overlay.<br />
Deselect any toolbars or buttons that you<br />
do not want to include.<br />
4. Click Next to view a selection of<br />
predesigned overlay layouts.<br />
5. Wizard Step 2 – Select a layout. (You<br />
have a chance to modify the layout later<br />
using Overlay Maker 3).<br />
6. Click Next to name the overlay and select<br />
additional options.<br />
Make Overlay Wizard Step 1<br />
If you select<br />
Note Buttons on Page,<br />
only the page<br />
buttons on the current<br />
page will have keys<br />
created. If you select<br />
Regions on Page, only<br />
the regions on the<br />
current page will have<br />
keys created.<br />
Wizard Step 2 –<br />
Many of the<br />
Tip layout choices<br />
match IntelliKeys Custom<br />
Keyguards.<br />
11: Using Overlay Maker 3 with IntelliTools Classroom Suite<br />
121