User's Guide
User's Guide
User's Guide

You also want an ePaper? Increase the reach of your titles
YUMPU automatically turns print PDFs into web optimized ePapers that Google loves.
Part 4: Deleting Unnecessary Keys<br />
Now you will modify the predesigned overlay so the<br />
student can use it to write one sentence only. You will<br />
keep keys that allow the student to write about what<br />
he/she did today. You will delete unnecessary keys.<br />
Select Tool button<br />
Delete Procedure<br />
1. Notice that by default, the Key Tool (on the<br />
vertical Standard Toolbar) is selected when you<br />
open Overlay Maker 3.<br />
Tip<br />
If you are not sure what a toolbar button<br />
does, hold your mouse over the button to<br />
see a tooltip.<br />
2. Click the Select Tool button.<br />
3. Select the the Read Sentence and Advance key on<br />
the top left corner of the overlay. It is labeled “It is<br />
cool.”<br />
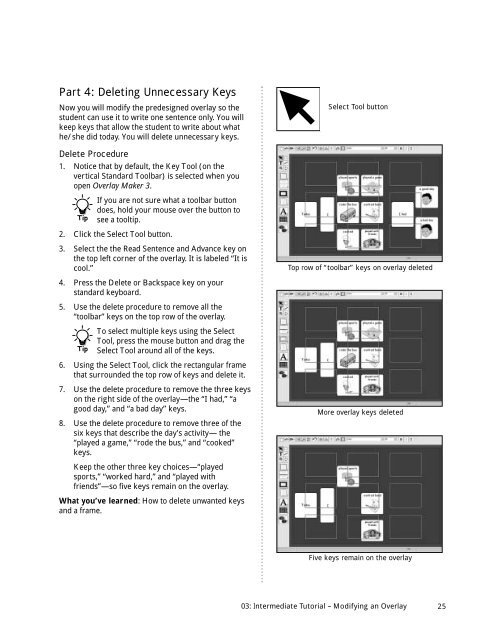
Top row of “toolbar” keys on overlay deleted<br />
4. Press the Delete or Backspace key on your<br />
standard keyboard.<br />
5. Use the delete procedure to remove all the<br />
“toolbar” keys on the top row of the overlay.<br />
Tip<br />
To select multiple keys using the Select<br />
Tool, press the mouse button and drag the<br />
Select Tool around all of the keys.<br />
6. Using the Select Tool, click the rectangular frame<br />
that surrounded the top row of keys and delete it.<br />
7. Use the delete procedure to remove the three keys<br />
on the right side of the overlay—the “I had,” “a<br />
good day,” and “a bad day” keys.<br />
8. Use the delete procedure to remove three of the<br />
six keys that describe the day’s activity— the<br />
“played a game,” “rode the bus,” and “cooked”<br />
keys.<br />
More overlay keys deleted<br />
Keep the other three key choices—“played<br />
sports,” “worked hard,” and “played with<br />
friends”—so five keys remain on the overlay.<br />
What you’ve learned: How to delete unwanted keys<br />
and a frame.<br />
Five keys remain on the overlay<br />
03: Intermediate Tutorial – Modifying an Overlay<br />
25