HP Officejet 4500 (G510) - static.highspeedb...
HP Officejet 4500 (G510) - static.highspeedb...
HP Officejet 4500 (G510) - static.highspeedb...

You also want an ePaper? Increase the reach of your titles
YUMPU automatically turns print PDFs into web optimized ePapers that Google loves.
Appendix C<br />
Set up the device with a computer dial-up modem<br />
If you are using the same phone line for sending faxes and for a computer dial-up modem, follow<br />
these directions for setting up the device.<br />
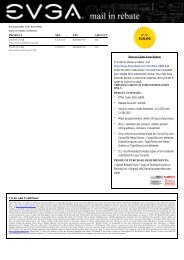
Back view of the device<br />
1 Telephone wall jack<br />
2 Use the phone cord supplied in the box with the device to connect to the<br />
"1-LINE" port<br />
You might need to connect the supplied phone cord to the adapter<br />
provided for your country/region.<br />
3 Computer with modem<br />
To set up the device with a computer dial-up modem<br />
1. Remove the white plug from the port labeled 2-EXT on the back of the device.<br />
2. Find the phone cord that connects from the back of your computer (your computer dial-up<br />
modem) to a telephone wall jack. Disconnect the cord from the telephone wall jack and plug it<br />
into the port labeled 2-EXT on the back of the device.<br />
3. Using the phone cord supplied in the box with the device, connect one end to your telephone<br />
wall jack, then connect the other end to the port labeled 1-LINE on the back of the device.<br />
NOTE: You might need to connect the supplied phone cord to the adapter provided for<br />
your country/region.<br />
If you do not use the supplied cord to connect from the telephone wall jack to the device,<br />
you might not be able to fax successfully. This special phone cord is different from the phone<br />
cords you might already have in your home or office.<br />
4. If your modem software is set to receive faxes to your computer automatically, turn off that<br />
setting.<br />
NOTE: If you do not turn off the automatic fax reception setting in your modem software,<br />
the device will not be able to receive faxes.<br />
5. Turn on the Auto Answer setting.<br />
6. (Optional) Change the Rings to Answer setting to the lowest setting (two rings).<br />
7. Run a fax test.<br />
When the phone rings, the device automatically answers after the number of rings you set in the<br />
Rings to Answer setting. The device begins emitting fax reception tones to the sending fax machine<br />
and receives the fax.<br />
If you encounter problems setting up the device with optional equipment, contact your local service<br />
provider or vendor for further assistance.<br />
184 Additional fax setup