- Page 1 and 2:
user manualDigitalcolour Multifunct
- Page 3 and 4:
Safety Conventions in This GuideThe
- Page 5 and 6:
ContentsPaper Selection. . . . . .
- Page 7 and 8:
ContentsSecurity Level . . . . . .
- Page 9 and 10:
Administrator tasksTo send document
- Page 11 and 12:
Menu Map(The names displayed on the
- Page 13 and 14:
Original Orientation (page 6-12)Sen
- Page 15 and 16:
Priority Override (page 4-48)EcoPri
- Page 17 and 18:
Border Erase (page 6-26)Continuous
- Page 19 and 20:
FAX TX Resolution(refer to Fax Oper
- Page 21 and 22:
Form Feed Timeout (page 9-63)LF Act
- Page 23 and 24:
Calibration (page 9-76)Developer Re
- Page 25 and 26:
EnvironmentThe service environmenta
- Page 27 and 28:
Laser Safety (Europe)Laser radiatio
- Page 29 and 30:
Legal and Safety InformationPlease
- Page 31 and 32:
GPL/LGPLThis product contains GPL (
- Page 33 and 34:
Monotype Imaging License Agreement1
- Page 35 and 36:
“Work” shall mean the work of a
- Page 37 and 38:
Energy Saving Control FunctionThe d
- Page 39 and 40:
Conventions in This GuideThe follow
- Page 41 and 42:
1 Part NamesThis chapter identifies
- Page 43 and 44:
Part NamesScans all documents in bl
- Page 45 and 46:
Part Names7111121314151617188 9 101
- Page 47 and 48:
2 Preparation before UseThis chapte
- Page 49 and 50:
Preparation before UseDetermining t
- Page 51 and 52:
Preparation before UseConnecting Ca
- Page 53 and 54:
Preparation before UseConnecting US
- Page 55 and 56:
Preparation before UsePower On/OffP
- Page 57 and 58:
Preparation before UseLow Power Mod
- Page 59 and 60:
Preparation before UseSwitching the
- Page 61 and 62:
Preparation before UseNetwork Setup
- Page 63 and 64:
Preparation before UseAuto-IP Setti
- Page 65 and 66:
Preparation before Use2 Click View
- Page 67 and 68:
Preparation before UseInstalling Pr
- Page 69 and 70:
Preparation before Use8 Select the
- Page 71 and 72:
Preparation before UseSetting WIA D
- Page 73 and 74:
Preparation before UseE-mail Settin
- Page 75 and 76:
Preparation before UseLoading Paper
- Page 77 and 78:
Preparation before UseLoading Paper
- Page 79 and 80:
Preparation before Use5 Be sure tha
- Page 81 and 82:
Preparation before Use4 With the bo
- Page 83 and 84:
Preparation before UseSide Feeder (
- Page 85 and 86:
Preparation before Use3 Adjust the
- Page 87 and 88:
Preparation before Use3 Insert alon
- Page 89 and 90:
Preparation before Use1 Press the S
- Page 91 and 92:
Preparation before Use1 Press the S
- Page 93 and 94:
Preparation before Use Original siz
- Page 95 and 96:
Preparation before UseHow to Load O
- Page 97 and 98:
3 Basic OperationThis chapter expla
- Page 99 and 100:
Basic OperationSimple LoginSelect t
- Page 101 and 102:
Basic OperationTouch Panel DisplayD
- Page 103 and 104:
Basic OperationSelecting Color Mode
- Page 105 and 106:
Basic OperationDensityUse this proc
- Page 107 and 108:
Basic OperationZoomAdjust the magni
- Page 109 and 110:
Basic OperationDuplexProduce two-si
- Page 111 and 112:
Basic OperationDuplex1-sided>>1-sid
- Page 113 and 114:
Basic OperationReserve NextThis fun
- Page 115 and 116:
Basic OperationStapleUse this featu
- Page 117 and 118:
Basic OperationPunchPunch holes in
- Page 119 and 120:
Basic OperationSendingThis machine
- Page 121 and 122:
Basic OperationNOTE: When selecting
- Page 123 and 124:
Basic OperationData to be entered a
- Page 125 and 126:
Basic OperationConfirmation Screen
- Page 127 and 128:
Basic OperationChecking what to ent
- Page 129 and 130:
Basic Operation3 Select the Share t
- Page 131 and 132:
Basic OperationChecking the [Path]C
- Page 133 and 134:
Basic OperationAdding a port1 From
- Page 135 and 136:
Basic Operation9 Enter "Scan to SMB
- Page 137 and 138:
Basic OperationDestination SearchDe
- Page 139 and 140:
Basic OperationUsing the Document B
- Page 141 and 142:
Basic OperationBasic Operation for
- Page 143 and 144:
Basic OperationDocument ListThe doc
- Page 145 and 146:
Basic OperationPreviewing Documents
- Page 147 and 148:
Basic OperationPassword Entry Requi
- Page 149 and 150:
Basic OperationQuick Setup ScreenIn
- Page 151 and 152:
Basic OperationCopy - Original Imag
- Page 153 and 154:
Basic OperationRecalling ProgramsUs
- Page 155 and 156:
Basic OperationUsing the Internet B
- Page 157 and 158:
Basic OperationUsing Weekly Timer"W
- Page 159 and 160:
4 Copying FunctionsThis chapter exp
- Page 161 and 162:
Copying FunctionsOriginal SizeStand
- Page 163 and 164:
Copying FunctionsUse the procedure
- Page 165 and 166:
Copying FunctionsOriginals of Diffe
- Page 167 and 168:
Copying FunctionsOriginal Orientati
- Page 169 and 170:
Copying FunctionsFoldYou can fold f
- Page 171 and 172:
Copying FunctionsPaper OutputYou ca
- Page 173 and 174:
Copying Functions4-in-1 ModeFor cop
- Page 175 and 176:
Copying FunctionsUse the procedure
- Page 177 and 178:
Copying FunctionsBorder Erase to Ba
- Page 179 and 180:
Copying FunctionsThe procedure for
- Page 181 and 182:
Copying FunctionsForm OverlayDensit
- Page 183 and 184:
Copying FunctionsCopies4 Select the
- Page 185 and 186:
Copying FunctionsTypes of Page Boun
- Page 187 and 188:
Copying FunctionsImage RepeatTiles
- Page 189 and 190:
Copying FunctionsText StampWhen mak
- Page 191 and 192:
Copying Functions3 Press [Layout/Ed
- Page 193 and 194:
Copying FunctionsColor BalanceAdjus
- Page 195 and 196:
Copying FunctionsOne-touch Image Ad
- Page 197 and 198:
Copying FunctionsSharpnessAdjust th
- Page 199 and 200:
Copying FunctionsSaturationThe brig
- Page 201 and 202:
Copying FunctionsContinuous ScanWhe
- Page 203 and 204:
Copying FunctionsMirror ImageCopies
- Page 205 and 206:
Copying FunctionsJob Finish NoticeO
- Page 207 and 208:
Copying FunctionsRepeat CopyEnables
- Page 209 and 210:
Copying FunctionsOHP Backing SheetW
- Page 211 and 212:
5 PrintingThis chapter explains the
- Page 213 and 214:
PrintingPrinter driver print settin
- Page 215 and 216:
PrintingBanner printingWhen a docum
- Page 217 and 218:
PrintingUsing the Banner Tray (Opti
- Page 219 and 220:
Printing7 Adjust the paper width gu
- Page 221 and 222:
PrintingJob StorageJob storage is a
- Page 223 and 224:
6 Sending FunctionsThis chapter exp
- Page 225 and 226:
Sending FunctionsUse the procedure
- Page 227 and 228:
Sending FunctionsUse the procedure
- Page 229 and 230:
Sending FunctionsCenteringWhen you
- Page 231 and 232:
Sending FunctionsOriginals of Diffe
- Page 233 and 234:
Sending Functions2-sided/Book Origi
- Page 235 and 236:
Sending FunctionsUse the procedure
- Page 237 and 238:
Sending FunctionsUse the procedures
- Page 239 and 240:
Sending FunctionsFile Format - Deta
- Page 241 and 242:
Sending FunctionsDensityUse the pro
- Page 243 and 244:
Sending FunctionsSharpnessSelect th
- Page 245 and 246:
Sending FunctionsColor SelectionThi
- Page 247 and 248:
Sending FunctionsPrevent Bleed-thru
- Page 249 and 250:
Sending FunctionsBorder Erase to Ba
- Page 251 and 252:
Sending FunctionsE-mail Subject/Bod
- Page 253 and 254:
Sending FunctionsWSD Scan - Selecti
- Page 255 and 256:
Sending FunctionsScanning using TWA
- Page 257 and 258:
Sending Functions4 Set how to displ
- Page 259 and 260:
Sending FunctionsSend and PrintWhen
- Page 261 and 262:
Sending FunctionsText StampWhen sen
- Page 263 and 264:
Sending FunctionsUse the procedure
- Page 265 and 266:
Sending FunctionsScanning with FMU
- Page 267 and 268:
7 Document BoxThis chapter explains
- Page 269 and 270:
Document BoxItemAuto File DeletionO
- Page 271 and 272:
Document BoxPrinting Documents (Pri
- Page 273 and 274:
Document BoxSending Documents (Send
- Page 275 and 276:
Document BoxForm Overlay from Custo
- Page 277 and 278:
Document Box7 To copy or move the d
- Page 279 and 280:
Document BoxDeleting DocumentsThe p
- Page 281 and 282:
Document BoxDeleting a DocumentYou
- Page 283 and 284:
Document Box6 Specify the number of
- Page 285 and 286:
Document BoxDeletion of Job Retenti
- Page 287 and 288:
Document BoxDeleting a Form StoredY
- Page 289 and 290:
Document Box4 Select the file to be
- Page 291 and 292:
Document Box3 Select the folder whe
- Page 293 and 294:
8 Status / Job CancelThis chapter e
- Page 295 and 296:
Status / Job CancelDetails of the S
- Page 297 and 298:
Status / Job CancelSending JobsStat
- Page 299 and 300:
Status / Job CancelChecking the Det
- Page 301 and 302:
Status / Job CancelChecking Job His
- Page 303 and 304:
Status / Job CancelPause and Resump
- Page 305 and 306:
Status / Job CancelChecking the Rem
- Page 307 and 308:
Status / Job CancelConfiguring the
- Page 309 and 310:
9 Default Setting (System Menu)This
- Page 311 and 312:
Default Setting (System Menu)Defaul
- Page 313 and 314:
Default Setting (System Menu)Up to
- Page 315 and 316:
Default Setting (System Menu)Paper
- Page 317 and 318:
Default Setting (System Menu)For Cu
- Page 319 and 320:
Default Setting (System Menu)Paper
- Page 321 and 322:
Default Setting (System Menu)Error
- Page 323 and 324:
Default Setting (System Menu)Use th
- Page 325 and 326:
Default Setting (System Menu)Origin
- Page 327 and 328:
Default Setting (System Menu)Color
- Page 329 and 330:
Default Setting (System Menu)Backgr
- Page 331 and 332:
Default Setting (System Menu)Border
- Page 333 and 334:
Default Setting (System Menu)Use th
- Page 335 and 336:
Default Setting (System Menu)Use th
- Page 337 and 338:
Default Setting (System Menu)E-mail
- Page 339 and 340:
Default Setting (System Menu)System
- Page 341 and 342:
Default Setting (System Menu)5 Pres
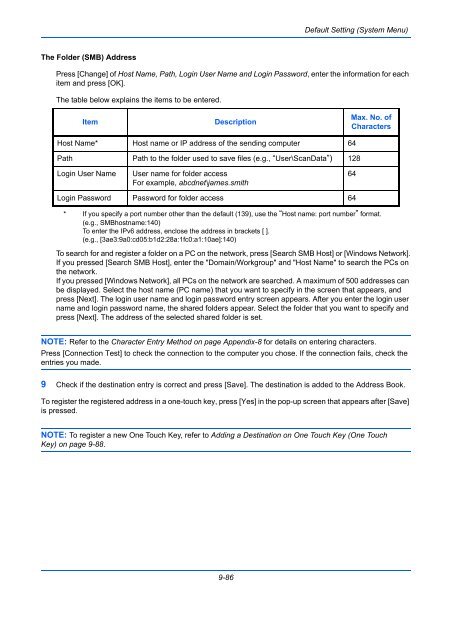
- Page 343 and 344: Default Setting (System Menu)Text S
- Page 345 and 346: Default Setting (System Menu)7 Pres
- Page 347 and 348: Default Setting (System Menu)Edit B
- Page 349 and 350: Default Setting (System Menu)Custom
- Page 351 and 352: Default Setting (System Menu)Messag
- Page 353 and 354: Default Setting (System Menu)Auto I
- Page 355 and 356: Default Setting (System Menu)Preset
- Page 357 and 358: Default Setting (System Menu)Color
- Page 359 and 360: Default Setting (System Menu)Destin
- Page 361 and 362: Default Setting (System Menu)Scan R
- Page 363 and 364: Default Setting (System Menu)10 Pre
- Page 365 and 366: Default Setting (System Menu)Docume
- Page 367 and 368: Default Setting (System Menu)Printe
- Page 369 and 370: Default Setting (System Menu)EcoPri
- Page 371 and 372: Default Setting (System Menu)Orient
- Page 373 and 374: Default Setting (System Menu)User N
- Page 375 and 376: Default Setting (System Menu)Networ
- Page 377 and 378: Default Setting (System Menu)Auto S
- Page 379 and 380: Default Setting (System Menu)Backgr
- Page 381 and 382: Default Setting (System Menu)Displa
- Page 383 and 384: Default Setting (System Menu)4 Find
- Page 385 and 386: Default Setting (System Menu)Develo
- Page 387 and 388: Default Setting (System Menu)Date/T
- Page 389 and 390: Default Setting (System Menu)Panel
- Page 391 and 392: Default Setting (System Menu)Interr
- Page 393: Default Setting (System Menu)E-mail
- Page 397 and 398: Default Setting (System Menu)3 Sele
- Page 399 and 400: Default Setting (System Menu)Intern
- Page 401 and 402: Default Setting (System Menu)Applic
- Page 403 and 404: Default Setting (System Menu)Deleti
- Page 405 and 406: Default Setting (System Menu)Networ
- Page 407 and 408: Default Setting (System Menu)TCP/IP
- Page 409 and 410: Default Setting (System Menu)Protoc
- Page 411 and 412: Default Setting (System Menu)WSD Sc
- Page 413 and 414: Default Setting (System Menu)IPP Se
- Page 415 and 416: Default Setting (System Menu)Use th
- Page 417 and 418: Default Setting (System Menu)LAN In
- Page 419 and 420: Default Setting (System Menu)Securi
- Page 421 and 422: Default Setting (System Menu)Data S
- Page 423 and 424: Default Setting (System Menu)Option
- Page 425 and 426: 10 ManagementThis chapter explains
- Page 427 and 428: ManagementUser Login/Job Accounting
- Page 429 and 430: ManagementAdding a User (Local User
- Page 431 and 432: Management10 Enter the login passwo
- Page 433 and 434: ManagementDeleting a user1 Press [D
- Page 435 and 436: ManagementGroup ListRegister the gr
- Page 437 and 438: ManagementUser Login/Job Accounting
- Page 439 and 440: ManagementObtain NW User PropertySe
- Page 441 and 442: ManagementSimple Login SettingsSimp
- Page 443 and 444: ManagementSimple Login Key: - UserE
- Page 445 and 446:
ManagementLogin/LogoutIf job accoun
- Page 447 and 448:
ManagementManaging AccountsThis cha
- Page 449 and 450:
Management [Total] selected for Cop
- Page 451 and 452:
ManagementAvailable Settings [Split
- Page 453 and 454:
ManagementTotal Job AccountingThis
- Page 455 and 456:
ManagementUser Login/Job Accounting
- Page 457 and 458:
ManagementUnknown ID JobThe behavio
- Page 459 and 460:
11 MaintenanceThis chapter describe
- Page 461 and 462:
Maintenance3 Remove the toner conta
- Page 463 and 464:
MaintenanceWaste Toner Box Replacem
- Page 465 and 466:
MaintenanceReplacing StaplesA stapl
- Page 467 and 468:
Maintenance2 Remove the staple cart
- Page 469 and 470:
MaintenanceCleaningClean the machin
- Page 471 and 472:
Maintenance3 Wipe the white guide (
- Page 473 and 474:
Maintenance5 Press the specified po
- Page 475 and 476:
12 TroubleshootingThis chapter expl
- Page 477 and 478:
TroubleshootingSymptom Checkpoints
- Page 479 and 480:
TroubleshootingSymptom Checkpoints
- Page 481 and 482:
TroubleshootingSymptom Checkpoints
- Page 483 and 484:
TroubleshootingError Message Checkp
- Page 485 and 486:
TroubleshootingError Message Checkp
- Page 487 and 488:
TroubleshootingError Message Checkp
- Page 489 and 490:
TroubleshootingError Message Checkp
- Page 491 and 492:
TroubleshootingError Message Checkp
- Page 493 and 494:
TroubleshootingErrorCodeError Messa
- Page 495 and 496:
TroubleshootingErrorCodeError Messa
- Page 497 and 498:
TroubleshootingClearing Paper JamsJ
- Page 499 and 500:
Troubleshooting4 Remove the jammed
- Page 501 and 502:
Troubleshooting3 Remove the jammed
- Page 503 and 504:
TroubleshootingMulti Purpose TrayFo
- Page 505 and 506:
Troubleshooting4 Remove the jammed
- Page 507 and 508:
TroubleshootingDuplex Unit and Cass
- Page 509 and 510:
TroubleshootingFixing unitFollow th
- Page 511 and 512:
TroubleshootingIf the original is d
- Page 513 and 514:
Troubleshooting4 Remove the jammed
- Page 515 and 516:
TroubleshootingNOTE: If it is diffi
- Page 517 and 518:
TroubleshootingConveyor / Inner Tra
- Page 519 and 520:
TroubleshootingConveyor Section1 Op
- Page 521 and 522:
TroubleshootingSide Feeder (500-she
- Page 523 and 524:
Troubleshooting3 Open the right cov
- Page 525 and 526:
Troubleshooting6 Remove the jammed
- Page 527 and 528:
Troubleshooting5 Re-install the sta
- Page 529 and 530:
Appendix• Optional Equipment ....
- Page 531 and 532:
Key CounterExpansion MemoryFAX KitG
- Page 533 and 534:
1 Press the stapling position key o
- Page 535 and 536:
Printed Document Guard KitThis prev
- Page 537 and 538:
Upper-case Letter Entry ScreenNo. D
- Page 539 and 540:
PaperThis section explains the pape
- Page 541 and 542:
Choosing the Appropriate PaperThis
- Page 543 and 544:
Other Paper SpecificationsPorosity:
- Page 545 and 546:
Storing envelopes for a long period
- Page 547 and 548:
SpecificationsIMPORTANT: Specificat
- Page 549 and 550:
Copy functionsItemCopy SpeedFirst C
- Page 551 and 552:
Scanner functionsItemDescriptionSys
- Page 553 and 554:
Document Finisher (Option)ItemDescr
- Page 555 and 556:
Banner Tray (Option)ItemDescription
- Page 557 and 558:
DHCP (Dynamic Host Configuration Pr
- Page 559 and 560:
RA(Stateless)The IPv6 router commun
- Page 561 and 562:
IndexIndexSymbols(Paper Width Guide
- Page 563 and 564:
IndexReserve Next Priority 9-46Copy
- Page 565 and 566:
IndexFTP Encrypted TX 6-38GGigabit
- Page 567 and 568:
IndexDeleting the RegisteredInforma
- Page 569 and 570:
IndexOutputting 4-49Selecting 4-49R
- Page 571 and 572:
IndexTransfer RollerCleaning 11-15T
- Page 573 and 574:
We recommend the use of our own bra