- Page 1 and 2: NONRESIDENTTRAININGCOURSEJuly 1996S
- Page 3: COMMANDING OFFICERNETPDTC6490 SAUFL
- Page 7 and 8: PREFACEBy enrolling in this self-st
- Page 9 and 10: CONTENTSCHAPTERPAGE1. Introduction
- Page 11: PASS/FAIL ASSIGNMENT PROCEDURESIf y
- Page 15 and 16: CHAPTER 1INTRODUCTION TO VISUAL COM
- Page 17 and 18: Phonetic AlphabetSome of the words
- Page 19 and 20: SPOTTERThe spotter is the most valu
- Page 21 and 22: CLASSIFICATIONCommunications Proced
- Page 23 and 24: CHAPTER 2SIGNAL EQUIPMENTBefore Sig
- Page 25: Five resistors are connected in par
- Page 29 and 30: Figure 2-7.—AN/SAT 2 infrared tra
- Page 31 and 32: Figure 2-10.—Power conversion uni
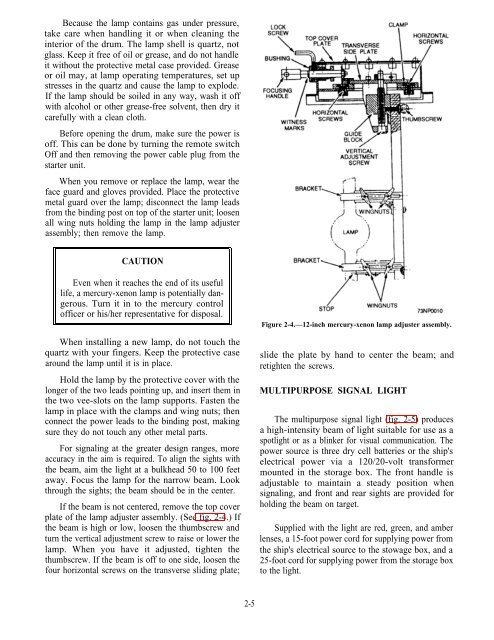
- Page 33 and 34: You were born with the finest optic
- Page 35 and 36: assembly. Take care to keep lubrica
- Page 38 and 39: The following steps are required to
- Page 40 and 41: eye. Each eyepiece is adjustable th
- Page 42 and 43: you may hear the sound of gas escap
- Page 44 and 45: Figure 2-23.—Measuring and taping
- Page 46 and 47: Page 2-24.Figure 2-24.—Completing
- Page 48 and 49: off the remaining tail at this poin
- Page 50 and 51: granted by the officer of the deck
- Page 52 and 53: ADDRESS OF MESSAGEMost messages hav
- Page 54 and 55: Figure 3-3.—Parts of a naval mess
- Page 56 and 57: Figure 3-4.—The precedence of a m
- Page 58 and 59: abbreviated service messages, the B
- Page 60 and 61: Standing alone, prosign C means “
- Page 62 and 63: Voice Call SignsVoice call signs ar
- Page 64 and 65: Figure 3-6.—Numeral pennant call
- Page 66 and 67: SHIPS' BOATS.—The following visua
- Page 68 and 69: types of messages that you will be
- Page 70 and 71: with other civil stations unless it
- Page 72 and 73: Call SignsThe following call signs
- Page 74 and 75: When required, a full answer, consi
- Page 76 and 77:
To request repetition of the second
- Page 78 and 79:
3. The aircraft should be maneuvere
- Page 80 and 81:
the receiving station follows suit
- Page 82 and 83:
SECURITYIn the interest of security
- Page 84 and 85:
ooks are transmitted by voice radio
- Page 86 and 87:
Table4-2.—Prowords—ContinuedPRO
- Page 88 and 89:
Table 4-2.-Prowords—ContinuedPROW
- Page 90 and 91:
EXECUTIVE METHODThe executive metho
- Page 93 and 94:
CHAPTER 5ALLIED FLAGHOIST PROCEDURE
- Page 95 and 96:
Figure 5-2.—Numeral pennants; spe
- Page 97 and 98:
More information on the hoisting of
- Page 99 and 100:
to the addressees or to the OTC if
- Page 101 and 102:
Example:If a junior commanding offi
- Page 103 and 104:
The SCREEN pennant is spoken, writt
- Page 105 and 106:
The letter N is also used for minus
- Page 107 and 108:
executive signal will be made by li
- Page 109 and 110:
CHAPTER 6INTERNATIONAL SIGNALINGIn
- Page 111 and 112:
Flashing light or sound signaling:
- Page 113 and 114:
CallingThe identity signal of the s
- Page 115 and 116:
These examples illustrate the conve
- Page 117 and 118:
Figure 6-1.—Morse signaling by ha
- Page 119 and 120:
5. MISCELLANEOUS6. METEOROLOGY—WE
- Page 121 and 122:
Figure 6-2.—Distress signals.A si
- Page 123 and 124:
Figure 6-3.—Lifesaving signals (p
- Page 125 and 126:
Figure 6-3.—Lifesaving signals (p
- Page 127 and 128:
signal is not hoisted to the dip; i
- Page 129 and 130:
CHAPTER 7CONVOY COMMUNICATIONSAltho
- Page 131 and 132:
Ships that pass through the MERZONE
- Page 133 and 134:
Figure 7-1.—Convoy formation grid
- Page 135 and 136:
TAKING UP FORMATIONWhen forming a c
- Page 137 and 138:
RADIOTELEGRAPHRadiotelegraph messag
- Page 139 and 140:
CHAPTER 8WATCHSTANDING DUTIESVisual
- Page 141 and 142:
Signalmen must be alert to respond
- Page 143 and 144:
where persons have fallen overboard
- Page 145 and 146:
Figure 8-2.—Visual communications
- Page 147 and 148:
Figure 8-3.—Watch-to-watch invent
- Page 149 and 150:
SIGNALTable 8-2.—Signals from a S
- Page 151 and 152:
Figure 8-4.-Vari-color signal illum
- Page 153 and 154:
Multipurpose LampWhen using the por
- Page 155 and 156:
Approach ShipThe approach ship main
- Page 157 and 158:
Figure 8-7.—Transfer-station mark
- Page 159 and 160:
CHAPTER 9NAVIGATIONAL DUTIESNavigat
- Page 161 and 162:
possible, then, to obtain relative
- Page 163 and 164:
distance on a Mercator chart, one m
- Page 165 and 166:
periodical announces new nautical c
- Page 167 and 168:
CLASS ABBREVIATION GENERAL DESCRIPT
- Page 169 and 170:
Sectors may be only a few degrees w
- Page 171 and 172:
Figure 9-12.—IALA Maritime Buoyag
- Page 173 and 174:
is used to describe any buoy that i
- Page 175 and 176:
TopmarksBy day, topmarks are the mo
- Page 177 and 178:
-Spoil ground marksMilitary exercis
- Page 179 and 180:
Head-on SituationWhen two ships mee
- Page 181 and 182:
Figure 9-22.—Pilot vessel, under
- Page 183 and 184:
Figure 9-24.—Towing vessels less
- Page 185 and 186:
Dredging/Underwater OperationWhen a
- Page 187 and 188:
Figure 9-28.—Pushing ahead or tow
- Page 189 and 190:
INTERNATIONALMAKING WAYINLANDMAKING
- Page 191 and 192:
CHAPTER 10HONORS AND CEREMONIESFrom
- Page 193 and 194:
When displayed with foreign ensigns
- Page 195 and 196:
way do not half-mast the ensign alt
- Page 197 and 198:
Figure 10-2.—Personal flags and c
- Page 199 and 200:
concerned, or the senior officer pr
- Page 201 and 202:
commission that has no flag officer
- Page 203 and 204:
BOAT HAILSBoat hails are used durin
- Page 205 and 206:
PresidentTable 10-4.—Passing Hono
- Page 207 and 208:
termination of the call, ruffles an
- Page 209 and 210:
Page 10-19Figure 10-5.—Personal f
- Page 211 and 212:
RED CROSS FLAGThe Red Cross (Geneva
- Page 213:
NOTEOn a flagship where the command
- Page 216 and 217:
Formulate and coordinate the comman
- Page 218 and 219:
such as “This page is unclassifie
- Page 220 and 221:
assigned duties. Personnel authoriz
- Page 222 and 223:
Precautionary measures must be take
- Page 224 and 225:
In setting a combination, numbers s
- Page 226 and 227:
have served their purposes, or are
- Page 228 and 229:
ehind pictures and radiators, and u
- Page 230 and 231:
A person about to be relieved will
- Page 232 and 233:
security should holdings fall into
- Page 234 and 235:
would be suitable for use as a seco
- Page 236 and 237:
These craft are capable of beaching
- Page 238 and 239:
CONTROL AREASLine of Departure (LOD
- Page 240 and 241:
station by displaying the designate
- Page 242 and 243:
ASSISTANT BOAT GROUPCOMMANDER (ABGC
- Page 244 and 245:
Figure l2-8.—Beach flags, markers
- Page 246 and 247:
Figure 12-9.—Standard flags and i
- Page 248 and 249:
a. Ships, Boats, and Landing CraftC
- Page 250 and 251:
In addition to megaphone, radio, an
- Page 252 and 253:
circle to the beach. The last 1,000
- Page 254 and 255:
Transmit the grid position using le
- Page 256 and 257:
Figure 12-16.—Arm and hand contro
- Page 258 and 259:
Figure 12-16.—Arm and hand contro
- Page 260 and 261:
Figure 12-16.—Arm and band contro
- Page 262 and 263:
Figure 12-16.—Arm and hand contro
- Page 264 and 265:
completed. At the end of start and
- Page 266 and 267:
wingspan provides the final clue fo
- Page 268 and 269:
Figure 13-8.—Fuselage shapesFigur
- Page 270 and 271:
SURFACE SHIPSThere are many types o
- Page 272 and 273:
Figure 13-13.—Classes of cruisers
- Page 274 and 275:
Figure 13-16.—Classes of frigates
- Page 276 and 277:
Figure 13-19.—Recognition silhoue
- Page 278 and 279:
Figure 13-19.—Recognition silhoue
- Page 280 and 281:
Figure 13-22.—Modern submarine.on
- Page 282 and 283:
Figure 13-24.—Sail placementFigur
- Page 284 and 285:
Figure 13-26.—Appearance groups.T
- Page 286 and 287:
Deckhouses are not raised. An islan
- Page 288 and 289:
Figure 13-32.—Types of king posts
- Page 290 and 291:
Figure 13-35.—Types of funnels.Fi
- Page 293 and 294:
CHAPTER 14TECHNICAL ADMINISTRATIONV
- Page 295 and 296:
the text on a page and improper cla
- Page 297 and 298:
From: Communications OfficerTo: All
- Page 299 and 300:
APPENDIX IGLOSSARYABEAM—Bearing 9
- Page 301:
PRECEDENCE—The relative order in
- Page 304 and 305:
Figure AII-1.—Formation of charac
- Page 306 and 307:
Drill 6This exercise contains all t
- Page 308 and 309:
Figure AII-2.—Semaphore alphabet
- Page 310 and 311:
Drill 2Practice sending and receivi
- Page 313 and 314:
APPENDIX IIIREFERENCE LISTChapter 1
- Page 315:
Replenishment at Sea, NWP 14, Chief
- Page 318 and 319:
Clearances, 11-4access, 11-6eligibi
- Page 320 and 321:
Flashing light procedure—Continue
- Page 322 and 323:
Radiotelephone—Continuedgeneral p
- Page 325:
Assignment QuestionsInformation: Th
- Page 328 and 329:
1-12. The multipurpose light is des
- Page 330 and 331:
1-40. What does an overscore over a
- Page 332 and 333:
1-65.1-66.1-67.1-68.1-69.1-70.In vi
- Page 334 and 335:
2-13. By which of the following mea
- Page 336 and 337:
2-40.2-41.2-42.2-43.What maneuver f
- Page 338 and 339:
2-66. What signals are reserved for
- Page 340 and 341:
3-12.3-13.3-14.3-15.3-16.3-17.You a
- Page 342 and 343:
3-38. What term denotes the positio
- Page 344 and 345:
3-63. You observe the following lig
- Page 346 and 347:
4-11.4-12.4-13.Your ship is receivi
- Page 348 and 349:
4-37.4-38.4-39.4-40.4-41.4-42.The O
- Page 350 and 351:
4-64.4-65.Grades assigned to exerci