MacFinish 2D-USB Handleiding
Hoofdstuk 1 - TimeTronics
Hoofdstuk 1 - TimeTronics
- No tags were found...

Create successful ePaper yourself
Turn your PDF publications into a flip-book with our unique Google optimized e-Paper software.
Page 64<br />
<strong>MacFinish</strong> <strong>2D</strong>-<strong>USB</strong> and MF8.x software<br />
Hoofdstuk 9 : Printing the Photo or Race<br />
results<br />
Hoofdstuk 9.1 : Printing directly to the printer<br />
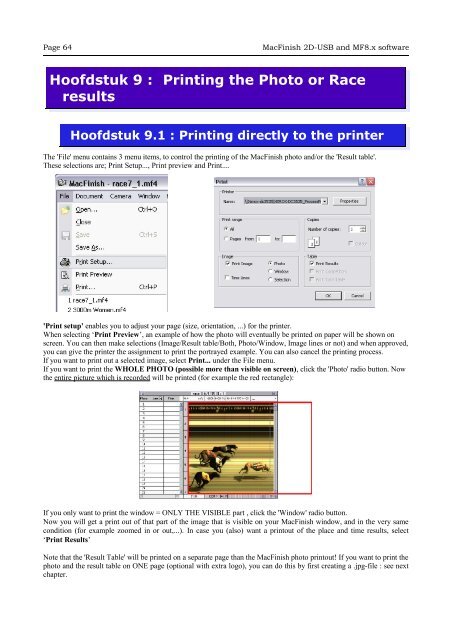
The 'File' menu contains 3 menu items, to control the printing of the <strong>MacFinish</strong> photo and/or the 'Result table'.<br />
These selections are; Print Setup..., Print preview and Print....<br />
'Print setup' enables you to adjust your page (size, orientation, ...) for the printer.<br />
When selecting ‘Print Preview’, an example of how the photo will eventually be printed on paper will be shown on<br />
screen. You can then make selections (Image/Result table/Both, Photo/Window, Image lines or not) and when approved,<br />
you can give the printer the assignment to print the portrayed example. You can also cancel the printing process.<br />
If you want to print out a selected image, select Print... under the File menu.<br />
If you want to print the WHOLE PHOTO (possible more than visible on screen), click the 'Photo' radio button. Now<br />
the entire picture which is recorded will be printed (for example the red rectangle):<br />
If you only want to print the window = ONLY THE VISIBLE part , click the 'Window' radio button.<br />
Now you will get a print out of that part of the image that is visible on your <strong>MacFinish</strong> window, and in the very same<br />
condition (for example zoomed in or out,...). In case you (also) want a printout of the place and time results, select<br />
‘Print Results’<br />
Note that the 'Result Table' will be printed on a separate page than the <strong>MacFinish</strong> photo printout! If you want to print the<br />
photo and the result table on ONE page (optional with extra logo), you can do this by first creating a .jpg-file : see next<br />
chapter.