KAOSS PAD KP3+ Owner's manual - Korg
KAOSS PAD KP3+ Owner's manual - Korg
KAOSS PAD KP3+ Owner's manual - Korg

Create successful ePaper yourself
Turn your PDF publications into a flip-book with our unique Google optimized e-Paper software.
Function settings<br />
These settings let you format an SD card, and<br />
save or load your samples.<br />
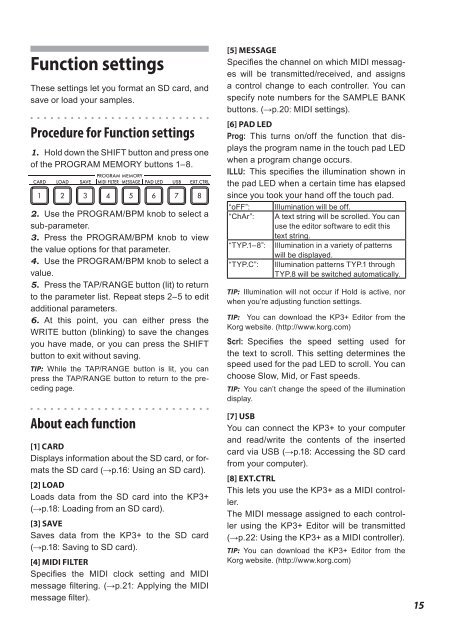
Procedure for Function settings<br />
1. Hold down the SHIFT button and press one<br />
of the PROGRAM MEMORY buttons 1–8.<br />
2. Use the PROGRAM/BPM knob to select a<br />
sub-parameter.<br />
3. Press the PROGRAM/BPM knob to view<br />
the value options for that parameter.<br />
4. Use the PROGRAM/BPM knob to select a<br />
value.<br />
5. Press the TAP/RANGE button (lit) to return<br />
to the parameter list. Repeat steps 2–5 to edit<br />
additional parameters.<br />
6. At this point, you can either press the<br />
WRITE button (blinking) to save the changes<br />
you have made, or you can press the SHIFT<br />
button to exit without saving.<br />
TIP: While the TAP/RANGE button is lit, you can<br />
press the TAP/RANGE button to return to the preceding<br />
page.<br />
About each function<br />
[1] CARD<br />
Displays information about the SD card, or formats<br />
the SD card (→p.16: Using an SD card).<br />
[2] LOAD<br />
Loads data from the SD card into the <strong>KP3+</strong><br />
(→p.18: Loading from an SD card).<br />
[3] SAVE<br />
Saves data from the <strong>KP3+</strong> to the SD card<br />
(→p.18: Saving to SD card).<br />
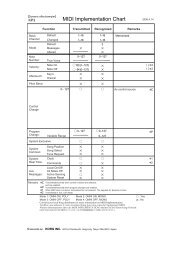
[4] MIDI FILTER<br />
Specifies the MIDI clock setting and MIDI<br />
message filtering. (→p.21: Applying the MIDI<br />
message filter).<br />
[5] MESSAGE<br />
Specifies the channel on which MIDI messages<br />
will be transmitted/received, and assigns<br />
a control change to each controller. You can<br />
specify note numbers for the SAMPLE BANK<br />
buttons. (→p.20: MIDI settings).<br />
[6] <strong>PAD</strong> LED<br />
Prog: This turns on/off the function that displays<br />
the program name in the touch pad LED<br />
when a program change occurs.<br />
ILLU: This specifies the illumination shown in<br />
the pad LED when a certain time has elapsed<br />
since you took your hand off the touch pad.<br />
“oFF”: Illumination will be off.<br />
“ChAr”: A text string will be scrolled. You can<br />
use the editor software to edit this<br />
text string.<br />
“TYP.1–8”: Illumination in a variety of patterns<br />
will be displayed.<br />
“TYP.C”: Illumination patterns TYP.1 through<br />
TYP.8 will be switched automatically.<br />
TIP: Illumination will not occur if Hold is active, nor<br />
when you’re adjusting function settings.<br />
TIP: You can download the <strong>KP3+</strong> Editor from the<br />
<strong>Korg</strong> website. (http://www.korg.com)<br />
Scrl: Specifies the speed setting used for<br />
the text to scroll. This setting determines the<br />
speed used for the pad LED to scroll. You can<br />
choose Slow, Mid, or Fast speeds.<br />
TIP: You can’t change the speed of the illumination<br />
display.<br />
[7] USB<br />
You can connect the <strong>KP3+</strong> to your computer<br />
and read/write the contents of the inserted<br />
card via USB (→p.18: Accessing the SD card<br />
from your computer).<br />
[8] EXT.CTRL<br />
This lets you use the <strong>KP3+</strong> as a MIDI controller.<br />
The MIDI message assigned to each controller<br />
using the <strong>KP3+</strong> Editor will be transmitted<br />
(→p.22: Using the <strong>KP3+</strong> as a MIDI controller).<br />
TIP: You can download the <strong>KP3+</strong> Editor from the<br />
<strong>Korg</strong> website. (http://www.korg.com)<br />
15