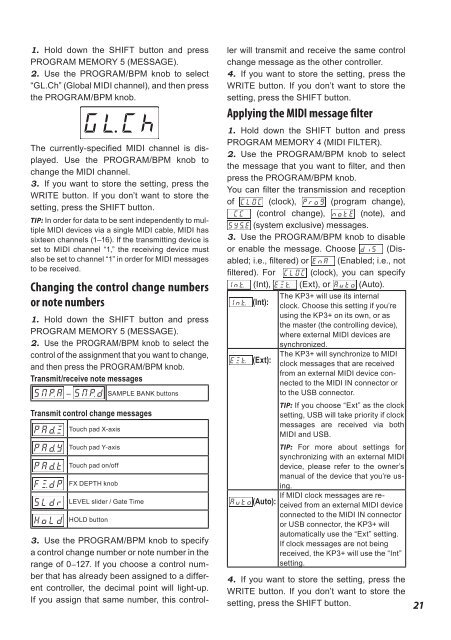
KAOSS PAD KP3+ Owner's manual - Korg
KAOSS PAD KP3+ Owner's manual - Korg
KAOSS PAD KP3+ Owner's manual - Korg
Create successful ePaper yourself
Turn your PDF publications into a flip-book with our unique Google optimized e-Paper software.
1. Hold down the SHIFT button and press<br />
PROGRAM MEMORY 5 (MESSAGE).<br />
2. Use the PROGRAM/BPM knob to select<br />
“GL.Ch” (Global MIDI channel), and then press<br />
the PROGRAM/BPM knob.<br />
The currently-specified MIDI channel is displayed.<br />
Use the PROGRAM/BPM knob to<br />
change the MIDI channel.<br />
3. If you want to store the setting, press the<br />
WRITE button. If you don’t want to store the<br />
setting, press the SHIFT button.<br />
TIP: In order for data to be sent independently to multiple<br />
MIDI devices via a single MIDI cable, MIDI has<br />
sixteen channels (1–16). If the transmitting device is<br />
set to MIDI channel “1,” the receiving device must<br />
also be set to channel “1” in order for MIDI messages<br />
to be received.<br />
Changing the control change numbers<br />
or note numbers<br />
1. Hold down the SHIFT button and press<br />
PROGRAM MEMORY 5 (MESSAGE).<br />
2. Use the PROGRAM/BPM knob to select the<br />
control of the assignment that you want to change,<br />
and then press the PROGRAM/BPM knob.<br />
Transmit/receive note messages<br />
– SAMPLE BANK buttons<br />
Transmit control change messages<br />
Touch pad X-axis<br />
Touch pad Y-axis<br />
Touch pad on/off<br />
FX DEPTH knob<br />
LEVEL slider / Gate Time<br />
HOLD button<br />
3. Use the PROGRAM/BPM knob to specify<br />
a control change number or note number in the<br />
range of 0–127. If you choose a control number<br />
that has already been assigned to a different<br />
controller, the decimal point will light-up.<br />
If you assign that same number, this controller<br />
will transmit and receive the same control<br />
change message as the other controller.<br />
4. If you want to store the setting, press the<br />
WRITE button. If you don’t want to store the<br />
setting, press the SHIFT button.<br />
Applying the MIDI message filter<br />
1. Hold down the SHIFT button and press<br />
PROGRAM MEMORY 4 (MIDI FILTER).<br />
2. Use the PROGRAM/BPM knob to select<br />
the message that you want to filter, and then<br />
press the PROGRAM/BPM knob.<br />
You can filter the transmission and reception<br />
of (clock), (program change),<br />
(control change), (note), and<br />
(system exclusive) messages.<br />
3. Use the PROGRAM/BPM knob to disable<br />
or enable the message. Choose (Disabled;<br />
i.e., filtered) or (Enabled; i.e., not<br />
filtered). For (clock), you can specify<br />
(Int), (Ext), or (Auto).<br />
(Int):<br />
(Ext):<br />
The <strong>KP3+</strong> will use its internal<br />
clock. Choose this setting if you’re<br />
using the <strong>KP3+</strong> on its own, or as<br />
the master (the controlling device),<br />
where external MIDI devices are<br />
synchronized.<br />
The <strong>KP3+</strong> will synchronize to MIDI<br />
clock messages that are received<br />
from an external MIDI device connected<br />
to the MIDI IN connector or<br />
to the USB connector.<br />
TIP: If you choose “Ext” as the clock<br />
setting, USB will take priority if clock<br />
messages are received via both<br />
MIDI and USB.<br />
TIP: For more about settings for<br />
synchronizing with an external MIDI<br />
device, please refer to the owner’s<br />
<strong>manual</strong> of the device that you’re using.<br />
If MIDI clock messages are received<br />
from an external MIDI device<br />
(Auto):<br />
connected to the MIDI IN connector<br />
or USB connector, the <strong>KP3+</strong> will<br />
automatically use the “Ext” setting.<br />
If clock messages are not being<br />
received, the <strong>KP3+</strong> will use the “Int”<br />
setting.<br />
4. If you want to store the setting, press the<br />
WRITE button. If you don’t want to store the<br />
setting, press the SHIFT button.<br />
21


