Owner's Manual for AVR-4310 - Audio Products Australia
Owner's Manual for AVR-4310 - Audio Products Australia
Owner's Manual for AVR-4310 - Audio Products Australia

You also want an ePaper? Increase the reach of your titles
YUMPU automatically turns print PDFs into web optimized ePapers that Google loves.
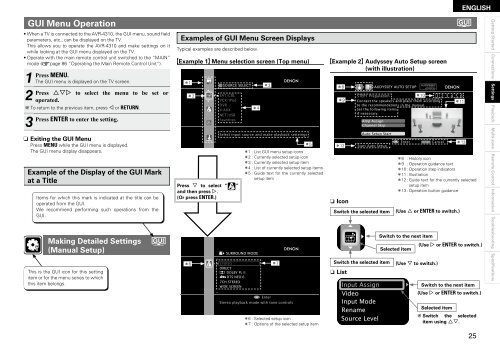
GUI Menu Operation<br />
• When a TV is connected to the <strong>AVR</strong>-<strong>4310</strong>, the GUI menu, sound fi eld<br />
parameters, etc., can be displayed on the TV.<br />
This allows you to operate the <strong>AVR</strong>-<strong>4310</strong> and make settings on it<br />
while looking at the GUI menu displayed on the TV.<br />
• Operate with the main remote control unit switched to the “MAIN”<br />
mode (vpage 86 “Operating the Main Remote Control Unit”).<br />
1 Press<br />
2 Press<br />
MENU.<br />
The GUI menu is displayed on the TV screen.<br />
uip to select the menu to be set or<br />
operated.<br />
b To return to the previous item, press o or RETURN.<br />
3 Press ENTER to enter the setting.<br />
n Exiting the GUI Menu<br />
Press MENU while the GUI menu is displayed.<br />
The GUI menu display disappears.<br />
Example of the Display of the GUI Mark<br />
at a Title<br />
Items <strong>for</strong> which this mark is indicated at the title can be<br />
operated from the GUI.<br />
We recommend per<strong>for</strong>ming such operations from the<br />
GUI.<br />
Making Detailed Settings<br />
(<strong>Manual</strong> Setup)<br />
This is the GUI icon <strong>for</strong> this setting<br />
item or <strong>for</strong> the menu series to which<br />
this item belongs.<br />
Examples of GUI Menu Screen Displays<br />
Typical examples are described below.<br />
GExample 1H Menu selection screen (Top menu)<br />
z1<br />
Press i to select “ ”<br />
and then press p.<br />
(Or press ENTER.)<br />
z6<br />
z2<br />
SOURCE SELECT<br />
SAT/CBL<br />
VCR/iPod<br />
DVR<br />
V.AUX<br />
NET/USB<br />
Favorites<br />
SURROUND MODE<br />
STEREO<br />
DIRECT<br />
DOLBY PL II<br />
DTS NEO:6<br />
7CH STEREO<br />
WIDE SCREEN<br />
z4<br />
z3<br />
Select input source and make playback setteings<br />
z1 : List GUI menu setup icons<br />
z2 : Currently selected setup icon<br />
z3 : Currently selected setup item<br />
z4 : List of currently selected setup items<br />
z5 : Guide text <strong>for</strong> the currently selected<br />
setup item<br />
Enter<br />
z7<br />
Stereo playback mode with tone controls<br />
z5<br />
z6 : Selected setup icon<br />
z7 : Options of the selected setup item<br />
GExample 2H Audyssey Auto Setup screen<br />
(with illustration)<br />
z8<br />
z9<br />
z12<br />
n Icon<br />
Switch the selected item<br />
Switch the selected item<br />
n List<br />
Input Assign<br />
Video<br />
Input Mode<br />
Rename<br />
Source Level<br />
AUDYSSEY AUTO SETUP<br />
STEP1 Preparation<br />
z10 1 2 3 4 5 6<br />
Connect the speakers and place them according<br />
to the recommendations in the manual.<br />
Set the following items<br />
if nesessary.<br />
z11<br />
Amp Assign<br />
Channel Skip<br />
Auto Setup Start<br />
Start Auto Setup<br />
Switch to the next item<br />
Selected item<br />
Enter RETURN Cancel<br />
Switch to the next item<br />
Selected item<br />
z13<br />
b Switch the selected<br />
item using ui.<br />
ENGLISH<br />
z8 : History icon<br />
z9 : Operation guidance text<br />
z10 : Operation step indicators<br />
z11 : Illustration<br />
z12 : Guide text <strong>for</strong> the currently selected<br />
setup item<br />
z13 : Operation button guidance<br />
(Use u or ENTER to switch.)<br />
(Use i to switch.)<br />
(Use p or ENTER to switch.)<br />
(Use p or ENTER to switch.)<br />
2<br />
Getting Started Connections Settings<br />
Playback Multi-zone Remote Control In<strong>for</strong>mation Troubleshooting Specifications