Owner's Manual for AVR-4310 - Audio Products Australia
Owner's Manual for AVR-4310 - Audio Products Australia
Owner's Manual for AVR-4310 - Audio Products Australia

You also want an ePaper? Increase the reach of your titles
YUMPU automatically turns print PDFs into web optimized ePapers that Google loves.
ENGLISH<br />
Getting Started<br />
Connections Settings Playback Remote Control<br />
Multi-zone In<strong>for</strong>mation Troubleshooting Specifications<br />
2<br />
Operating the Connected Devices by Remote<br />
Control Unit<br />
Operating the Main Remote Control Unit ································86<br />
Operating AV Equipment ····························································86<br />
Presetting ····················································································87<br />
Operating Preset Components ···················································87<br />
Setting the Remote ID ································································90<br />
Learning Function ·······································································90<br />
MACRO Function ········································································91<br />
Punch Through Function ······························································91<br />
Setting the Time the Backlight Stays Lit ·····································92<br />
Adjusting the Backlight’s Brightness ···········································92<br />
Specifying the Zone Used with the Main Remote Control ·········92<br />
Resetting the Main Remote Control Unit ···································93<br />
Operating the Sub Remote Control Unit ··································94<br />
Switching Zones ·········································································95<br />
Switching the Multi-zone Input Source to the Same Input Source<br />
as Used in the MAIN ZONE ························································95<br />
Setting the Zone <strong>for</strong> Which the Sub Remote Control Unit is Used<br />
(ZONE SELECT LOCK Mode) ·····················································95<br />
Setting the Remote ID ································································95<br />
Resetting the Settings ································································95<br />
Other In<strong>for</strong>mation ·······························································96<br />
Troubleshooting·································································105<br />
Restoring All the Settings to as They were at the Time of<br />
Purchase (Resetting the Microprocessor) ·······························107<br />
Specifications ······································································108<br />
List of preset codes ··································End of this manual<br />
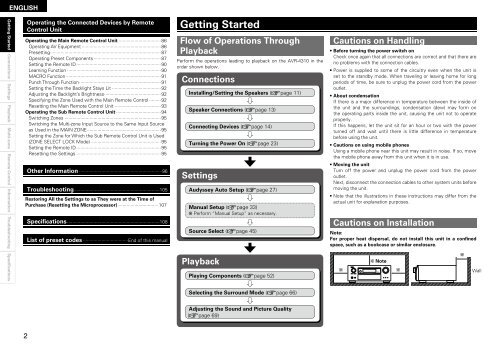
Getting Started<br />
Flow of Operations Through<br />
Playback<br />
Per<strong>for</strong>m the operations leading to playback on the <strong>AVR</strong>-<strong>4310</strong> in the<br />
order shown below.<br />
Connections<br />
Installing/Setting the Speakers (vpage 11)<br />
Speaker Connections (vpage 13)<br />
Connecting Devices (vpage 14)<br />
Turning the Power On (vpage 23)<br />
Settings<br />
Audyssey Auto Setup (vpage 27)<br />
<strong>Manual</strong> Setup (vpage 33)<br />
b Per<strong>for</strong>m “<strong>Manual</strong> Setup” as necessary.<br />
Source Select (vpage 45)<br />
Playback<br />
Playing Components (vpage 52)<br />
Selecting the Surround Mode (vpage 66)<br />
Adjusting the Sound and Picture Quality<br />
(vpage 69)<br />
Cautions on Handling<br />
• Be<strong>for</strong>e turning the power switch on<br />
Check once again that all connections are correct and that there are<br />
no problems with the connection cables.<br />
• Power is supplied to some of the circuitry even when the unit is<br />
set to the standby mode. When traveling or leaving home <strong>for</strong> long<br />
periods of time, be sure to unplug the power cord from the power<br />
outlet.<br />
• About condensation<br />
If there is a major difference in temperature between the inside of<br />
the unit and the surroundings, condensation (dew) may <strong>for</strong>m on<br />
the operating parts inside the unit, causing the unit not to operate<br />
properly.<br />
If this happens, let the unit sit <strong>for</strong> an hour or two with the power<br />
turned off and wait until there is little difference in temperature<br />
be<strong>for</strong>e using the unit.<br />
• Cautions on using mobile phones<br />
Using a mobile phone near this unit may result in noise. If so, move<br />
the mobile phone away from this unit when it is in use.<br />
• Moving the unit<br />
Turn off the power and unplug the power cord from the power<br />
outlet.<br />
Next, disconnect the connection cables to other system units be<strong>for</strong>e<br />
moving the unit.<br />
• Note that the illustrations in these instructions may differ from the<br />
actual unit <strong>for</strong> explanation purposes.<br />
Cautions on Installation<br />
Note:<br />
For proper heat dispersal, do not install this unit in a confined<br />
space, such as a bookcase or similar enclosure.<br />
b Note<br />
b b<br />
b<br />
Wall