Owner's Manual for AVR-4310 - Audio Products Australia
Owner's Manual for AVR-4310 - Audio Products Australia
Owner's Manual for AVR-4310 - Audio Products Australia

Create successful ePaper yourself
Turn your PDF publications into a flip-book with our unique Google optimized e-Paper software.
Setting items Setting contents<br />
Network Connecting<br />
Make settings <strong>for</strong> wired<br />
LAN.<br />
Main remote control<br />
operation buttons<br />
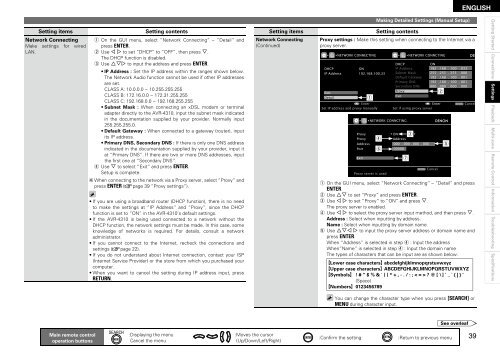
q On the GUI menu, select “Network Connecting” – “Detail” and<br />
press ENTER.<br />
w Use o p to set “DHCP” to “OFF”, then press i.<br />
The DHCP function is disabled.<br />
e Use uip to input the address and press ENTER.<br />
• IP Address : Set the IP address within the ranges shown below.<br />
The Network <strong>Audio</strong> function cannot be used if other IP addresses<br />
are set.<br />
CLASS A: 10.0.0.0 ~ 10.255.255.255<br />
CLASS B: 172.16.0.0 ~ 172.31.255.255<br />
CLASS C: 192.168.0.0 ~ 192.168.255.255<br />
• Subnet Mask : When connecting an xDSL modem or terminal<br />
adapter directly to the <strong>AVR</strong>-<strong>4310</strong>, input the subnet mask indicated<br />
in the documentation supplied by your provider. Normally input<br />
255.255.255.0.<br />
• Default Gateway : When connected to a gateway (router), input<br />
its IP address.<br />
• Primary DNS, Secondary DNS : If there is only one DNS address<br />
indicated in the documentation supplied by your provider, input it<br />
at “Primary DNS”. If there are two or more DNS addresses, input<br />
the fi rst one at “Secondary DNS”.<br />
r Use i to select “Exit” and press ENTER.<br />
Setup is complete.<br />
b When connecting to the network via a Proxy server, select “Proxy” and<br />
press ENTER (vpage 39 “Proxy settings”).<br />
• If you are using a broadband router (DHCP function), there is no need<br />
to make the settings at “IP Address” and “Proxy”, since the DHCP<br />
function is set to “ON” in the <strong>AVR</strong>-<strong>4310</strong>’s default settings.<br />
• If the <strong>AVR</strong>-<strong>4310</strong> is being used connected to a network without the<br />
DHCP function, the network settings must be made. In this case, some<br />
knowledge of networks is required. For details, consult a network<br />
administrator.<br />
• If you cannot connect to the Internet, recheck the connections and<br />
settings (vpage 22).<br />
• If you do not understand about Internet connection, contact your ISP<br />
(Internet Service Provider) or the store from which you purchased your<br />
computer.<br />
• When you want to cancel the setting during IP address input, press<br />
RETURN.<br />
:Displaying the menu<br />
Cancel the menu<br />
:Moves the cursor<br />
(Up/Down/Left/Right)<br />
Setting items Setting contents<br />
Network Connecting<br />
(Continued)<br />
Making Detailed Settings (<strong>Manual</strong> Setup)<br />
Proxy settings : Make this setting when connecting to the Internet via a<br />
proxy server.<br />
DHCP<br />
IP Address<br />
Exit<br />
Detail<br />
NETWORK CONNECTING<br />
ON<br />
192.168.100.33<br />
Enter<br />
Set IP address and proxy manually<br />
Proxy<br />
Proxy<br />
Address<br />
Port<br />
Exit<br />
q<br />
Proxy<br />
NETWORK CONNCTING<br />
DHCP<br />
IP Address<br />
Subnet Mask<br />
Default Gateway<br />
Primary DNS<br />
Secondary DNS<br />
:Confi rm the setting :Return to previous menu<br />
Exit<br />
NETWORK CONNCTING<br />
r<br />
y<br />
Proxy server is used<br />
ON<br />
192 .168 . 100 . 033<br />
255 .255 . 255 . 000<br />
192 .168 . 100 . 001<br />
192 .168 . 100 . 001<br />
000 .000 . 000 . 000<br />
See overleaf<br />
ENGLISH<br />
Enter RETURN Cancel<br />
Set if using proxy server<br />
ON<br />
Address<br />
000 . 000 . 000 . 000<br />
00000<br />
RETURN Cancel<br />
q On the GUI menu, select “Network Connecting” – “Detail” and press<br />
ENTER.<br />
w Use ui to set “Proxy” and press ENTER.<br />
e Use o p to set “Proxy” to “ON” and press i.<br />
The proxy server is enabled.<br />
r Use o p to select the proxy server input method, and then press i.<br />
Address : Select when inputting by address.<br />
Name : Select when inputting by domain name.<br />
t Use uio p to input the proxy server address or domain name and<br />
press ENTER.<br />
When “Address” is selected in step r : Input the address<br />
When“Name” is selected in step r : Input the domain name<br />
The types of characters that can be input are as shown below.<br />
GLower case charactersH abcdefghijklmnopqrstuvwxyz<br />
GUpper case charactersH ABCDEFGHIJKLMNOPQRSTUVWXYZ<br />
GSymbolsH ! # “ $ % & ’ ( ) * + , - . / : ; < = > ? @ [ \ ] ˆ _ ` { | } ˜<br />
(Space)<br />
GNumbersH 0123456789<br />
u<br />
You can change the character type when you press [SEARCH] or<br />
MENU during character input.<br />
e<br />
w<br />
t<br />
Getting Started Connections Settings<br />
Playback Multi-zone Remote Control In<strong>for</strong>mation Troubleshooting Specifications