Owner's Manual for AVR-4310 - Audio Products Australia
Owner's Manual for AVR-4310 - Audio Products Australia
Owner's Manual for AVR-4310 - Audio Products Australia

Create successful ePaper yourself
Turn your PDF publications into a flip-book with our unique Google optimized e-Paper software.
ENGLISH<br />
Getting Started Connections Settings<br />
Playback Multi-zone Remote Control In<strong>for</strong>mation Troubleshooting Specifications<br />
28<br />
Make the Optimal Speaker Settings, and Correct the Room Acoustics (Audyssey Auto Setup)<br />
NOTE<br />
• Loud test sounds may be played during Audyssey MultEQ XT<br />
automatic speaker setup. This is part of normal operation. If there<br />
is background noise in room, these test signals will increase in<br />
volume.<br />
• Do not stand between the speakers and setup microphone or allow<br />
obstacles in the path while the measurements are being made. This<br />
will cause inaccurate readings.<br />
• Make the room as quiet as possible. Background noise can disrupt<br />
the room measurements. Close windows, silence cell phones,<br />
televisions, radios, air conditioners, fluorescent lights, home<br />
appliances, light dimmers, or other devices as measurements may<br />
be affected by these sounds.<br />
Cell phones should be placed away from all audio electronics during<br />
the measurement process as Radio Frequency Interference (RFI)<br />
may cause measurement disruptions (even if the cell phone is not<br />
in use).<br />
• Operating MASTER VOLUME during the measurements will cancel<br />
the measurements.<br />
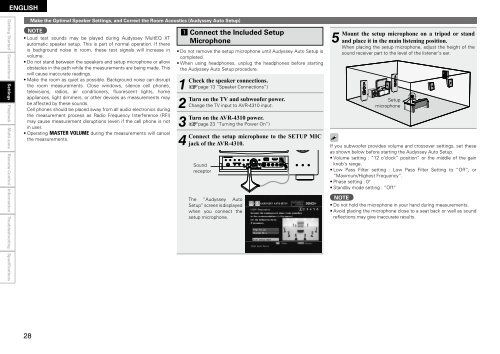
a Connect the Included Setup<br />
Microphone<br />
• Do not remove the setup microphone until Audyssey Auto Setup is<br />
completed.<br />
• When using headphones, unplug the headphones be<strong>for</strong>e starting<br />
the Audyssey Auto Setup procedure.<br />
1<br />
Check<br />
2<br />
Turn<br />
3<br />
Turn<br />
4<br />
Connect<br />
the speaker connections.<br />
(vpage 13 “Speaker Connections”)<br />
on the TV and subwoofer power.<br />
Change the TV input to <strong>AVR</strong>-<strong>4310</strong> input.<br />
on the <strong>AVR</strong>-<strong>4310</strong> power.<br />
(vpage 23 “Turning the Power On”)<br />
the setup microphone to the SETUP MIC<br />
jack of the <strong>AVR</strong>-<strong>4310</strong>.<br />
Sound<br />
receptor<br />
The “Audyssey Auto<br />
Setup” screen is displayed<br />
when you connect the<br />
setup microphone.<br />
5 Mount<br />
the setup microphone on a tripod or stand<br />
and place it in the main listening position.<br />
When placing the setup microphone, adjust the height of the<br />
sound receiver part to the level of the listener’s ear.<br />
Setup<br />
microphone<br />
If you subwoofer provides volume and crossover settings, set these<br />
as shown below be<strong>for</strong>e starting the Audyssey Auto Setup.<br />
• Volume setting : “12 o’clock” position” or the middle of the gain<br />
knob’s range.<br />
• Low Pass Filter setting : Low Pass Filter Setting to “Off”, or<br />
“Maximum/Highest Frequency”.<br />
• Phase setting : 0°<br />
• Standby mode setting : “Off”<br />
NOTE<br />
• Do not hold the microphone in your hand during measurements.<br />
• Avoid placing the microphone close to a seat back or wall as sound<br />
reflections may give inaccurate results.