Owner's Manual for AVR-4310 - Audio Products Australia
Owner's Manual for AVR-4310 - Audio Products Australia
Owner's Manual for AVR-4310 - Audio Products Australia

You also want an ePaper? Increase the reach of your titles
YUMPU automatically turns print PDFs into web optimized ePapers that Google loves.
ENGLISH<br />
Getting Started Connections Settings<br />
Playback Multi-zone Remote Control In<strong>for</strong>mation Troubleshooting Specifications<br />
2<br />
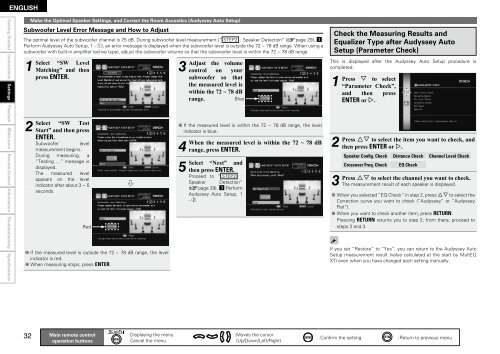
Make the Optimal Speaker Settings, and Correct the Room Acoustics (Audyssey Auto Setup)<br />
Subwoofer Level Error Message and How to Adjust<br />
The optimal level of the subwoofer channel is 75 dB. During subwoofer level measurement (“ STEP2 : Speaker Detection” (vpage 29), d:<br />
Per<strong>for</strong>m Audyssey Auto Setup, 1 - q), an error message is displayed when the subwoofer level is outside the 72 ~ 78 dB range. When using a<br />
subwoofer with built-in amplifier (active type), adjust the subwoofer volume so that the subwoofer level is within the 72 ~ 78 dB range.<br />
1 Select<br />
2 Select<br />
“SW Level<br />
Matching” and then<br />
press ENTER.<br />
“SW Test<br />
Start” and then press<br />
ENTER.<br />
Subwoofer level<br />
measurement begins.<br />
During measuring, a<br />
“Testing …” message is<br />
displayed.<br />
The measured level<br />
appears on the level<br />
indicator after about 3 ~ 5<br />
seconds.<br />
Red<br />
b If the measured level is outside the 72 ~ 78 dB range, the level<br />
indicator is red.<br />
b When measuring stops, press ENTER.<br />
Main remote control<br />
operation buttons<br />
:Displaying the menu<br />
Cancel the menu<br />
3 Adjust<br />
the volume<br />
control on your<br />
subwoofer so that<br />
the measured level is<br />
within the 72 ~ 78 dB<br />
range.<br />
Blue<br />
b If the measured level is within the 72 ~ 78 dB range, the level<br />
indicator is blue.<br />
4<br />
When<br />
5<br />
Select<br />
the measured level is within the 72 ~ 78 dB<br />
range, press ENTER.<br />
“Next” and<br />
then press ENTER.<br />
Proceed to “ STEP2 :<br />
Speaker Detection”<br />
(vpage 29), d:Per<strong>for</strong>m<br />
Audyssey Auto Setup, 1<br />
- w.<br />
:Moves the cursor<br />
(Up/Down/Left/Right)<br />
Check the Measuring Results and<br />
Equalizer Type after Audyssey Auto<br />
Setup (Parameter Check)<br />
This is displayed after the Audyssey Auto Setup procedure is<br />
completed.<br />
1 Press<br />
2 Press<br />
3 Press<br />
i to select<br />
“Parameter Check”,<br />
and then press<br />
ENTER or p.<br />
ui to select the item you want to check, and<br />
then press ENTER or p.<br />
Speaker Config. Check Distance Check Channel Level Check<br />
Crossover Freq. Check EQ Check<br />
ui to select the channel you want to check.<br />
The measurement result of each speaker is displayed.<br />
b When you selected “EQ Check” in step 2, press ui to select the<br />
Correction curve you want to check (“Audyssey” or “Audyssey<br />
Flat”).<br />
b When you want to check another item, press RETURN.<br />
Pressing RETURN returns you to step 2; from there, proceed to<br />
steps 2 and 3.<br />
If you set “Restore” to “Yes”, you can return to the Audyssey Auto<br />
Setup measurement result (value calculated at the start by MultEQ<br />
XT) even when you have changed each setting manually.<br />
:Confirm the setting :Return to previous menu