Owner's Manual for AVR-4310 - Audio Products Australia
Owner's Manual for AVR-4310 - Audio Products Australia
Owner's Manual for AVR-4310 - Audio Products Australia

You also want an ePaper? Increase the reach of your titles
YUMPU automatically turns print PDFs into web optimized ePapers that Google loves.
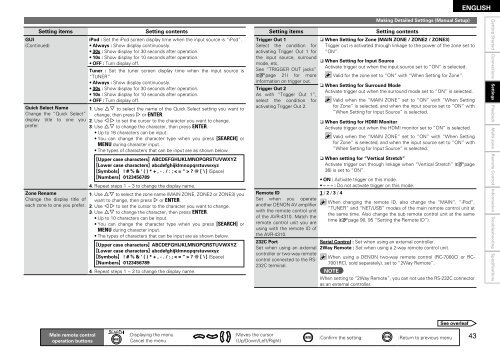
GUI<br />
(Continued)<br />
Setting items Setting contents<br />
Quick Select Name<br />
Change the “Quick Select”<br />
display title to one you<br />
prefer.<br />
Zone Rename<br />
Change the display title of<br />
each zone to one you prefer.<br />
Main remote control<br />
operation buttons<br />
iPod : Set the iPod screen display time when the input source is “iPod”.<br />
• Always : Show display continuously.<br />
• 30s : Show display <strong>for</strong> 30 seconds after operation.<br />
• 10s : Show display <strong>for</strong> 10 seconds after operation.<br />
• OFF : Turn display off.<br />
Tuner : Set the tuner screen display time when the input source is<br />
“TUNER”.<br />
• Always : Show display continuously.<br />
• 30s : Show display <strong>for</strong> 30 seconds after operation.<br />
• 10s : Show display <strong>for</strong> 10 seconds after operation.<br />
• OFF : Turn display off.<br />
1. Use ui to select the name of the Quick Select setting you want to<br />
change, then press p or ENTER.<br />
2. Use o p to set the cursor to the character you want to change.<br />
3. Use ui to change the character, then press ENTER.<br />
• Up to 16 characters can be input.<br />
• You can change the character type when you press [SEARCH] or<br />
MENU during character input.<br />
• The types of characters that can be input are as shown below.<br />
GUpper case charactersH ABCDEFGHIJKLMNOPQRSTUVWXYZ<br />
GLower case charactersH abcdefghijklmnopqrstuvwxyz<br />
GSymbolsH ! # % & ‘ ( ) * + , - . / : ; < = “ > ? @ [ \ ] (Space)<br />
GNumbersH 0123456789<br />
4. Repeat steps 1 ~ 3 to change the display name.<br />
1. Use ui to select the zone name (MAIN ZONE, ZONE2 or ZONE3) you<br />
want to change, then press p or ENTER.<br />
2. Use o p to set the cursor to the character you want to change.<br />
3. Use ui to change the character, then press ENTER.<br />
• Up to 10 characters can be input.<br />
• You can change the character type when you press [SEARCH] or<br />
MENU during character input.<br />
• The types of characters that can be input are as shown below.<br />
GUpper case charactersH ABCDEFGHIJKLMNOPQRSTUVWXYZ<br />
GLower case charactersH abcdefghijklmnopqrstuvwxyz<br />
GSymbolsH ! # % & ‘ ( ) * + , - . / : ; < = “ > ? @ [ \ ] (Space)<br />
GNumbersH 0123456789<br />
4. Repeat steps 1 ~ 3 to change the display name.<br />
:Displaying the menu<br />
Cancel the menu<br />
:Moves the cursor<br />
(Up/Down/Left/Right)<br />
Making Detailed Settings (<strong>Manual</strong> Setup)<br />
:Confirm the setting :Return to previous menu<br />
See overleaf<br />
ENGLISH<br />
Setting items Setting contents<br />
Trigger Out 1<br />
n When Setting <strong>for</strong> Zone (MAIN ZONE / ZONE2 / ZONE3)<br />
Select the condition <strong>for</strong> Trigger out is activated through linkage to the power of the zone set to<br />
activating Trigger Out 1 <strong>for</strong> “ON”.<br />
the input source, surround<br />
n When Setting <strong>for</strong> Input Source<br />
mode, etc.<br />
Activate trigger out when the input source set to “ON” is selected.<br />
See “TRIGGER OUT jacks”<br />
(vpage 21) <strong>for</strong> more Valid <strong>for</strong> the zone set to “ON” with “When Setting <strong>for</strong> Zone”.<br />
in<strong>for</strong>mation on trigger out.<br />
n When Setting <strong>for</strong> Surround Mode<br />
Trigger Out 2<br />
Activate trigger out when the surround mode set to “ON” is selected.<br />
As with “Trigger Out 1”,<br />
select the condition <strong>for</strong> Valid when the “MAIN ZONE” set to “ON” with “When Setting<br />
activating Trigger Out 2.<br />
<strong>for</strong> Zone” is selected, and when the input source set to “ON” with<br />
“When Setting <strong>for</strong> Input Source” is selected.<br />
Remote ID<br />
Set when you operate<br />
another DENON AV amplifier<br />
with the remote control unit<br />
of the <strong>AVR</strong>-<strong>4310</strong>. Match the<br />
remote control unit you are<br />
using with the remote ID of<br />
the <strong>AVR</strong>-<strong>4310</strong>.<br />
232C Port<br />
Set when using an external<br />
controller or two-way remote<br />
control connected to the RS-<br />
232C terminal.<br />
n When Setting <strong>for</strong> HDMI Monitor<br />
Activate trigger out when the HDMI monitor set to “ON” is selected.<br />
Valid when the “MAIN ZONE” set to “ON” with “When Setting<br />
<strong>for</strong> Zone” is selected, and when the input source set to “ON” with<br />
“When Setting <strong>for</strong> Input Source” is selected.<br />
n When setting <strong>for</strong> “Vertical Stretch”<br />
Activate trigger out through linkage when “Vertical Stretch” (vpage<br />
36) is set to “ON”.<br />
• ON : Activate trigger on this mode.<br />
• – – – : Do not activate trigger on this mode.<br />
1 / 2 / 3 / 4<br />
When changing the remote ID, also change the “MAIN”, “iPod”,<br />
“TUNER” and “NET/USB” modes of the main remote control unit at<br />
the same time. Also change the sub remote control unit at the same<br />
time (vpage 90, 95 “Setting the Remote ID”).<br />
Serial Control : Set when using an external controller.<br />
2Way Remote : Set when using a 2-way remote control unit.<br />
When using a DENON two-way remote control (RC-7000CI or RC-<br />
7001RCI, sold separately), set to “2Way Remote”.<br />
NOTE<br />
When setting to “2Way Remote”, you can not use the RS-232C connector<br />
as an external controller.<br />
4<br />
Getting Started Connections Settings<br />
Playback Multi-zone Remote Control In<strong>for</strong>mation Troubleshooting Specifications