Owner's Manual for AVR-4310 - Audio Products Australia
Owner's Manual for AVR-4310 - Audio Products Australia
Owner's Manual for AVR-4310 - Audio Products Australia

Create successful ePaper yourself
Turn your PDF publications into a flip-book with our unique Google optimized e-Paper software.
ENGLISH<br />
Getting Started Connections Settings<br />
Playback Multi-zone Remote Control In<strong>for</strong>mation Troubleshooting Specifications<br />
8<br />
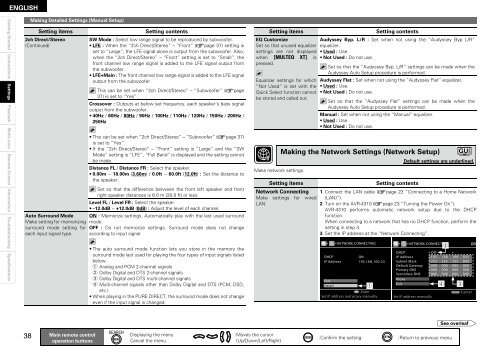
Making Detailed Settings (<strong>Manual</strong> Setup)<br />
Setting items Setting contents<br />
2ch Direct/Stereo<br />
(Continued)<br />
Auto Surround Mode<br />
Make setting <strong>for</strong> memorizing<br />
surround mode setting <strong>for</strong><br />
each input signal type.<br />
Main remote control<br />
operation buttons<br />
SW Mode : Select low range signal to be reproduced by subwoofer.<br />
• LFE : When the “2ch Direct/Stereo” – “Front” (vpage 37) setting is<br />
set to “Large”, the LFE signal alone is output from the subwoofer. Also,<br />
when the “2ch Direct/Stereo” – “Front” setting is set to “Small”, the<br />
front channel low range signal is added to the LFE signal output from<br />
the subwoofer.<br />
• LFE+Main : The front channel low range signal is added to the LFE signal<br />
output from the subwoofer.<br />
This can be set when “2ch Direct/Stereo” – “Subwoofer” (vpage<br />
37) is set to “Yes”.<br />
Crossover : Outputs at below set frequency, each speaker’s bass signal<br />
output from the subwoofer.<br />
• 40Hz / 60Hz / 80Hz / 90Hz / 100Hz / 110Hz / 120Hz / 150Hz / 200Hz /<br />
250Hz<br />
• This can be set when “2ch Direct/Stereo” – “Subwoofer” (vpage 37)<br />
is set to “Yes”.<br />
• If the “2ch Direct/Stereo” – “Front” setting is “Large” and the “SW<br />
Mode” setting is “LFE”, “Full Band” is displayed and the setting cannot<br />
be made.<br />
Distance FL / Distance FR : Select the speaker.<br />
• 0.00m ~ 18.00m (3.60m) / 0.0ft ~ 60.0ft (12.0ft) : Set the distance to<br />
the speaker.<br />
Set so that the difference between the front left speaker and front<br />
right speaker distances is 6.0 m (20.0 ft) or less.<br />
Level FL / Level FR : Select the speaker.<br />
• –12.0dB ~ +12.0dB (0dB) : Adjust the level of each channel.<br />
ON : Memorize settings. Automatically play with the last used surround<br />
mode.<br />
OFF : Do not memorize settings. Surround mode does not change<br />
according to input signal<br />
• The auto surround mode function lets you store in the memory the<br />
surround mode last used <strong>for</strong> playing the four types of input signals listed<br />
below.<br />
q Analog and PCM 2-channel signals<br />
w Dolby Digital and DTS 2-channel signals<br />
e Dolby Digital and DTS multi-channel signals<br />
r Multi-channel signals other than Dolby Digital and DTS (PCM, DSD,<br />
etc.)<br />
• When playing in the PURE DIRECT, the surround mode does not change<br />
even if the input signal is changed.<br />
:Displaying the menu<br />
Cancel the menu<br />
:Moves the cursor<br />
(Up/Down/Left/Right)<br />
Setting items Setting contents<br />
EQ Customize<br />
Set so that unused equalizer<br />
settings are not displayed<br />
when [MULTEQ XT] is<br />
pressed.<br />
Equalizer settings <strong>for</strong> which<br />
“Not Used” is set with the<br />
Quick Select function cannot<br />
be stored and called out.<br />
Make network settings.<br />
Audyssey Byp. L/R : Set when not using the “Audyssey Byp L/R”<br />
equalizer.<br />
• Used : Use.<br />
• Not Used : Do not use.<br />
Set so that the “Audyssey Byp. L/R” settings can be made when the<br />
Audyssey Auto Setup procedure is per<strong>for</strong>med.<br />
Audyssey Flat : Set when not using the “Audyssey Flat” equalizer.<br />
• Used : Use.<br />
• Not Used : Do not use.<br />
Set so that the “Audyssey Flat” settings can be made when the<br />
Audyssey Auto Setup procedure is per<strong>for</strong>med.<br />
<strong>Manual</strong> : Set when not using the “<strong>Manual</strong>” equalizer.<br />
• Used : Use.<br />
• Not Used : Do not use.<br />
Making the Network Settings (Network Setup)<br />
Setting items Setting contents<br />
Network Connecting<br />
Make settings <strong>for</strong> wired<br />
LAN.<br />
1. Connect the LAN cable (vpage 22 “Connecting to a Home Network<br />
(LAN)”).<br />
2. Turn on the <strong>AVR</strong>-<strong>4310</strong> (vpage 23 “Turning the Power On”).<br />
<strong>AVR</strong>-<strong>4310</strong> per<strong>for</strong>ms automatic network setup due to the DHCP<br />
function.<br />
When connecting to a network that has no DHCP function, per<strong>for</strong>m the<br />
setting in step 3.<br />
3. Set the IP address at the “Network Connecting”.<br />
DHCP<br />
IP Address<br />
Exit<br />
Detail<br />
NETWORK CONNECTING<br />
ON<br />
192.168.100.33<br />
q<br />
Enter<br />
Set IP address and proxy manually<br />
Proxy<br />
NETWORK CONNECTING<br />
DHCP<br />
IP Address<br />
Subnet Mask<br />
Default Gateway<br />
Primary DNS<br />
Secondary DNS<br />
:Confi rm the setting :Return to previous menu<br />
Exit<br />
Default settings are underlined.<br />
Set IP address manually<br />
w<br />
OFF<br />
192 . 168 . 100 . 033<br />
255 . 255 . 255 . 000<br />
000 . 000 . 000 . 000<br />
000 . 000 . 000 . 000<br />
000 . 000 . 000 . 000<br />
r e<br />
RETURN Cancel<br />
See overleaf