- Page 1 and 2:
SAS® 9.1.3 Integration Technologie
- Page 3 and 4:
SAS® Integration Technologies: Adm
- Page 5 and 6:
SAS® Integration Technologies: Adm
- Page 7 and 8:
SAS® Integration Technologies: Adm
- Page 9 and 10:
SAS® Integration Technologies: Adm
- Page 11 and 12:
Setting up an LDAP Directory Server
- Page 13 and 14:
10. You are asked whether you want
- Page 15 and 16:
SAS® Integration Technologies: Adm
- Page 17 and 18:
sasDomainName eq, pres sasLogicalNa
- Page 19 and 20:
Adding Person Entries to the Direct
- Page 21 and 22:
Using the Integration Technologies
- Page 23 and 24:
saschannels sassubscribers Hardware
- Page 25 and 26:
If the value is set to none, the LD
- Page 27 and 28:
SAS® Integration Technologies: Adm
- Page 29 and 30:
The command to start the SAS sessio
- Page 31 and 32: Logical names All logical names ass
- Page 33 and 34: Delete Help Server Wizard Set Acces
- Page 35 and 36: Verifying IT Administrator Connecti
- Page 37 and 38: Modifying Objects with IT Administr
- Page 39 and 40: Searching for Objects Using IT Admi
- Page 41 and 42: Reloading (Refreshing) IT Administr
- Page 43 and 44: Choosing a Server Configuration Int
- Page 45 and 46: SAS® Integration Technologies: Adm
- Page 47 and 48: Overview of Pooling A workspace poo
- Page 49 and 50: Setting up Workspace Pooling You ca
- Page 51 and 52: Server and Client Requirements SAS
- Page 53 and 54: server and need metadata definition
- Page 55 and 56: Creating the Metadata for a COM/DCO
- Page 57 and 58: When you complete all of the steps
- Page 59 and 60: ♦ Enter a unique name (sasServerc
- Page 61 and 62: Configuration File Example: Minimal
- Page 63 and 64: Enabling DCOM on the Server and the
- Page 65 and 66: Configuring SAS for DCOM The COM Se
- Page 67 and 68: Setting Default COM Security on Win
- Page 69 and 70: SAS® Integration Technologies: Adm
- Page 71 and 72: SAS® Integration Technologies: Adm
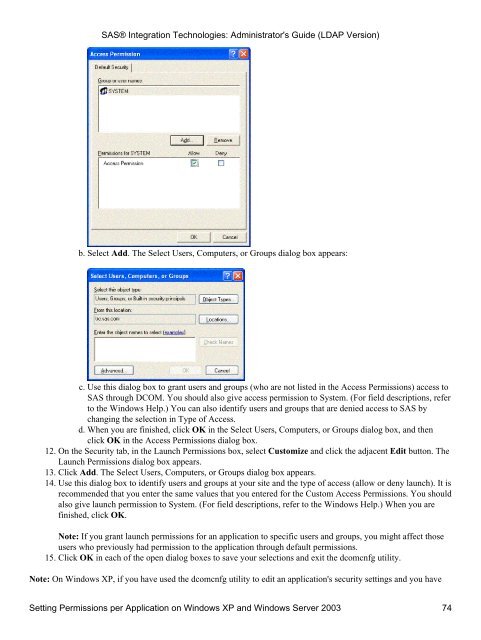
- Page 73 and 74: SAS® Integration Technologies: Adm
- Page 75 and 76: Setting Default COM Security on Win
- Page 77 and 78: SAS® Integration Technologies: Adm
- Page 79 and 80: Setting Permissions per Application
- Page 81: ♦ SAS® Integration Technologies:
- Page 85 and 86: SAS® Integration Technologies: Adm
- Page 87 and 88: SAS® Integration Technologies: Adm
- Page 89 and 90: where is the name of your machine
- Page 91 and 92: SAS® Integration Technologies: Adm
- Page 93 and 94: SAS® Integration Technologies: Adm
- Page 95 and 96: Using the SAS Integration Technolog
- Page 97 and 98: SAS® Integration Technologies: Adm
- Page 99 and 100: configuration file for a connection
- Page 101 and 102: SAS® Integration Technologies: Adm
- Page 103 and 104: SAS® Integration Technologies: Adm
- Page 105 and 106: SAS® Integration Technologies: Adm
- Page 107 and 108: 3. Select the type of server to tes
- Page 109 and 110: • Make sure the permissions are c
- Page 111 and 112: Object Server Parameters The follow
- Page 113 and 114: Attributes for sasServer The sasSer
- Page 115 and 116: SAS® Integration Technologies: Adm
- Page 117 and 118: Attributes for sasLogicalNameInfo T
- Page 119 and 120: How an IOM Bridge Server Works In o
- Page 121 and 122: UNIX Note: When you install the spa
- Page 123 and 124: This completes the basic configurat
- Page 125 and 126: Spawner Requirements Hardware Requi
- Page 127 and 128: • Example UUID Generator IOM Brid
- Page 129 and 130: Using the IT Administrator Wizard t
- Page 131 and 132: ◊ If you would like to add anothe
- Page 133 and 134:
Using IT Administrator to Define a
- Page 135 and 136:
Using IT Administrator to Define a
- Page 137 and 138:
IOM Bridge Servers SAS® Integratio
- Page 139 and 140:
the sasSpawner Attributes List will
- Page 141 and 142:
Configuring a UUID Generator Curren
- Page 143 and 144:
The following procedure explicitly
- Page 145 and 146:
foundDashDash=1; fi args="$args$tmp
- Page 147 and 148:
Invoking (Starting) the Spawner Aft
- Page 149 and 150:
Starting the Spawner on Windows To
- Page 151 and 152:
♦ ♦ −ldap_binddn "CN=John Doe
- Page 153 and 154:
Method 1: Using SAS Setup 1. Log in
- Page 155 and 156:
Spawner Invocation Options The foll
- Page 157 and 158:
Note: If none of the spawner defini
- Page 159 and 160:
Using the SAS Integration Technolog
- Page 161 and 162:
SAS® Integration Technologies: Adm
- Page 163 and 164:
configuration file for a connection
- Page 165 and 166:
SAS® Integration Technologies: Adm
- Page 167 and 168:
SAS® Integration Technologies: Adm
- Page 169 and 170:
SAS® Integration Technologies: Adm
- Page 171 and 172:
SAS® Integration Technologies: Adm
- Page 173 and 174:
SAS® Integration Technologies: Adm
- Page 175 and 176:
SAS® Integration Technologies: Adm
- Page 177 and 178:
SAS® Integration Technologies: Adm
- Page 179 and 180:
SAS® Integration Technologies: Adm
- Page 181 and 182:
SAS® Integration Technologies: Adm
- Page 183 and 184:
SAS® Integration Technologies: Adm
- Page 185 and 186:
SAS® Integration Technologies: Adm
- Page 187 and 188:
SAS® Integration Technologies: Adm
- Page 189 and 190:
Configuration File Examples: Server
- Page 191 and 192:
Configuration File Example: Using L
- Page 193 and 194:
Configuration File Examples: UUID G
- Page 195 and 196:
SAS® Integration Technologies: Adm
- Page 197 and 198:
Attributes for sasLogin A SAS login
- Page 199 and 200:
Attributes for sasServer The sasSer
- Page 201 and 202:
SAS® Integration Technologies: Adm
- Page 203 and 204:
Object Server Parameters The follow
- Page 205 and 206:
Server Startup Command You can spec
- Page 207 and 208:
Attributes for sasSpawner The sasSp
- Page 209 and 210:
SAS® Integration Technologies: Adm
- Page 211 and 212:
SAS® Integration Technologies: Adm
- Page 213 and 214:
Creating a Stored Process Path A st
- Page 215 and 216:
7. List the possible values for the
- Page 217 and 218:
2. are discussed separately and in
- Page 219 and 220:
6. After you define the subscribers
- Page 221 and 222:
7. You cannot deliver information o
- Page 223 and 224:
Creating Subscribers The publicatio
- Page 225 and 226:
Creating Subscriptions When you ass
- Page 227 and 228:
Entry Filters Publishers send infor
- Page 229 and 230:
Creating Overrides An override is c
- Page 231 and 232:
Creating a Library Data Source A li
- Page 233 and 234:
Creating a Table Data Source A tabl
- Page 235 and 236:
Adding Person Entries to the Direct
- Page 237 and 238:
SAS® Integration Technologies: Adm
- Page 239 and 240:
This example allows access to two g
- Page 241 and 242:
Setting Access Permissions for an O
- Page 243 and 244:
Specifying Bind Rules The bind rule
- Page 245 and 246:
e before, after, or equal to the ti
- Page 247 and 248:
SAS® Integration Technologies: Adm
- Page 249 and 250:
Cn=sasArchivePaths,sascomponent=Arc
- Page 251 and 252:
SAS® Integration Technologies: Adm
- Page 253 and 254:
SAS® Integration Technologies: Adm
- Page 255:
Your Turn If you have comments or s