CLM HD8 - Projector Central
CLM HD8 - Projector Central
CLM HD8 - Projector Central

You also want an ePaper? Increase the reach of your titles
YUMPU automatically turns print PDFs into web optimized ePapers that Google loves.
3. Physical installation<br />
3. PHYSICAL INSTALLATION<br />
About this chapter<br />
This chapter explains how to install and set up your <strong>CLM</strong> projector. If you are familiar with the projector and want to quickly set it<br />
up for temporary use, follow the “Quick setup” instructions below. For a more complete setup, follow the instructions and guides<br />
covered in the remaining subsections.<br />
Quick setup<br />
The following steps describe briefly how to setup your <strong>CLM</strong> projector in a table mount front projection. Note that each step refers to<br />
a corresponding procedure, which is more detailed and illustrated.<br />
1. Install the batteries of the remote control, see "RCU battery installation", page 20.<br />
2. Place the projector on a solid table in front of the screen at the expected throw distance. Ensure that the projector is installed<br />
at right angles (horizontally and vertically) with the screen.<br />
3. Select and install an appropriate lens, which covers the throw ratio ( = screen size / projector screen distance). For more details<br />
see "Lens selection", page 23.<br />
4. Connect the projector with the local power net, see "Power connection", page 35.<br />
5. Connect your source to the appropriate input module, see "Input source connections", page 37.<br />
6. Switch ON the projector, see procedure "Switching on", page 45.<br />
7. Select the input slot at which your source is connected with. Do this by pressing the numeric key “1” or “2” on the remote control<br />
unit or on the local keypad, see "Source selection", page 53.<br />
8. Zoom and shift the lens until the image is properly projected on the screen, Do this by using the “ZOOM” and “FOCUS” key on<br />
the remote control unit or on the local keypad, see"Quick Lens Adjustment via LENS key", page 48 or "Direct Lens Adjustment<br />
(RCU)", page 49. If necessary, level the projector from side to side by turning the adjustable feet in or out, see "Alignment of a<br />
table mounted <strong>CLM</strong> projector", page 24.<br />
Overview<br />
• Remote control unit (RCU)<br />
• Lenses<br />
• Alignment of a table mounted <strong>CLM</strong> projector<br />
• Suspension of the <strong>CLM</strong> projector with rigging clamps<br />
• Alignment of a ceiling mounted <strong>CLM</strong> projector<br />
3.1 Remote control unit (RCU)<br />
Introduction<br />
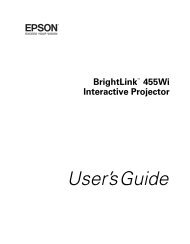
The standard remote control unit (A) can be equipped with the optional rugged case (B) and an XLR adapter (C).<br />
The remote control unit can be used wired via mini-jack or via optional rugged XLR. Note that the backlight of the remote control unit<br />
illuminate continuously when used with a wire.<br />
A<br />
B<br />
C<br />
Image 3-1<br />
R59770057 <strong>CLM</strong> <strong>HD8</strong> 15/03/2010 19