CLM HD8 - Projector Central
CLM HD8 - Projector Central
CLM HD8 - Projector Central

Create successful ePaper yourself
Turn your PDF publications into a flip-book with our unique Google optimized e-Paper software.
8. Input menu<br />
Genlock off<br />
Genlock on<br />
(default position) locking done on input source of main window, when automatic was selected or on the<br />
selected input source when a specific input was selected. <strong>Projector</strong> detects automatically the vertical<br />
frequency and clock frequency of the input signal. A slightly difference with the source is possible.<br />
locking done on indicated vertical frequency and clock frequency. This vertical frequency and clock frequency<br />
must be exactly the same as those of the source.<br />
Only use genlock ON for very stable sources and preferable for broadcast sources.<br />
For Genlock on,<br />
to change the locking frequency, use the ▲ or ▼ key to select Vert freq and press ENTER to activate. The first digit is selected.<br />
Use the ▲ or ▼ key to select the desired digit and press ◄ or ► key to select the next digit in the address or enter the value with<br />
the digit keys on the remote control or local keypad. The next digit in the value will be automatically selected.<br />
to change the clock frequency, use the ▲ or ▼ key to select Clock freq and press ENTER to activate. The first digit is selected.<br />
Use the ▲ or ▼ key to select the desired digit and press ◄ or ► key to select the next digit in the address or enter the value with<br />
the digit keys on the remote control or local keypad. The next digit in the value will be automatically selected.<br />
For older custom files, created with software packages older than package 1.5.6, the Genlock function will<br />
be grayed out. If you want to use this genlock function, a new custom file must be created starting from the<br />
standard file. Copying the custom file in a new file do not solve this issue.<br />
8.4 Minimum delay<br />
Purpose<br />
In normal mode, the processing (scaling and de-interlacing) in DLP projectors introduces a few frames delay (from input to screen).<br />
Setting the option Minimum Delay to "ON" disables all scaling and de-interlacing in the processing and reduces frame delay of the<br />
projector (from input to screen) to ONE frame, caused by the formatter board (DLP technology restriction). The intended use of this<br />
option is to apply native and progressive data to the projector and displaying it with minimum delay, using the full resolution of the<br />
projector. Other formats will be displayed either unscaled and/or interlaced.<br />
This feature can be used if additional delay in the projector is not acceptable. For instance if a projector is showing the DVI loop out<br />
of another DLP or if an external scaler/de-interlacer does the processing.<br />
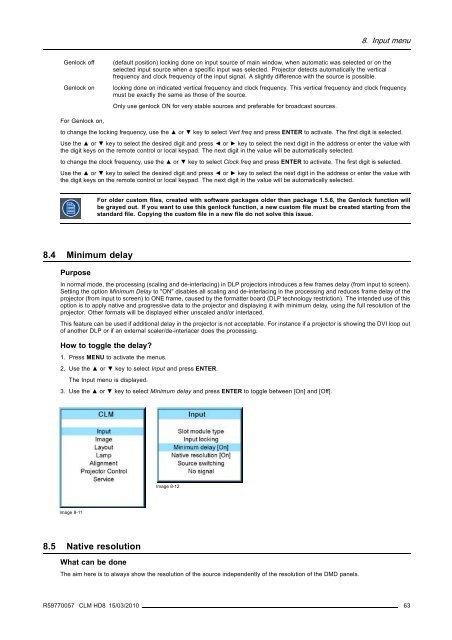
How to toggle the delay?<br />
1. Press MENU to activate the menus.<br />
2. Use the ▲ or ▼ key to select Input and press ENTER.<br />
The Input menu is displayed.<br />
3. Use the ▲ or ▼ key to select Minimum delay and press ENTER to toggle between [On] and [Off].<br />
Image 8-12<br />
Image 8-11<br />
8.5 Native resolution<br />
What can be done<br />
The aim here is to always show the resolution of the source independently of the resolution of the DMD panels.<br />
R59770057 <strong>CLM</strong> <strong>HD8</strong> 15/03/2010 63