- Page 1 and 2:
8550, 8550N, 8550DN, 8550GN, 8550MF
- Page 3 and 4:
Copyright Information © Copyright
- Page 5 and 6:
CompuServe Printer drivers, updated
- Page 7 and 8:
Asia-Pacific Countries/Regions Aust
- Page 9 and 10:
European Customer Support Center La
- Page 11 and 12:
HP Customer Care Centers Asia Pacif
- Page 13 and 14:
12 EN
- Page 15 and 16:
3 Common Printing Tasks Selecting M
- Page 17 and 18:
8 Solving Printer Problems Performi
- Page 19 and 20:
Paper Handling Note: See “Printer
- Page 21 and 22:
Printer Information Configurations
- Page 23 and 24:
Locating the Printer's Parts Figure
- Page 25 and 26:
Optional Paper Handling Accessories
- Page 27 and 28:
26 1 The HP Color LaserJet 8550 Pri
- Page 29 and 30:
Printer Control Panel Keys and Indi
- Page 31 and 32:
When to Use the Printer Control Pan
- Page 33 and 34:
Factory Defaults The following tabl
- Page 35 and 36:
Menu Item Factory Default PRINTING
- Page 37 and 38:
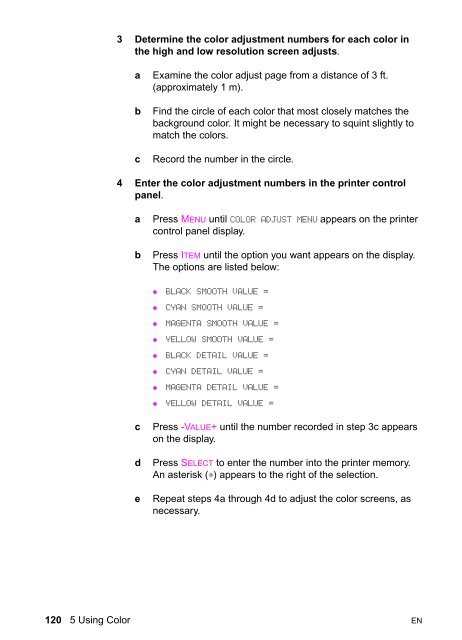
Menu Item Factory Default COLOR ADJ
- Page 39 and 40:
Changing Settings in the Printer Co
- Page 41 and 42:
Configuring Media Type and Size Con
- Page 43 and 44:
Selecting an Output Bin Select the
- Page 45 and 46:
Note If the requested media size is
- Page 47 and 48:
Setting the Power Save Mode The Pow
- Page 49 and 50:
Setting the I/O Timeout The I/O tim
- Page 51 and 52:
Selecting the Display Language Usin
- Page 53 and 54:
Interpreting the Configuration Page
- Page 55 and 56:
Duplex Registration The duplex regi
- Page 57 and 58:
Managing Memory The printer support
- Page 59 and 60:
58 2 Using the Printer Control Pane
- Page 61 and 62:
z z Do not use media that has alrea
- Page 63 and 64:
Tray Location Media Type Media Size
- Page 65 and 66:
Bin Media Type Media Size (Common N
- Page 67 and 68:
Supported Media Weights and Sizes f
- Page 69 and 70: Preprinted Forms and Letterhead Obs
- Page 71 and 72: Transparencies CAUTION Use only tra
- Page 73 and 74: Colored Media Colored media should
- Page 75 and 76: Printing from Tray 1 Load up to 100
- Page 77 and 78: To print envelopes from tray 1 1 Se
- Page 79 and 80: Orienting Media Orienting Media in
- Page 81 and 82: Printing from Trays 2 (some printer
- Page 83 and 84: 9 Ensure that the media size tab on
- Page 85 and 86: Printing from Tray 4 (some printer
- Page 87 and 88: Printing Tips for Tray 4 (some prin
- Page 89 and 90: Using the HP TonerGauge The HP Tone
- Page 91 and 92: 4 From the software or printer driv
- Page 93 and 94: Printing Multiple Pages on One Shee
- Page 95 and 96: Quick Sets (continued) Printer Driv
- Page 97 and 98: Deleting a Stored Quick Copy Job Wh
- Page 99 and 100: A stored proof and hold job can als
- Page 101 and 102: Deleting a Private Job A private jo
- Page 103 and 104: Variable Data Printing Some applica
- Page 105 and 106: Print on Backside of Heavy Media Pr
- Page 107 and 108: Managing Fonts and Forms on Disk HP
- Page 109 and 110: 108 4 Advanced Printing Features EN
- Page 111 and 112: Using Color The color features of t
- Page 113 and 114: ICC/CMS Some applications and opera
- Page 115 and 116: Adjusting the Print Color and Quali
- Page 117 and 118: Resolution Considerations for Graph
- Page 119: Adjusting the Color Balance CAUTION
- Page 123 and 124: Overall Color of Circles Correction
- Page 125 and 126: Replacing Printer Consumables Figur
- Page 127 and 128: Consumable Printer Message Page Cou
- Page 129 and 130: 128 6 Maintaining the Printer EN
- Page 131 and 132: Message Description Recommended Act
- Page 133 and 134: Message Description Recommended Act
- Page 135 and 136: Message Description Recommended Act
- Page 137 and 138: Message Description Recommended Act
- Page 139 and 140: Message Description Recommended Act
- Page 141 and 142: Message Description Recommended Act
- Page 143 and 144: Message Description Recommended Act
- Page 145 and 146: Message Description Recommended Act
- Page 147 and 148: Message Description Recommended Act
- Page 149 and 150: Message Description Recommended Act
- Page 151 and 152: Message Description Recommended Act
- Page 153 and 154: Message Description Recommended Act
- Page 155 and 156: Message Description Recommended Act
- Page 157 and 158: Message Description Recommended Act
- Page 159 and 160: Message Description Recommended Act
- Page 161 and 162: 160 7 Printer Control Panel Message
- Page 163 and 164: Working with Toner HP recommends th
- Page 165 and 166: Figure 16 A B C Upper Left Door Fus
- Page 167 and 168: Problem (Media jams, continued) Cau
- Page 169 and 170: Problem Media does not feed automat
- Page 171 and 172:
Problem (Media does not feed from t
- Page 173 and 174:
Problem Curled or wrinkled output C
- Page 175 and 176:
Problem The multi-bin mailbox will
- Page 177 and 178:
Problem (The printer is on, but not
- Page 179 and 180:
Problem The printer is on, but cann
- Page 181 and 182:
Problem Cannot print a configuratio
- Page 183 and 184:
Problem Cannot select colors in the
- Page 185 and 186:
Problem Partial printout Cause and
- Page 187 and 188:
Problem (Missing colors, continued)
- Page 189 and 190:
Problem Toner smear Cause and Solut
- Page 191 and 192:
Problem Vertical bands or very dark
- Page 193 and 194:
Problem Irregular, raised spots or
- Page 195 and 196:
Problem (Dull or dark colors on tra
- Page 197 and 198:
Problem (Repetitive defects, contin
- Page 199 and 200:
Cleaning the Transfer Drum Perform
- Page 201 and 202:
5 Lift the drum out of the printer.
- Page 203 and 204:
Cleaning the Post Charger Clean the
- Page 205 and 206:
Accessories, Options, and Related P
- Page 207 and 208:
Part Part Number Type / Size Refere
- Page 209 and 210:
To install a DIMM 1 Synchronous DRA
- Page 211 and 212:
8 Insert the formatter board into t
- Page 213 and 214:
Operating Environmental Specificati
- Page 215 and 216:
z Paper Usage This printer either h
- Page 217 and 218:
Material safety data sheet Material
- Page 219 and 220:
Declaration of Conformity DECLARATI
- Page 221 and 222:
DECLARATION OF CONFORMITY according
- Page 223 and 224:
DECLARATION OF CONFORMITY according
- Page 225 and 226:
VCCI Statement (Japan) Korean EMI S
- Page 227 and 228:
Laser Statement for Finland Luokan
- Page 229 and 230:
228 B Specifications EN
- Page 231 and 232:
5. The warranty period begins on th
- Page 233 and 234:
cleaning, transfer charger 203 clea
- Page 235 and 236:
dpi, graphics 116 dpi, printer defa
- Page 237 and 238:
lights, 3000-sheet Stapler/Stacker
- Page 239 and 240:
print jobs, delayed 48 print jobs,
- Page 241 and 242:
toner, lines 189 toner, low respons