CLIOwin 7 PCI User's Manual - Audiomatica
CLIOwin 7 PCI User's Manual - Audiomatica
CLIOwin 7 PCI User's Manual - Audiomatica

You also want an ePaper? Increase the reach of your titles
YUMPU automatically turns print PDFs into web optimized ePapers that Google loves.
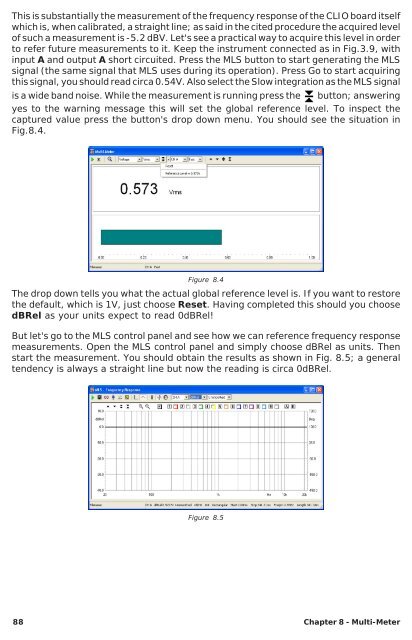
This is substantially the measurement of the frequency response of the CLIO board itself<br />
which is, when calibrated, a straight line; as said in the cited procedure the acquired level<br />
of such a measurement is -5.2 dBV. Let's see a practical way to acquire this level in order<br />
to refer future measurements to it. Keep the instrument connected as in Fig.3.9, with<br />
input A and output A short circuited. Press the MLS button to start generating the MLS<br />
signal (the same signal that MLS uses during its operation). Press Go to start acquiring<br />
this signal, you should read circa 0.54V. Also select the Slow integration as the MLS signal<br />
is a wide band noise. While the measurement is running press the button; answering<br />
yes to the warning message this will set the global reference level. To inspect the<br />
captured value press the button's drop down menu. You should see the situation in<br />
Fig.8.4.<br />
Figure 8.4<br />
The drop down tells you what the actual global reference level is. If you want to restore<br />
the default, which is 1V, just choose Reset. Having completed this should you choose<br />
dBRel as your units expect to read 0dBRel!<br />
But let's go to the MLS control panel and see how we can reference frequency response<br />
measurements. Open the MLS control panel and simply choose dBRel as units. Then<br />
start the measurement. You should obtain the results as shown in Fig. 8.5; a general<br />
tendency is always a straight line but now the reading is circa 0dBRel.<br />
Figure 8.5<br />
88 Chapter 8 - Multi-Meter