ClientBase Overview Database Administrators
ClientBase Overview Database Administrators
ClientBase Overview Database Administrators

You also want an ePaper? Increase the reach of your titles
YUMPU automatically turns print PDFs into web optimized ePapers that Google loves.
<strong>ClientBase</strong> <strong>Overview</strong> for <strong>Administrators</strong><br />
Quick Steps to Viewing and Selecting Marketing Codes for a Client<br />
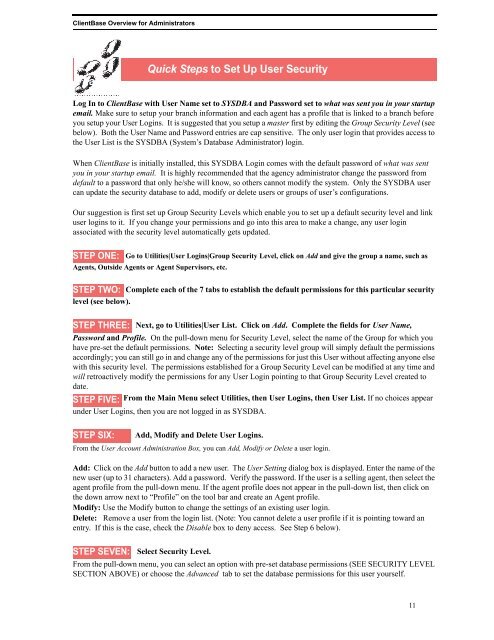
Quick Steps to Set Up User Security<br />
Log In to <strong>ClientBase</strong> with User Name set to SYSDBA and Password set to what was sent you in your startup<br />
email. Make sure to setup your branch information and each agent has a profile that is linked to a branch before<br />
you setup your User Logins. It is suggested that you setup a master first by editing the Group Security Level (see<br />
below). Both the User Name and Password entries are cap sensitive. The only user login that provides access to<br />
the User List is the SYSDBA (System’s <strong>Database</strong> Administrator) login.<br />
When <strong>ClientBase</strong> is initially installed, this SYSDBA Login comes with the default password of what was sent<br />
you in your startup email. It is highly recommended that the agency administrator change the password from<br />
default to a password that only he/she will know, so others cannot modify the system. Only the SYSDBA user<br />
can update the security database to add, modify or delete users or groups of user’s configurations.<br />
Our suggestion is first set up Group Security Levels which enable you to set up a default security level and link<br />
user logins to it. If you change your permissions and go into this area to make a change, any user login<br />
associated with the security level automatically gets updated.<br />
STEP ONE:<br />
Go to Utilities|User Logins|Group Security Level, click on Add and give the group a name, such as<br />
Agents, Outside Agents or Agent Supervisors, etc.<br />
STEP TWO:<br />
Complete each of the 7 tabs to establish the default permissions for this particular security<br />
level (see below).<br />
STEP THREE:<br />
Next, go to Utilities|User List. Click on Add. Complete the fields for User Name,<br />
Password and Profile. On the pull-down menu for Security Level, select the name of the Group for which you<br />
have pre-set the default permissions. Note: Selecting a security level group will simply default the permissions<br />
accordingly; you can still go in and change any of the permissions for just this User without affecting anyone else<br />
with this security level. The permissions established for a Group Security Level can be modified at any time and<br />
will retroactively modify the permissions for any User Login pointing to that Group Security Level created to<br />
date.<br />
STEP FIVE: From the Main Menu select Utilities, then User Logins, then User List. If no choices appear<br />
under User Logins, then you are not logged in as SYSDBA.<br />
STEP SIX:<br />
Add, Modify and Delete User Logins.<br />
From the User Account Administration Box, you can Add, Modify or Delete a user login.<br />
Add: Click on the Add button to add a new user. The User Setting dialog box is displayed. Enter the name of the<br />
new user (up to 31 characters). Add a password. Verify the password. If the user is a selling agent, then select the<br />
agent profile from the pull-down menu. If the agent profile does not appear in the pull-down list, then click on<br />
the down arrow next to “Profile” on the tool bar and create an Agent profile.<br />
Modify: Use the Modify button to change the settings of an existing user login.<br />
Delete: Remove a user from the login list. (Note: You cannot delete a user profile if it is pointing toward an<br />
entry. If this is the case, check the Disable box to deny access. See Step 6 below).<br />
STEP SEVEN:<br />
Select Security Level.<br />
From the pull-down menu, you can select an option with pre-set database permissions (SEE SECURITY LEVEL<br />
SECTION ABOVE) or choose the Advanced tab to set the database permissions for this user yourself.<br />
11