ClientBase Overview Database Administrators
ClientBase Overview Database Administrators
ClientBase Overview Database Administrators

Create successful ePaper yourself
Turn your PDF publications into a flip-book with our unique Google optimized e-Paper software.
<strong>ClientBase</strong> <strong>Overview</strong> for <strong>Administrators</strong><br />
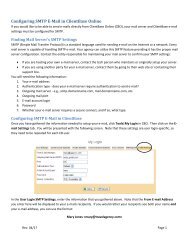
from MAPI to SMTP Client, from the drop down list.<br />
STEP THREE: Complete the User Login SMTP Settings obtained from the entity responsible for maintaining<br />
your mail server:<br />
Default E-mail Client: Choose SMTP off the drop down menu.<br />
Default SMTP Mode: Offers different options for creating the body of the E-mail message. Select either Formatted Text,<br />
Document Templates, Raw HTML or Plain Text from the drop down list. This setting determines the default Mode when<br />
using the Merge to E-mail feature, but can be changed when sending an E-mail.<br />
Outgoing Mail Server: Enter your outgoing mail server name determined in your steps above. Examples:<br />
mail.domainname.com, smtp.domainname.com, or gomail.wspan.com).<br />
Port: This setting defines the TCP/IP port which your E-mail application listens on for incoming mail. If left blank, this<br />
setting uses port 25 by default, which is the Internet standard for receiving SMTP mail. In some situations, you may have<br />
chosen to move the SMTP service to another port. Perhaps you already have a service on port 25, and you do not want the<br />
services to conflict over the port assignment. In such a case, enter the port <strong>ClientBase</strong> should use.<br />
From E-mail Address: Enter the E-mail address for the User Login you are setting up. The address entered here appears<br />
as the from address for all E-mails sent from this User. If you wish to change this address frequently, you can do so at the<br />
E-mail level when you are sending it out.<br />
In the From E-mail field, if you type joseph@Trams.com and a message is sent, you see the From field saying<br />
joseph@Trams.com. Some people prefer it to look like this instead, Joseph Melika. To have it appear like this, type<br />
Joseph Melika instead of just joseph@Trams.com. You can also use your company name or<br />
department name; for example, Travel With the Stars or Star Travel<br />
Marketing.<br />
Login Type: Set to either None or Simple Login:<br />
Simple Login: A setting used to authenticate your connection to the SMTP mail server by forcing a USER Name and<br />
Password. If your network login does not handle this authentification automatically, then set this field to Simple<br />
Login.<br />
None: If your agency is hosting your own E-mail server and your network login has been configured to handle the<br />
authentication to your SMTP Server automatically, set this field to None.<br />
E-mail Account Login and Password: Use when Login Type is set to Simple Login. Enter your E-mail Account Login<br />
and Password here.<br />
STEP FOUR:<br />
Click OK to save.<br />
STEP FIVE:<br />
From each workstation, sign into <strong>ClientBase</strong> and go to Workstation Defaults|Environment.<br />
Unless you need special workstation settings to override your User Settings setup by the SYSDBA as described above, verify<br />
that Default E-mail Client is set to Ignore.<br />
40