ClientBase Overview Database Administrators
ClientBase Overview Database Administrators
ClientBase Overview Database Administrators

Create successful ePaper yourself
Turn your PDF publications into a flip-book with our unique Google optimized e-Paper software.
<strong>ClientBase</strong> <strong>Overview</strong> for <strong>Administrators</strong><br />
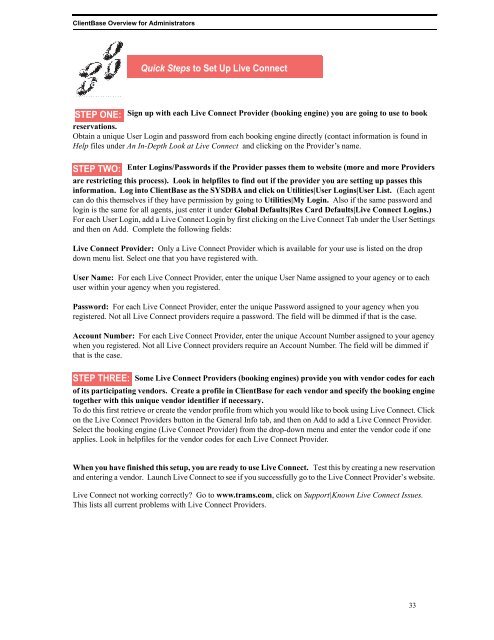
Quick Steps to Set Up Live Connect<br />
STEP ONE: Sign up with each Live Connect Provider (booking engine) you are going to use to book<br />
reservations.<br />
Obtain a unique User Login and password from each booking engine directly (contact information is found in<br />
Help files under An In-Depth Look at Live Connect and clicking on the Provider’s name.<br />
STEP TWO: Enter Logins/Passwords if the Provider passes them to website (more and more Providers<br />
are restricting this process). Look in helpfiles to find out if the provider you are setting up passes this<br />
information. Log into <strong>ClientBase</strong> as the SYSDBA and click on Utilities|User Logins|User List. (Each agent<br />
can do this themselves if they have permission by going to Utilities|My Login. Also if the same password and<br />
login is the same for all agents, just enter it under Global Defaults|Res Card Defaults|Live Connect Logins.)<br />
For each User Login, add a Live Connect Login by first clicking on the Live Connect Tab under the User Settings<br />
and then on Add. Complete the following fields:<br />
Live Connect Provider: Only a Live Connect Provider which is available for your use is listed on the drop<br />
down menu list. Select one that you have registered with.<br />
User Name: For each Live Connect Provider, enter the unique User Name assigned to your agency or to each<br />
user within your agency when you registered.<br />
Password: For each Live Connect Provider, enter the unique Password assigned to your agency when you<br />
registered. Not all Live Connect providers require a password. The field will be dimmed if that is the case.<br />
Account Number: For each Live Connect Provider, enter the unique Account Number assigned to your agency<br />
when you registered. Not all Live Connect providers require an Account Number. The field will be dimmed if<br />
that is the case.<br />
STEP THREE:<br />
Some Live Connect Providers (booking engines) provide you with vendor codes for each<br />
of its participating vendors. Create a profile in <strong>ClientBase</strong> for each vendor and specify the booking engine<br />
together with this unique vendor identifier if necessary.<br />
To do this first retrieve or create the vendor profile from which you would like to book using Live Connect. Click<br />
on the Live Connect Providers button in the General Info tab, and then on Add to add a Live Connect Provider.<br />
Select the booking engine (Live Connect Provider) from the drop-down menu and enter the vendor code if one<br />
applies. Look in helpfiles for the vendor codes for each Live Connect Provider.<br />
When you have finished this setup, you are ready to use Live Connect. Test this by creating a new reservation<br />
and entering a vendor. Launch Live Connect to see if you successfully go to the Live Connect Provider’s website.<br />
Live Connect not working correctly? Go to www.trams.com, click on Support|Known Live Connect Issues.<br />
This lists all current problems with Live Connect Providers.<br />
33