ClientBase Overview Database Administrators
ClientBase Overview Database Administrators
ClientBase Overview Database Administrators

You also want an ePaper? Increase the reach of your titles
YUMPU automatically turns print PDFs into web optimized ePapers that Google loves.
<strong>ClientBase</strong> <strong>Overview</strong> for <strong>Administrators</strong><br />
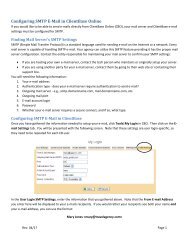
Quick Steps to Backup<br />
STEP ONE:<br />
Go to Start|Programs|Trams|Backup/Restore.<br />
Other users do not have to be out of the program. When you backup <strong>ClientBase</strong>, you also backup Trams Back Office!<br />
STEP TWO:<br />
Setup the Backup Utility.<br />
From the Backup tab, select the Alias of the backup database. The <strong>Database</strong> Path listed below the alias is where your data<br />
currently resides. Backup To shows the drive, directory, and name of the backup file you are creating. Backup To files<br />
can be set to another computer on network, a CD or flash drive.<br />
STEP THREE: Run Backup.<br />
To begin the backup, click on Backup Now. You receive a message, "<strong>Database</strong> Backup in Progress" indicating that a<br />
backup file is being created. <strong>ClientBase</strong> automatically checks your files to make sure the data is in good shape. Note that<br />
this check commences any time the backup is invoked and only modified files are checked for errors.<br />
STEP FOUR:<br />
Setup Backup with a Desktop Icon<br />
To retain these settings each time you want to do a backup, click Create Shortcut. This creates a shortcut on your desktop<br />
that you can double click on each time you want to do backup.<br />
Quick Steps to Restore<br />
STEP ONE:<br />
Go to Start|Programs|Trams|Backup/Restore.<br />
In the event there is a power surge or your hard disks crashes, you may need to restore your backup data. Select the<br />
Restore Tab. The Restore function lets you recover backup data saved on disks using the Trams Backup function. Restore<br />
replaces your current data files with those on your backup diskette(s). This restore program restores both Trams Back<br />
Office and <strong>ClientBase</strong> data. Since the two programs share a common database, you cannot restore one without the other.<br />
IMPORTANT: Everyone must be out of <strong>ClientBase</strong> and Trams Back Office when restored in performed.<br />
STEP THREE: Setup Restore.<br />
Choose the correct <strong>Database</strong> Alias; type the Password for SYSDBA; choose the location of the file to be restored (the<br />
default is a:); and finally click on the Restore Now! button to begin the restore process.<br />
Quick Steps to Setting Up Scheduled Backup<br />
STEP ONE:<br />
Go to Start|Programs|Backup/Restore, enter settings, and create shortcut.<br />
Under the Profile Tab, enter settings as outlined above. Setup Click Create Shortcut.<br />
14