

OPERATOR'S MANUAL - The Baker Company Blog
OPERATOR'S MANUAL - The Baker Company Blog
OPERATOR'S MANUAL - The Baker Company Blog

You also want an ePaper? Increase the reach of your titles
YUMPU automatically turns print PDFs into web optimized ePapers that Google loves.
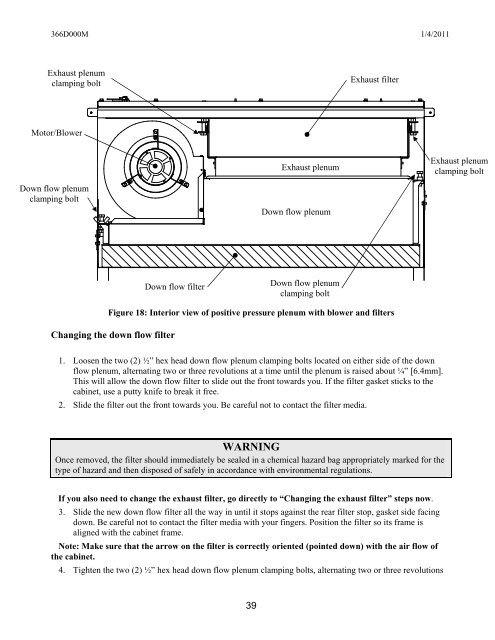
366D000M 1/4/2011Exhaust plenumclamping boltExhaust filterMotor/BlowerExhaust plenumExhaust plenumclamping boltDown flow plenumclamping boltDown flow plenumDown flow filterDown flow plenumclamping boltFigure 18: Interior view of positive pressure plenum with blower and filtersChanging the down flow filter1. Loosen the two (2) ½” hex head down flow plenum clamping bolts located on either side of the downflow plenum, alternating two or three revolutions at a time until the plenum is raised about ¼” [6.4mm].This will allow the down flow filter to slide out the front towards you. If the filter gasket sticks to thecabinet, use a putty knife to break it free.2. Slide the filter out the front towards you. Be careful not to contact the filter media.WARNINGOnce removed, the filter should immediately be sealed in a chemical hazard bag appropriately marked for thetype of hazard and then disposed of safely in accordance with environmental regulations.If you also need to change the exhaust filter, go directly to “Changing the exhaust filter” steps now.3. Slide the new down flow filter all the way in until it stops against the rear filter stop, gasket side facingdown. Be careful not to contact the filter media with your fingers. Position the filter so its frame isaligned with the cabinet frame.Note: Make sure that the arrow on the filter is correctly oriented (pointed down) with the air flow ofthe cabinet.4. Tighten the two (2) ½” hex head down flow plenum clamping bolts, alternating two or three revolutions39


