

OPERATOR'S MANUAL - The Baker Company Blog
OPERATOR'S MANUAL - The Baker Company Blog
OPERATOR'S MANUAL - The Baker Company Blog

You also want an ePaper? Increase the reach of your titles
YUMPU automatically turns print PDFs into web optimized ePapers that Google loves.
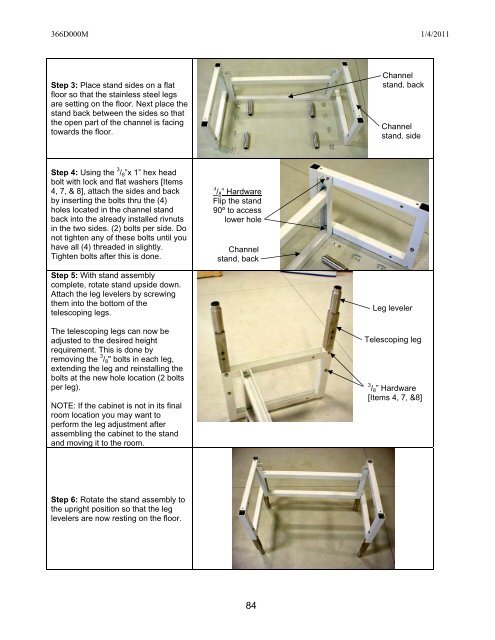
366D000M 1/4/2011Step 3: Place stand sides on a flatfloor so that the stainless steel legsare setting on the floor. Next place thestand back between the sides so thatthe open part of the channel is facingtowards the floor.Channelstand, backChannelstand, sideStep 4: Using the 3 / 8 ”x 1” hex headbolt with lock and flat washers [Items4, 7, & 8], attach the sides and backby inserting the bolts thru the (4)holes located in the channel standback into the already installed rivnutsin the two sides. (2) bolts per side. Donot tighten any of these bolts until youhave all (4) threaded in slightly.Tighten bolts after this is done.3 / 8 ” HardwareFlip the stand90º to accesslower holeChannelstand, backStep 5: With stand assemblycomplete, rotate stand upside down.Attach the leg levelers by screwingthem into the bottom of thetelescoping legs.<strong>The</strong> telescoping legs can now beadjusted to the desired heightrequirement. This is done byremoving the 3 / 8 " bolts in each leg,extending the leg and reinstalling thebolts at the new hole location (2 boltsper leg).NOTE: If the cabinet is not in its finalroom location you may want toperform the leg adjustment afterassembling the cabinet to the standand moving it to the room.Leg levelerTelescoping leg3 / 8 ” Hardware[Items 4, 7, &8]Step 6: Rotate the stand assembly tothe upright position so that the leglevelers are now resting on the floor.84


