programming with max/msp - Virtual Sound
programming with max/msp - Virtual Sound
programming with max/msp - Virtual Sound

You also want an ePaper? Increase the reach of your titles
YUMPU automatically turns print PDFs into web optimized ePapers that Google loves.
1.1<br />
54<br />
Practice<br />
Paragraph 1.1 - First steps <strong>with</strong> Max/MSP<br />
by clicking on its icon. (Remember, you can cause the palette to appear by<br />
double-clicking on any empty spot in the Patcher Window). When you click on<br />
the icon, a new kind of object will appear: instead of an object box, a new user<br />
interface object (also known as a ui object) will be created. Here’s a little tip:<br />
if you have a hard time finding an object in the object palette, just create an<br />
object box (the same generic object that we just used to create cycle~), and<br />
then type the name of the object that you want to create (such as gain~) into<br />
its interior. Once you’ve done this, click outside of the object, and the object box<br />
will immediately morph into the ui object whose name you typed.<br />
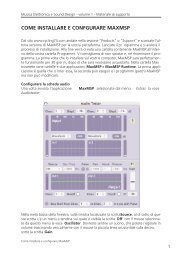
Fig.1.5 The gain~ object<br />
Drag the newly created gain~ object to a spot in the Patcher Window<br />
underneath the cycle~ object, and connect the outlet of cycle~ to the<br />
inlet of gain~ in the following manner: first, bring the mouse pointer near<br />
the outlet on the lower edge of the cycle~ object. A red circle, along <strong>with</strong> a<br />
box containing descriptive text (a feature officially called “object assistance”<br />
by Max/MSP), should appear. The circle, shown in Figure 1.6a, indicates that<br />
the outlet is selected, and by clicking and dragging the mouse towards the<br />
gain~ object while holding the mouse button down, a yellow-and-black<br />
striped patch cord can be made to appear. If you drag the end of this patch<br />
cord towards the inlet of the gain~ object (the small dark patch on its upper<br />
edge), you will see another red circle (and more descriptive text) appear, as<br />
shown in Figure 1.6b. This second circle indicates that you have located an<br />
inlet that is compatible – at this point, release the mouse button, and you will<br />
have connected the two objects!<br />
The gain~ object has two inlets on its upper edge (which are really quite difficult<br />
to see as distinct, since they are crammed together and poorly distinguished<br />
from each other). The left inlet, to which we connected the cycle~ object, is<br />
designed to receive audio signals from a generator such as cycle~, and the right<br />
inlet is designed to receive numeric values which, for the time being, we are not<br />
interested in. 8 It is impossible to make buggy connections by routing the digital<br />
signal outlet to the numeric inlet, because Max will not allow incompatible connections<br />
such as this to be made.<br />
8 For the curious, this numeric inlet represents the “slew rate” for the fader handle, or the time<br />
interval in milliseconds used for interpolating fader positions while it is being moved.<br />
from “Electronic Music and <strong>Sound</strong> Design” Vol. 1 by Alessandro Cipriani and Maurizio Giri<br />
© ConTempoNet 2010 - All rights reserved