programming with max/msp - Virtual Sound
programming with max/msp - Virtual Sound
programming with max/msp - Virtual Sound

Create successful ePaper yourself
Turn your PDF publications into a flip-book with our unique Google optimized e-Paper software.
Chapter 1P - <strong>Sound</strong> synthesis <strong>with</strong> Max/MSP 1P<br />
In the top part of the palette, there is a row of buttons that can be used to<br />
view all of the objects by category (see Figure 1.17). The first button, All, will<br />
show every object, while the next button, Recent, shows only icons of recently<br />
used objects. What follows are the remaining categories: Basic contains the<br />
most fundamental functions; Sliders, Buttons, and Interface contain various<br />
types of user interface objects; objects that internally manage data are found in<br />
Data; finally, Audio objects and those that manage images (Image) round out<br />
the list. Click on the any category to see which objects fit into that particular<br />
category, and then return to the overview of every object by clicking All.<br />
Some of the icons in the palette, when they are selected, show a little circle that<br />
contains a number: this number represents the different prototypes, or “variations<br />
on a theme”, that we have at our disposition for this object. Click, for<br />
example, on the number that appears when you pass the mouse pointer over<br />
the gain~ object (the fader that we used in our first patch), and the palette will<br />
show different variations of the object for us to choose from. We will shortly see<br />
how it is possible to implement such prototypes in order to increase the number<br />
of available objects.<br />
SOME ORDER FOR A CHAOTIC WORLD<br />
You probably noticed that some of the patch cords in patch 01_01.<strong>max</strong>pat<br />
(Figure 1.9) had angles in them which divided their connections into tidy segments.<br />
How was this done? The answer is simple: by selecting Segmented<br />
Patch Cords from the Options menu.<br />
If you use this option, the procedure for connecting two objects will be slightly<br />
different than what we’ve seen already: begin connecting <strong>with</strong> a click on the<br />
outlet that will form the source of the connection, and then pull the patch cord<br />
out from the object <strong>with</strong>out holding the mouse button down. (The cable will<br />
remain hooked to the mouse pointer.) Segments can be created at any time<br />
<strong>with</strong> a click of the mouse at the point at which you want to change direction;<br />
for every click, there is a new segment. The final click should be made on the<br />
inlet of the object to which you wish to connect.<br />
If you make an error and want to release the cable <strong>with</strong>out connecting, you<br />
need to on the Mac or on Windows, or else<br />
hit the escape key ().<br />
If you select some objects that are lined up roughly horizontally, and then press<br />
, the objects will become perfectly aligned. The same<br />
command works to create vertical columns of objects one over the other. (The<br />
two scope~ objects and the two number~ objects in 01_01.<strong>max</strong>pat were<br />
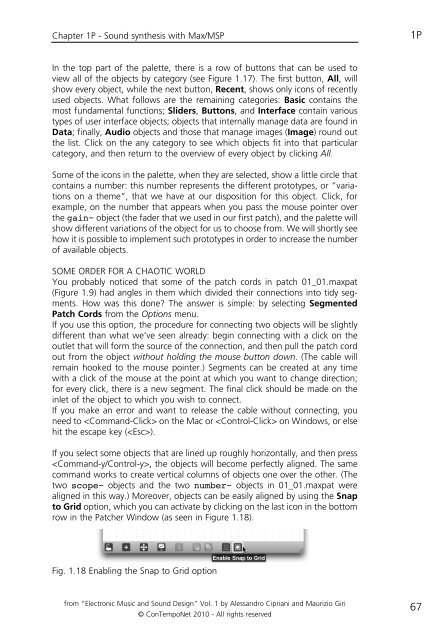
aligned in this way.) Moreover, objects can be easily aligned by using the Snap<br />
to Grid option, which you can activate by clicking on the last icon in the bottom<br />
row in the Patcher Window (as seen in Figure 1.18).<br />
Fig. 1.18 Enabling the Snap to Grid option<br />
from “Electronic Music and <strong>Sound</strong> Design” Vol. 1 by Alessandro Cipriani and Maurizio Giri<br />
© ConTempoNet 2010 - All rights reserved<br />
67