XNX Universal Transmitter - Merkantile
XNX Universal Transmitter - Merkantile
XNX Universal Transmitter - Merkantile

You also want an ePaper? Increase the reach of your titles
YUMPU automatically turns print PDFs into web optimized ePapers that Google loves.
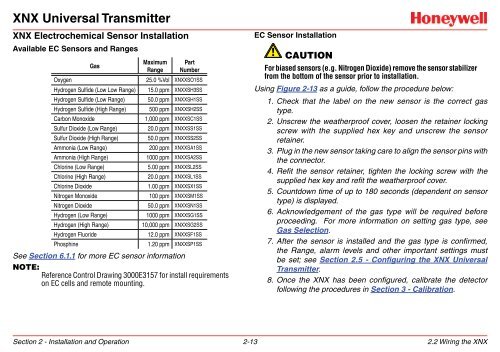
<strong>XNX</strong> <strong>Universal</strong> <strong>Transmitter</strong><strong>XNX</strong> Electrochemical Sensor InstallationAvailable EC Sensors and RangesGasMaximumRangePartNumberOxygen 25.0 %Vol <strong>XNX</strong>XSO1SSHydrogen Sulfide (Low Low Range) 15.0 ppm <strong>XNX</strong>XSH3SSHydrogen Sulfide (Low Range) 50.0 ppm <strong>XNX</strong>XSH1SSHydrogen Sulfide (High Range) 500 ppm <strong>XNX</strong>XSH2SSCarbon Monoxide 1,000 ppm <strong>XNX</strong>XSC1SSSulfur Dioxide (Low Range) 20.0 ppm <strong>XNX</strong>XSS1SSSulfur Dioxide (High Range) 50.0 ppm <strong>XNX</strong>XSS2SSAmmonia (Low Range) 200 ppm <strong>XNX</strong>XSA1SSAmmonia (High Range) 1000 ppm <strong>XNX</strong>XSA2SSChlorine (Low Range) 5.00 ppm <strong>XNX</strong>XSL2SSChlorine (High Range) 20.0 ppm <strong>XNX</strong>XSL1SSChlorine Dioxide 1.00 ppm <strong>XNX</strong>XSX1SSNitrogen Monoxide 100 ppm <strong>XNX</strong>XSM1SSNitrogen Dioxide 50.0 ppm <strong>XNX</strong>XSN1SSHydrogen (Low Range) 1000 ppm <strong>XNX</strong>XSG1SSHydrogen (High Range) 10,000 ppm <strong>XNX</strong>XSG2SSHydrogen Fluoride 12.0 ppm <strong>XNX</strong>XSF1SSPhosphine 1.20 ppm <strong>XNX</strong>XSP1SSSee Section 6.1.1 for more EC sensor informationNote:Reference Control Drawing 3000E3157 for install requirementson EC cells and remote mounting.EC Sensor InstallationCautionFor biased sensors (e.g. Nitrogen Dioxide) remove the sensor stabilizerfrom the bottom of the sensor prior to installation.Using Figure 2-13 as a guide, follow the procedure below:1. Check that the label on the new sensor is the correct gastype.2. Unscrew the weatherproof cover, loosen the retainer lockingscrew with the supplied hex key and unscrew the sensorretainer.3. Plug in the new sensor taking care to align the sensor pins withthe connector.4. Refit the sensor retainer, tighten the locking screw with thesupplied hex key and refit the weatherproof cover.5. Countdown time of up to 180 seconds (dependent on sensortype) is displayed.6. Acknowledgement of the gas type will be required beforeproceeding. For more information on setting gas type, seeGas Selection.7. After the sensor is installed and the gas type is confirmed,the Range, alarm levels and other important settings mustbe set; see Section 2.5 - Configuring the <strong>XNX</strong> <strong>Universal</strong><strong>Transmitter</strong>.8. Once the <strong>XNX</strong> has been configured, calibrate the detectorfollowing the procedures in Section 3 - Calibration.Section 2 - Installation and Operation 2-132.2 Wiring the <strong>XNX</strong>