XNX Universal Transmitter - Merkantile
XNX Universal Transmitter - Merkantile
XNX Universal Transmitter - Merkantile

You also want an ePaper? Increase the reach of your titles
YUMPU automatically turns print PDFs into web optimized ePapers that Google loves.
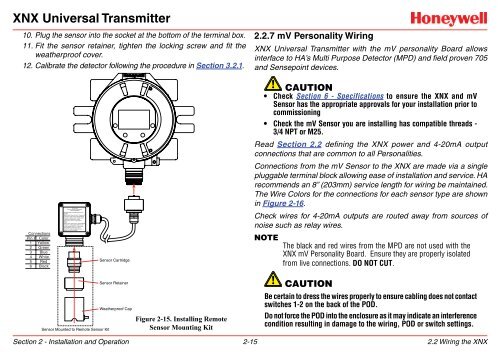
<strong>XNX</strong> <strong>Universal</strong> <strong>Transmitter</strong>10. Plug the sensor into the socket at the bottom of the terminal box.11. Fit the sensor retainer, tighten the locking screw and fit theweatherproof cover.12. Calibrate the detector following the procedure in Section 3.2.1.2.2.7 mV Personality Wiring<strong>XNX</strong> <strong>Universal</strong> <strong>Transmitter</strong> with the mV personality Board allowsinterface to HA’s Multi Purpose Detector (MPD) and field proven 705and Sensepoint devices.ConnectionsPin # Color1 Yellow2 Green3 Blue4 White5 Red6 BlackSensor CartridgeCaution• Check Section 6 - Specifications to ensure the <strong>XNX</strong> and mVSensor has the appropriate approvals for your installation prior tocommissioning• Check the mV Sensor you are installing has compatible threads -3/4 NPT or M25.Read Section 2.2 defining the <strong>XNX</strong> power and 4-20mA outputconnections that are common to all Personalities.Connections from the mV Sensor to the <strong>XNX</strong> are made via a singlepluggable terminal block allowing ease of installation and service. HArecommends an 8” (203mm) service length for wiring be maintained.The Wire Colors for the connections for each sensor type are shownin Figure 2-16.Check wires for 4-20mA outputs are routed away from sources ofnoise such as relay wires.NoteThe black and red wires from the MPD are not used with the<strong>XNX</strong> mV Personality Board. Ensure they are properly isolatedfrom live connections. DO NOT CUT.Sensor Mounted to Remote Sensor KitSensor RetainerWeatherproof CapFigure 2-15. Installing RemoteSensor Mounting KitCautionBe certain to dress the wires properly to ensure cabling does not contactswitches 1-2 on the back of the POD.Do not force the POD into the enclosure as it may indicate an interferencecondition resulting in damage to the wiring, POD or switch settings.Section 2 - Installation and Operation 2-152.2 Wiring the <strong>XNX</strong>