XNX Universal Transmitter - Merkantile
XNX Universal Transmitter - Merkantile
XNX Universal Transmitter - Merkantile

You also want an ePaper? Increase the reach of your titles
YUMPU automatically turns print PDFs into web optimized ePapers that Google loves.
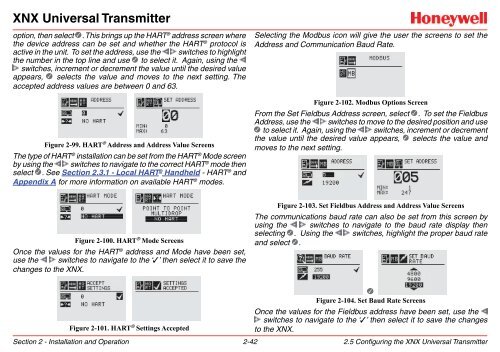
<strong>XNX</strong> <strong>Universal</strong> <strong>Transmitter</strong>option, then select . This brings up the HART ® address screen wherethe device address can be set and whether the HART ® protocol isactive in the unit. To set the address, use the switches to highlightthe number in the top line and use to select it. Again, using theswitches, increment or decrement the value until the desired valueappears, selects the value and moves to the next setting. Theaccepted address values are between 0 and 63.Figure 2-99. HART ® Address and Address Value ScreensThe type of HART ® installation can be set from the HART ® Mode screenby using the switches to navigate to the correct HART ® mode thenselect . See Section 2.3.1 - Local HART ® Handheld - HART ® andAppendix A for more information on available HART ® modes.Selecting the Modbus icon will give the user the screens to set theAddress and Communication Baud Rate.Figure 2-102. Modbus Options ScreenFrom the Set Fieldbus Address screen, select . To set the FieldbusAddress, use the switches to move to the desired position and use to select it. Again, using the switches, increment or decrementthe value until the desired value appears, selects the value andmoves to the next setting.Figure 2-100. HART ® Mode ScreensOnce the values for the HART ® address and Mode have been set,use the switches to navigate to the ‘3’ then select it to save thechanges to the <strong>XNX</strong>.Figure 2-103. Set Fieldbus Address and Address Value ScreensThe communications baud rate can also be set from this screen byusing the switches to navigate to the baud rate display thenselecting . Using the switches, highlight the proper baud rateand select .Figure 2-101. HART ® Settings AcceptedSection 2 - Installation and Operation 2-42Figure 2-104. Set Baud Rate ScreensOnce the values for the Fieldbus address have been set, use theswitches to navigate to the ‘3’ then select it to save the changesto the <strong>XNX</strong>.2.5 Configuring the <strong>XNX</strong> <strong>Universal</strong> <strong>Transmitter</strong>