XNX Universal Transmitter - Merkantile
XNX Universal Transmitter - Merkantile
XNX Universal Transmitter - Merkantile

Create successful ePaper yourself
Turn your PDF publications into a flip-book with our unique Google optimized e-Paper software.
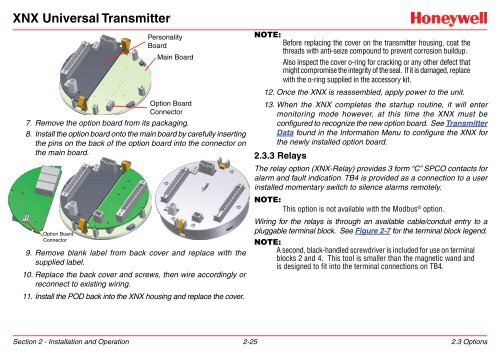
<strong>XNX</strong> <strong>Universal</strong> <strong>Transmitter</strong>PersonalityBoardMain BoardOption BoardConnector7. Remove the option board from its packaging.8. Install the option board onto the main board by carefully insertingthe pins on the back of the option board into the connector onthe main board.Option BoardConnector9. Remove blank label from back cover and replace with thesupplied label.10. Replace the back cover and screws, then wire accordingly orreconnect to existing wiring.11. Install the POD back into the <strong>XNX</strong> housing and replace the cover.Note:Before replacing the cover on the transmitter housing, coat thethreads with anti-seize compound to prevent corrosion buildup.Also inspect the cover o-ring for cracking or any other defect thatmight compromise the integrity of the seal. If it is damaged, replacewith the o-ring supplied in the accessory kit.12. Once the <strong>XNX</strong> is reassembled, apply power to the unit.13. When the <strong>XNX</strong> completes the startup routine, it will entermonitoring mode however, at this time the <strong>XNX</strong> must beconfigured to recognize the new option board. See <strong>Transmitter</strong>Data found in the Information Menu to configure the <strong>XNX</strong> forthe newly installed option board.2.3.3 RelaysThe relay option (<strong>XNX</strong>-Relay) provides 3 form “C” SPCO contacts foralarm and fault indication. TB4 is provided as a connection to a userinstalled momentary switch to silence alarms remotely.Note:This option is not available with the Modbus ® option.Wiring for the relays is through an available cable/conduit entry to apluggable terminal block. See Figure 2-7 for the terminal block legend.Note:A second, black-handled screwdriver is included for use on terminalblocks 2 and 4. This tool is smaller than the magnetic wand andis designed to fit into the terminal connections on TB4.Section 2 - Installation and Operation 2-252.3 Options