GPS-NAVIGATOR GP-32 & GP-37
GPS-NAVIGATOR GP-32 & GP-37
GPS-NAVIGATOR GP-32 & GP-37

Create successful ePaper yourself
Turn your PDF publications into a flip-book with our unique Google optimized e-Paper software.
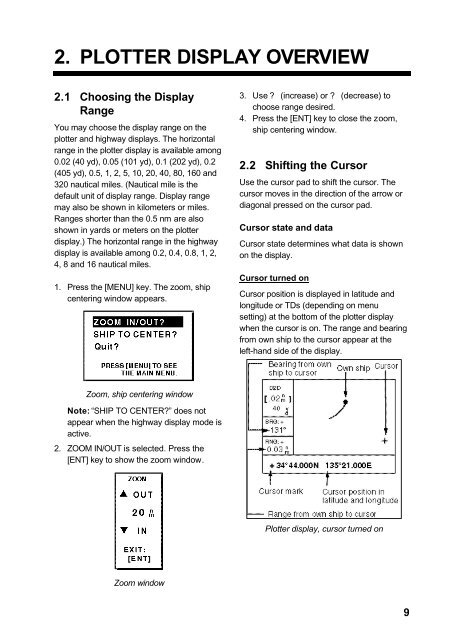
2. PLOTTER DISPLAY OVERVIEW2.1 Choosing the DisplayRangeYou may choose the display range on theplotter and highway displays. The horizontalrange in the plotter display is available among0.02 (40 yd), 0.05 (101 yd), 0.1 (202 yd), 0.2(405 yd), 0.5, 1, 2, 5, 10, 20, 40, 80, 160 and<strong>32</strong>0 nautical miles. (Nautical mile is thedefault unit of display range. Display rangemay also be shown in kilometers or miles.Ranges shorter than the 0.5 nm are alsoshown in yards or meters on the plotterdisplay.) The horizontal range in the highwaydisplay is available among 0.2, 0.4, 0.8, 1, 2,4, 8 and 16 nautical miles.1. Press the [MENU] key. The zoom, shipcentering window appears.3. Use ? (increase) or ? (decrease) tochoose range desired.4. Press the [ENT] key to close the zoom,ship centering window.2.2 Shifting the CursorUse the cursor pad to shift the cursor. Thecursor moves in the direction of the arrow ordiagonal pressed on the cursor pad.Cursor state and dataCursor state determines what data is shownon the display.Cursor turned onCursor position is displayed in latitude andlongitude or TDs (depending on menusetting) at the bottom of the plotter displaywhen the cursor is on. The range and bearingfrom own ship to the cursor appear at theleft-hand side of the display.Zoom, ship centering windowNote: “SHIP TO CENTER?” does notappear when the highway display mode isactive.2. ZOOM IN/OUT is selected. Press the[ENT] key to show the zoom window.Plotter display, cursor turned onZoom window9