GPS-NAVIGATOR GP-32 & GP-37
GPS-NAVIGATOR GP-32 & GP-37
GPS-NAVIGATOR GP-32 & GP-37

Create successful ePaper yourself
Turn your PDF publications into a flip-book with our unique Google optimized e-Paper software.
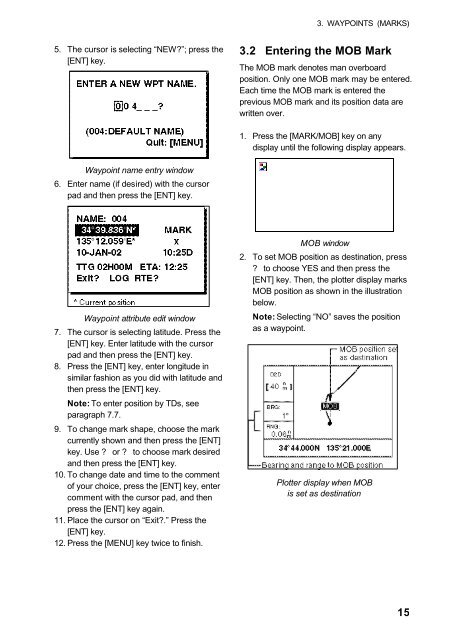
3. WAYPOINTS (MARKS)5. The cursor is selecting “NEW?”; press the[ENT] key.3.2 Entering the MOB MarkThe MOB mark denotes man overboardposition. Only one MOB mark may be entered.Each time the MOB mark is entered theprevious MOB mark and its position data arewritten over.1. Press the [MARK/MOB] key on anydisplay until the following display appears.Waypoint name entry window6. Enter name (if desired) with the cursorpad and then press the [ENT] key.Waypoint attribute edit window7. The cursor is selecting latitude. Press the[ENT] key. Enter latitude with the cursorpad and then press the [ENT] key.8. Press the [ENT] key, enter longitude insimilar fashion as you did with latitude andthen press the [ENT] key.Note: To enter position by TDs, seeparagraph 7.7.9. To change mark shape, choose the markcurrently shown and then press the [ENT]key. Use ? or ? to choose mark desiredand then press the [ENT] key.10. To change date and time to the commentof your choice, press the [ENT] key, entercomment with the cursor pad, and thenpress the [ENT] key again.11. Place the cursor on “Exit?.” Press the[ENT] key.12. Press the [MENU] key twice to finish.MOB window2. To set MOB position as destination, press? to choose YES and then press the[ENT] key. Then, the plotter display marksMOB position as shown in the illustrationbelow.Note: Selecting “NO” saves the positionas a waypoint.Plotter display when MOBis set as destination15