Download the Tutorial
Download the Tutorial
Download the Tutorial

You also want an ePaper? Increase the reach of your titles
YUMPU automatically turns print PDFs into web optimized ePapers that Google loves.
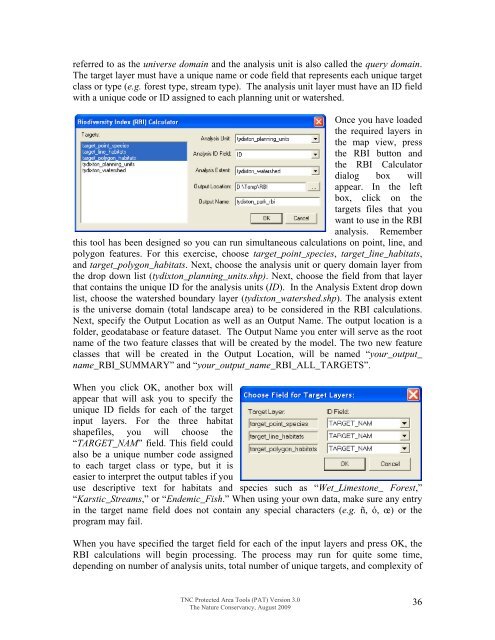
eferred to as <strong>the</strong> universe domain and <strong>the</strong> analysis unit is also called <strong>the</strong> query domain.The target layer must have a unique name or code field that represents each unique targetclass or type (e.g. forest type, stream type). The analysis unit layer must have an ID fieldwith a unique cod e or ID assigned to each planning unit or watershed.Once you have loaded<strong>the</strong> required layers in<strong>the</strong> map view, press<strong>the</strong> RBI button and<strong>the</strong> RBI Calculatordialog box willappear. In <strong>the</strong> leftbox, click on <strong>the</strong>targets files that youwant to use in <strong>the</strong> RBIanalysis. Rememberthis tool has been designed so you can run simultaneous calculations on point, line, andpolygon features. For this exercise, choose target_point_species, target_line_habitats,and target_polygon_habitats. Next, choose <strong>the</strong> analysis unit or query domain layer from<strong>the</strong> drop down list (tydixton_planning_units.shp). Next, choose <strong>the</strong> field from that layerthat contains <strong>the</strong> unique ID for <strong>the</strong> analysis units (ID). In <strong>the</strong> Analysis Extent drop downlist, choose <strong>the</strong> watershed boundary layer (tydixton_watershed.shp). The analysis extentis <strong>the</strong> universe domain (total landscape area) to be considered in <strong>the</strong> RBI calculations.Next, specify <strong>the</strong> Output Location as well as an Output Name. The output location is afolder, geodatabase or feature dataset. The Output Name you enter will serve as <strong>the</strong> rootname of <strong>the</strong> two feature classes that will be created by <strong>the</strong> model. The two new featureclasses that will be created in <strong>the</strong> Output Location, will be named “your_output_name_RBI_SUMMARY” and “your_output_name_RBI_ALL_TARGETS”.When you click OK, ano<strong>the</strong>r box willappear that will ask you to specify <strong>the</strong>unique ID fields for each of <strong>the</strong> targetinput layers. For <strong>the</strong> three habitatshapefiles, you will choose <strong>the</strong>“TARGET_NAM” field. This field couldalso be a unique number code assignedto each target class or type, but it iseasier to interpret <strong>the</strong> output tables if youuse descriptive text for habitats and species such as “Wet_Limestone_ Forest,”“Karstic_Streams,” or “Endemic_Fish.” When using your own data, make sure any entryin <strong>the</strong> target name field does not contain any special characters (e.g. ñ, ó, œ) or <strong>the</strong>program may fail.When you have specified <strong>the</strong> target field for each of <strong>the</strong> input layers and press OK, <strong>the</strong>RBI calculations will begin processing. The process may run for quite some time,depending on number of analysis units, total number of unique targets, and complexity ofTNC Protected Area Tools (PAT) Version 3.0The Nature Conservancy, August 200936