Download the Tutorial
Download the Tutorial
Download the Tutorial

Create successful ePaper yourself
Turn your PDF publications into a flip-book with our unique Google optimized e-Paper software.
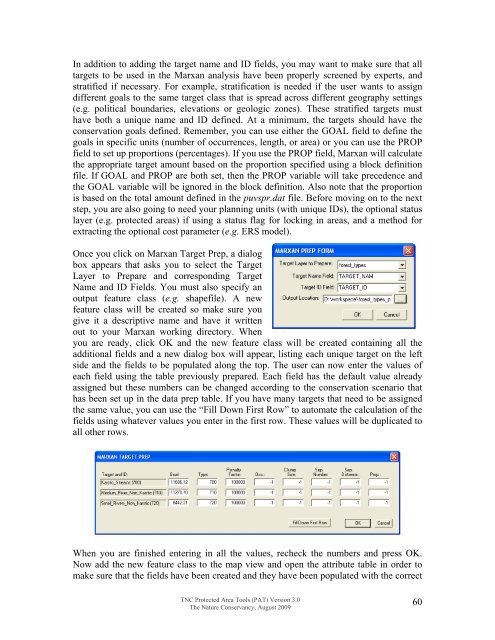
In addition to adding <strong>the</strong> target name and ID fields, you may want to make sure that alltargets to be used in <strong>the</strong> Marxan analysis have been properly screened by experts, andstratified if necessary. For example, stratification is needed if <strong>the</strong> user wants to assigndifferent goals to <strong>the</strong> same target class that is spread across different geography settings(e.g. political boundaries, elevations or geologic zones). These stratified targets musthave both a unique name and ID defined. At a minimum, <strong>the</strong> targets should have <strong>the</strong>conservation goals defined. Remember, you can use ei<strong>the</strong>r <strong>the</strong> GOAL field to define <strong>the</strong>goals in specific units (number of occurrences, length, or area) or you can use <strong>the</strong> PROPfield to set up proportions (percentages). If you use <strong>the</strong> PROP field, Marxan will calculate<strong>the</strong> appropriate target amount based on <strong>the</strong> proportion specified using a block definitionfile. If GOAL and PROP are both set, <strong>the</strong>n <strong>the</strong> PROP variable will take precedence and<strong>the</strong> GOAL variable will be ignored in <strong>the</strong> block definition. Also note that <strong>the</strong> proportionis based on <strong>the</strong> total amount defined in <strong>the</strong> puvspr.dat file. Before moving on to <strong>the</strong> nextstep, you are also going to need your planning units (with unique IDs), <strong>the</strong> optional statuslayer (e.g. protected areas) if using a status flag for locking in areas, and a method forextracting <strong>the</strong> optional cost parameter (e.g. ERS model).Once you click on Marxan Target Prep, a dialogbox appears that asks you to select <strong>the</strong> TargetLayer to Prepare and corresponding TargetName and ID Fields. You must also specify anoutput feature class (e.g. shapefile). A newfeature class will be created so make sure yougive it a descriptive name and have it writtenout to your Marxan working directory. Whenyou are ready, click OK and <strong>the</strong> new feature class will be created containing all <strong>the</strong>additional fields and a new dialog box will appear, listing each unique target on <strong>the</strong> leftside and <strong>the</strong> fields to be populated along <strong>the</strong> top. The user can now enter <strong>the</strong> values ofeach field using <strong>the</strong> table previously prepared. Each field has <strong>the</strong> default value alreadyassigned but <strong>the</strong>se num bers can be change d accordi ng to <strong>the</strong> conservation scenario thathas been set up in <strong>the</strong> data prep table. If you h ave many targ ets that need to be assignedth e same value, you can use <strong>the</strong> “Fill Down First Row” to automate <strong>the</strong> calculation of <strong>the</strong>fields using whatever values you enter i n <strong>the</strong> first row. These values w ill be duplicatedtoall o<strong>the</strong>r rows.When you are finished entering in all <strong>the</strong> values, recheck <strong>the</strong> numbers and press OK.Now add <strong>the</strong> new feature class to <strong>the</strong> map view and open <strong>the</strong> attribute table in order tomake sure that <strong>the</strong> fields have been created and <strong>the</strong>y have been populated with <strong>the</strong> correctTNC Protected Area Tools (PAT) Version 3.0The Nature Conservancy, August 200960