Download the Tutorial
Download the Tutorial
Download the Tutorial

You also want an ePaper? Increase the reach of your titles
YUMPU automatically turns print PDFs into web optimized ePapers that Google loves.
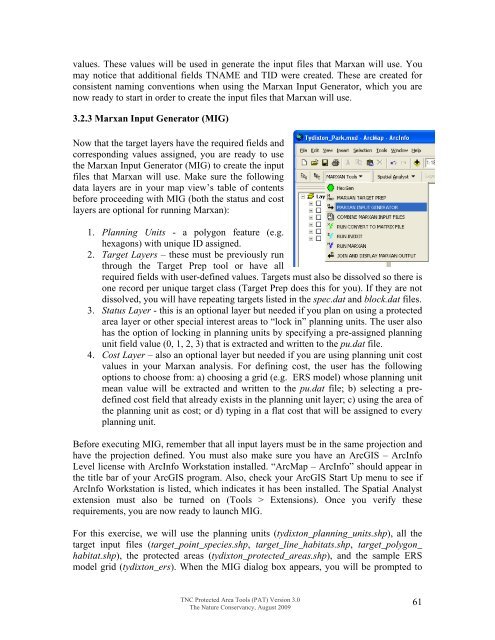
values. These values will be used in generate <strong>the</strong> input files that Marxan will use. Youmay notice that additional fields TNAME and TID were created. These are created forconsistent naming conventions when using <strong>the</strong> Marxan Input Generator, which you arenow ready to start in order to create <strong>the</strong> input files that Marxan will use.3.2.3 Marxan Input Generator (MIG)Now that <strong>the</strong> target layers have <strong>the</strong> required fields andcorresponding values assigned, you are ready to use<strong>the</strong> Marxan Input Generator (MIG) to create <strong>the</strong> inputfiles that Marxan will use. Make sure <strong>the</strong> followingdata layers are in your map view’s table of contentsbefore proceeding with MIG (both <strong>the</strong> status and costlayers are optional for running Marxan):1. Planning Units - a polygon feature (e.g.hexagons) with unique ID assigned.2. Target Layers – <strong>the</strong>se must be previously runthrough <strong>the</strong> Target Prep tool or have allrequired fields with user-defined values. Targets must also be dissolved so <strong>the</strong>re isone record per unique target class (Target Prep does this for you). If <strong>the</strong>y are notdissolved, you will have repeating targets listed in <strong>the</strong> spec.dat and block.dat files.3. Status Layer - this is an optional layer but needed if you plan on using a protectedarea layer or o<strong>the</strong>r special interest areas to “lock in” planning units. The user alsohas <strong>the</strong> option of locking in planning units by specifying a pre-assigned planningunit field value (0, 1, 2, 3) that is extracted and written to <strong>the</strong> pu.dat file.4. Cost Layer – also an optional layer but needed if you are using planning unit costvalues in your Marxan analysis. For defining cost, <strong>the</strong> user has <strong>the</strong> followingoptions to choose from: a) choosing a grid (e.g. ERS model) whose planning unitmean value will be extracted and written to <strong>the</strong> pu.dat file; b) selecting a predefinedcost field that already exists in <strong>the</strong> planning unit layer; c) using <strong>the</strong> area of<strong>the</strong> planning unit as cost; or d) typing in a flat cost that will be assigned to everyplanning unit.Before executing MIG, remember that all input layers must be in <strong>the</strong> same projection andhave <strong>the</strong> projection defined. You must also make sure you have an ArcGIS – ArcInfoLevel license with ArcInfo Workstation installed. “ArcMap – ArcInfo” should appear in<strong>the</strong> title bar of your ArcGIS program. Also, check your ArcGIS Start Up menu to see ifArcInfo Workstation is listed, which indicates it has been installed. The Spatial Analystextension must also be turned on (Tools > Extensions). Once you verify <strong>the</strong>serequirements, you are now ready to launch MIG.For this exercise, we will use <strong>the</strong> planning units (tydixton_planning_units.shp), all <strong>the</strong>target input files (target_point_species.shp, target_line_habitats.shp, target_polygon_habitat.shp), <strong>the</strong> protected areas (tydixton_protected_areas.shp), and <strong>the</strong> sample ERSmodel grid (tydixton_ers). When <strong>the</strong> MIG dialog box appears, you will be prompted toTNC Protected Area Tools (PAT) Version 3.0The Nature Conservancy, August 200961