3D Creative December 2015
contoh majalah 3dcreative. majalah yang menyajikan trick, tips, dan seni dari teknologi citra 3 Dimensi
contoh majalah 3dcreative. majalah yang menyajikan trick, tips, dan seni dari teknologi citra 3 Dimensi

You also want an ePaper? Increase the reach of your titles
YUMPU automatically turns print PDFs into web optimized ePapers that Google loves.
<strong>3D</strong>CREATIVE MAGAZINE | Designing a fantasy character<br />
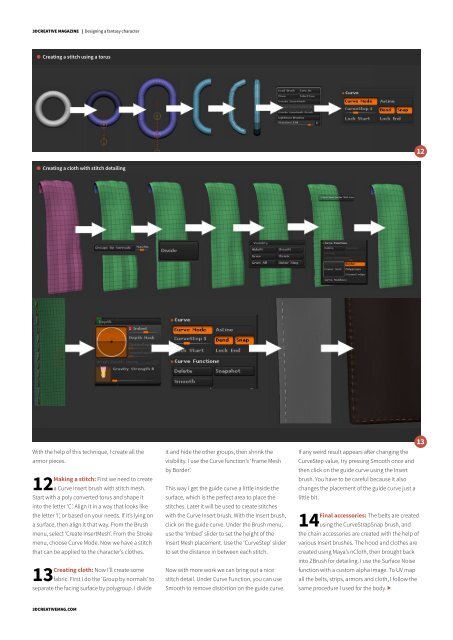
Creating a stitch using a torus<br />
Creating a cloth with stitch detailing<br />
With the help of this technique, I create all the<br />
armor pieces.<br />
Making a stitch: First we need to create<br />
12 a Curve Insert brush with stitch mesh.<br />
Start with a poly converted torus and shape it<br />
into the letter ‘C’. Align it in a way that looks like<br />
the letter ‘I’, or based on your needs. If it’s lying on<br />
a surface, then align it that way. From the Brush<br />
menu, select ‘Create InsertMesh’. From the Stroke<br />
menu, choose Curve Mode. Now we have a stitch<br />
that can be applied to the character’s clothes.<br />
Creating cloth: Now I’ll create some<br />
13 fabric. First I do the ‘Group by normals’ to<br />
separate the facing surface by polygroup. I divide<br />
it and hide the other groups, then shrink the<br />
visibility. I use the Curve function’s ‘Frame Mesh<br />
by Border’.<br />
This way I get the guide curve a little inside the<br />
surface, which is the perfect area to place the<br />
stitches. Later it will be used to create stitches<br />
with the Curve Insert brush. With the Insert brush,<br />
click on the guide curve. Under the Brush menu,<br />
use the ‘Imbed’ slider to set the height of the<br />
Insert Mesh placement. Use the ‘CurveStep’ slider<br />
to set the distance in between each stitch.<br />
Now with more work we can bring out a nice<br />
stitch detail. Under Curve Function, you can use<br />
Smooth to remove distortion on the guide curve.<br />
If any weird result appears after changing the<br />
CurveStep value, try pressing Smooth once and<br />
then click on the guide curve using the Insert<br />
brush. You have to be careful because it also<br />
changes the placement of the guide curve just a<br />
little bit.<br />
Final accessories: The belts are created<br />
14 using the CurveStrapSnap brush, and<br />
the chain accessories are created with the help of<br />
various Insert brushes. The hood and clothes are<br />
created using Maya’s nCloth, then brought back<br />
into ZBrush for detailing. I use the Surface Noise<br />
function with a custom alpha image. To UV map<br />
all the belts, strips, armors and cloth, I follow the<br />
same procedure I used for the body.<br />
<strong>3D</strong>CREATIVEMAG.COM