<strong>3D</strong>CREATIVE MAGAZINE | Creating textures for sci-fi spacecraft Paint some areas of glow to add more visual interest to the model Paint the peeling on the borders of the panels and in other exposed areas <strong>3D</strong>CREATIVEMAG.COM
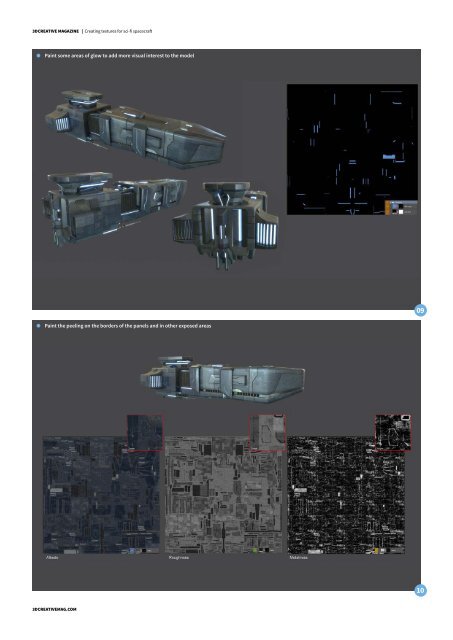
<strong>3D</strong>CREATIVE MAGAZINE | ISSUE 124 Create a solid color and mask the areas of the decals. Play with the blending options to get a nice wear effect Making the emissive map: Once I’ve 09 got all the colors, panels, metal and scratches, the ship’s starting to take shape in terms of shaders/materials. It looks metallic and a bit damaged. Before I continue adding the peeling, dust and rust, I’ll first create the emissive map. The emissive map always adds that extra layer of detail and visual interest to the model, creating areas that emit light. I always like to add some lines and dots here and there, and it also looks good to paint the windows and engines and make them glow. To make the emissive map, I create a black solid color as the base layer, and on top of this one I add the emissive color layer (in this case, blue). This blue layer has a mask where I start to paint all the areas I wanted to glow. (I use the UV template in Screen mode as a guide to paint.) Adding peeling to the borders: Finally, 10 the peeling, my favorite part. I need to be extra careful when making the peeling because I always add too much and then the model starts to look super destroyed; I end up deleting a lot of what I had already painted. (In any case, my models always look destroyed!) So whatever the goal you want for your model, whether you want it to look old and damaged or only have a bit of peeling damage, this is a very fun step. Nowadays there are some techniques to obtain this effect quickly: for example, using curvature maps or Substance Designer. However, I’m still a big fan of painting by hand because I like to have full control of what I want to do and where exactly I want to do it. Using one technique or another will alway depends on your time constraints. In this tutorial I will share how I do this completely by hand. For the albedo map, I create a dark-gray solid color layer and use a dry brush to start masking the borders of the panels. Remember that the value of gray determines the reflectance of the metal in the metalness map. I want the peeling to look bright, but not much, so I test some different gray values until I get the result I want. In the roughness map, I use a very dark-gray because I want the surface to look smooth, since it’s the raw metal that’s been revealed underneath the paint. Finally, for the metalness map, I use a very light-gray, almost white. Even if I use PBR and start using real material values, I change them a bit to fit my own tastes. Decals: After the hard work of painting 11 all the peeling, let’s take a rest to add some decals, like the yellow bands on the sides and some logos. As usual, I create a solid color layer (yellow this time) and mask in the areas where I want the bands and logos to be. To give the worn feeling of the yellow paint, I modify some blending options in the Layer Style window. In the roughness map, I use a light-gray to get a rough result. As I said before, it needs to be tested several times to get the desired result. The metalness map remains unaffected. 75