3D Creative December 2015
contoh majalah 3dcreative. majalah yang menyajikan trick, tips, dan seni dari teknologi citra 3 Dimensi
contoh majalah 3dcreative. majalah yang menyajikan trick, tips, dan seni dari teknologi citra 3 Dimensi

Create successful ePaper yourself
Turn your PDF publications into a flip-book with our unique Google optimized e-Paper software.
<strong>3D</strong>CREATIVE MAGAZINE | Texturing sci-fi ships with MARI<br />
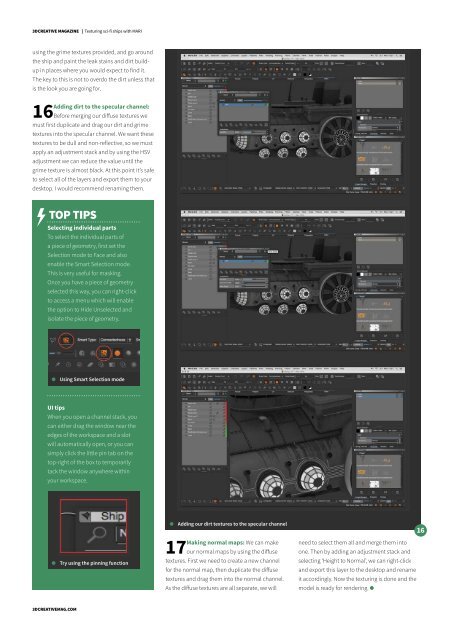
using the grime textures provided, and go around<br />
the ship and paint the leak stains and dirt buildup<br />
in places where you would expect to find it.<br />
The key to this is not to overdo the dirt unless that<br />
is the look you are going for.<br />
Adding dirt to the specular channel:<br />
16 Before merging our diffuse textures we<br />
must first duplicate and drag our dirt and grime<br />
textures into the specular channel. We want these<br />
textures to be dull and non-reflective, so we must<br />
apply an adjustment stack and by using the HSV<br />
adjustment we can reduce the value until the<br />
grime texture is almost black. At this point it’s safe<br />
to select all of the layers and export them to your<br />
desktop. I would recommend renaming them.<br />
TOP TIPS<br />
Selecting individual parts<br />
To select the individual parts of<br />
a piece of geometry, first set the<br />
Selection mode to Face and also<br />
enable the Smart Selection mode.<br />
This is very useful for masking.<br />
Once you have a piece of geometry<br />
selected this way, you can right-click<br />
to access a menu which will enable<br />
the option to Hide Unselected and<br />
isolate the piece of geometry.<br />
Using Smart Selection mode<br />
UI tips<br />
When you open a channel stack, you<br />
can either drag the window near the<br />
edges of the workspace and a slot<br />
will automatically open, or you can<br />
simply click the little pin tab on the<br />
top-right of the box to temporarily<br />
tack the window anywhere within<br />
your workspace.<br />
Try using the pinning function<br />
Adding our dirt textures to the specular channel<br />
Making normal maps: We can make<br />
17 our normal maps by using the diffuse<br />
textures. First we need to create a new channel<br />
for the normal map, then duplicate the diffuse<br />
textures and drag them into the normal channel.<br />
As the diffuse textures are all separate, we will<br />
need to select them all and merge them into<br />
one. Then by adding an adjustment stack and<br />
selecting ‘Height to Normal’, we can right-click<br />
and export this layer to the desktop and rename<br />
it accordingly. Now the texturing is done and the<br />
model is ready for rendering.<br />
<strong>3D</strong>CREATIVEMAG.COM