3D Creative December 2015
contoh majalah 3dcreative. majalah yang menyajikan trick, tips, dan seni dari teknologi citra 3 Dimensi
contoh majalah 3dcreative. majalah yang menyajikan trick, tips, dan seni dari teknologi citra 3 Dimensi

Create successful ePaper yourself
Turn your PDF publications into a flip-book with our unique Google optimized e-Paper software.
<strong>3D</strong>CREATIVE MAGAZINE | Presenting assets in Marmoset Viewer<br />
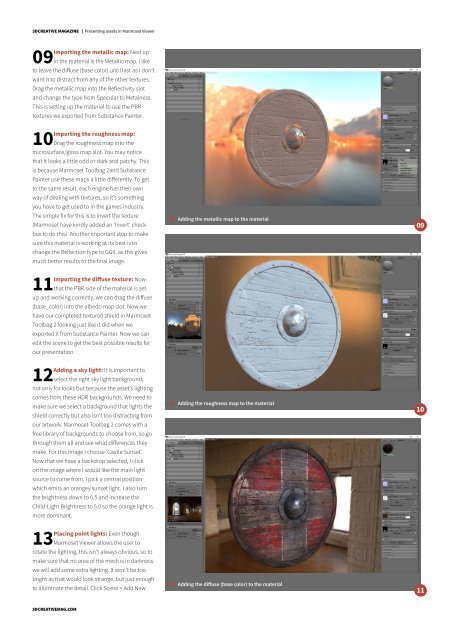
Importing the metallic map: Next up<br />
09 in the material is the Metallic map. I like<br />
to leave the diffuse (base color) until last as I don’t<br />
want it to distract from any of the other textures.<br />
Drag the metallic map into the Reflectivity slot<br />
and change the type from Specular to Metalness.<br />
This is setting up the material to use the PBR<br />
textures we exported from Substance Painter.<br />
Importing the roughness map:<br />
10 Drag the roughness map into the<br />
microsurface/gloss map slot. You may notice<br />
that it looks a little odd or dark and patchy. This<br />
is because Marmoset Toolbag 2and Substance<br />
Painter use these maps a little differently. To get<br />
to the same result, each engine has their own<br />
way of dealing with textures, so it’s something<br />
you have to get used to in the games industry.<br />
The simple fix for this is to invert the texture<br />
(Marmoset have kindly added an ‘Invert’ check<br />
box to do this). Another important step to make<br />
sure this material is working at its best is to<br />
change the Reflection type to GGX, as this gives<br />
much better results to the final image.<br />
Importing the diffuse texture: Now<br />
11 that the PBR side of the material is set<br />
up and working correctly, we can drag the diffuse<br />
(base_color) into the albedo map slot. Now we<br />
have our completed textured shield in Marmoset<br />
Toolbag 2 looking just like it did when we<br />
exported it from Substance Painter. Now we can<br />
edit the scene to get the best possible results for<br />
our presentation.<br />
Adding a sky light: It is important to<br />
12 select the right sky light background,<br />
not only for looks but because the asset’s lighting<br />
comes from these HDR backgrounds. We need to<br />
make sure we select a background that lights the<br />
shield correctly but also isn’t too distracting from<br />
our artwork. Marmoset Toolbag 2 comes with a<br />
free library of backgrounds to choose from, so go<br />
through them all and see what differences they<br />
make. For this image I choose ‘Castle Sunset’.<br />
Now that we have a backdrop selected, I click<br />
on the image where I would like the main light<br />
source to come from. I pick a central position<br />
which emits an orangey sunset light. I also turn<br />
the brightness down to 0.5 and increase the<br />
Child-Light Brightness to 5.0 so the orange light is<br />
more dominant.<br />
Placing point lights: Even though<br />
13 Marmoset Viewer allows the user to<br />
rotate the lighting, this isn’t always obvious, so to<br />
make sure that no area of the mesh is in darkness<br />
we will add some extra lighting. It won’t be too<br />
bright as that would look strange, but just enough<br />
to illuminate the detail. Click Scene > Add New<br />
Adding the metallic map to the material<br />
Adding the roughness map to the material<br />
Adding the diffuse (base color) to the material<br />
<strong>3D</strong>CREATIVEMAG.COM