WSCAD51 Getting Started - FTP Directory Listing
WSCAD51 Getting Started - FTP Directory Listing
WSCAD51 Getting Started - FTP Directory Listing

You also want an ePaper? Increase the reach of your titles
YUMPU automatically turns print PDFs into web optimized ePapers that Google loves.
<strong>Getting</strong> <strong>Started</strong><br />
96<br />
• '-S2', Push-button at 425,0 / 500,0 mm<br />
• '-S3', Push-button at 425.0 / 575.0 mm<br />
• '-S4', Push-button at 350.0 / 575.0 mm<br />
• '-S5', Push-button at 500.0 / 575.0 mm<br />
• '-Q1', Main switch 3 pole at 392.5 / 400.0 mm<br />
To position the switch exactly, turn Snap off.<br />
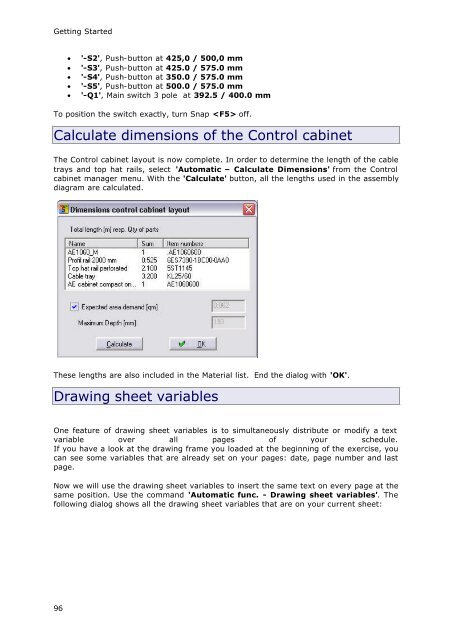
Calculate dimensions of the Control cabinet<br />
The Control cabinet layout is now complete. In order to determine the length of the cable<br />
trays and top hat rails, select 'Automatic – Calculate Dimensions' from the Control<br />
cabinet manager menu. With the 'Calculate' button, all the lengths used in the assembly<br />
diagram are calculated.<br />
These lengths are also included in the Material list. End the dialog with 'OK'.<br />
Drawing sheet variables<br />
One feature of drawing sheet variables is to simultaneously distribute or modify a text<br />
variable over all pages of your schedule.<br />
If you have a look at the drawing frame you loaded at the beginning of the exercise, you<br />
can see some variables that are already set on your pages: date, page number and last<br />
page.<br />
Now we will use the drawing sheet variables to insert the same text on every page at the<br />
same position. Use the command 'Automatic func. - Drawing sheet variables'. The<br />
following dialog shows all the drawing sheet variables that are on your current sheet: