WSCAD51 Getting Started - FTP Directory Listing
WSCAD51 Getting Started - FTP Directory Listing
WSCAD51 Getting Started - FTP Directory Listing

Create successful ePaper yourself
Turn your PDF publications into a flip-book with our unique Google optimized e-Paper software.
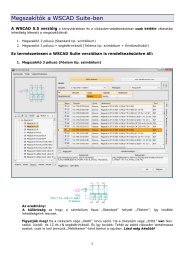
<strong>Getting</strong> <strong>Started</strong><br />
Now you are going to create the Symbol Graphics by selecting 'Draw' and the menu<br />
lists the available commands. Make sure that the 'Line type' is set to continuous and<br />
that the 'Line width' is set to '1'. Note the information bar at the bottom of your<br />
screen. There you can see and also modify the settings for line type and line width.<br />
To make it more convenient, the display scale should be larger, therefore press <br />
(this changes only the zoom factor).<br />
Using lines you can now draw the two NC contacts. Turn Snap mode on (, 'S' in the<br />
last line of the screen) and also Orthogonal mode (, 'O' as second character).<br />
Select 'Draw-Line' from the menu and draw a line from 100.0/140.0 mm to<br />
100.0/137.5 mm, and then the horizontal part to 101.5/137.5 mm. You must turn<br />
Snap off to do this! Quit the line command with the right mo use key (twice). Now you<br />
are going to copy the lines. Select 'Draw- Repeat' and position the cursor at<br />
105.0/50.0 mm (Snap turned on) and press the left mouse key.<br />
112<br />
Now create the lower part of the NC contact by drawing a line from<br />
100.0/132.5 mm to 100.0/135mm. Turn Orthogonal () and<br />
Snap () off and draw the second line diagonally to 101/138mm.<br />
Copy this line with 'Repeat' to 105.0/132.5 mm.<br />
Draw a line to represent the pusher from 95.0/137.5 mm to 95.0/135.0 mm (Snap<br />
off, Orthogonal on) and a dashed line (change to line type 7) from 95.0/136.3 mm to<br />
105.5/136.3 mm. The graphic of the symbol are now complete.<br />
In this example, the pins are the only parts of the symbol with great importance, when<br />
using the automatic functions.<br />
To place the pins on the symbol, select 'Pins - Place' on the main menu and the dialog<br />
'Place Pins' appears.<br />
Accept the default settings with 'OK' and position the cursor on the four ends to set the<br />
pins. (Note that Snap is on, as it cannot be turned off.). Exit by clicking the right mouse<br />
button after setting the fourth pin.<br />
Select 'Pin number' from the menu 'Pins'. Select the first end,<br />
enter the first pin number e.g. 1 and press the left mouse button (or<br />
). Place the number on the right hand side of the pin, the<br />
direction is always horizontal.