WSCAD51 Getting Started - FTP Directory Listing
WSCAD51 Getting Started - FTP Directory Listing
WSCAD51 Getting Started - FTP Directory Listing

Create successful ePaper yourself
Turn your PDF publications into a flip-book with our unique Google optimized e-Paper software.
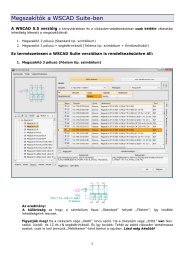
Creating a symbol<br />
The cursor will jump automatically to the next pin ready to enter the next number. You<br />
can, however, place the cursor on another pin e.g. when correcting a mistake. Enter the<br />
remaining pin numbers and exit by pressing the right mouse button or .<br />
The symbol requires a component name to be stored in the library. Select 'Graphics -<br />
Symbol Name' and then 'Input' and enter the name e.g. !S2x NC Switch. The '!'symbol<br />
makes the name invisible on the drawing. Position the name, remembering that<br />
the position is not important, because you cannot see it on the drawing (in the symbol<br />
editor everything is visible).<br />
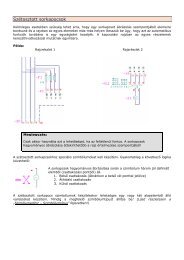
For automatic numbering the symbol needs a reference name (or symbol). In the<br />
database the reference name of a switch is 'S'. In the 'Graphics' menu select<br />
'Reference Name' and then 'Input' and at the prompt enter '-S'.<br />
Position the reference name left to the symbol. Open the 'Graphics' menu select<br />
'Reference Name' again and set the alignment to 'Right'. During automatic numbering<br />
it will be located automatically. As an exercise change the size of the name, and<br />
reposition it with 'Move' using the commands on the 'Reference' menu.<br />
Individual symbols are stored in libraries. Components can be stored in any library you<br />
want to. (WSCAD 5 is supplied with several libraries containing many symbols of<br />
different types).<br />
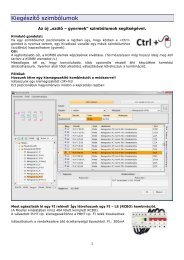
TIP<br />
Select 'Library' on the main menu and the 'Library' menu<br />
appears. You either store the symbol in the current library<br />
(refer to the library name at the lower right part of the<br />
screen), or in your own library created using the 'New<br />
library' command. When you create a new library, enter<br />
the library name without the extension '.BIB', as the<br />
program will create this automatically.<br />
To place the symbol in the library, select 'Save symbol'<br />
and you have to define the reference point. (Note the<br />
information in the status bar). With the Snap mode on,<br />
select Pin number '1'.<br />
When a symbol is placed in a drawing, the reference point of the<br />
symbol corresponds to the cursor location, and the drawing sheet<br />
path references (i.e. cross references) are calculated from the coordinates<br />
of the Ref. Point.<br />
Press the left mouse button and the symbol will be stored in the library. It can then be<br />
placed in a drawing using the 'Load Symbol... ' command from the 'Schematic' menu.<br />
Exit the Component Editor by clicking 'Exit'.<br />
IMPORTANT<br />
Make sure that when creating a symbol, the Snap grid setting<br />
matches the Snap grid of the library used.<br />
113