WSCAD51 Getting Started - FTP Directory Listing
WSCAD51 Getting Started - FTP Directory Listing
WSCAD51 Getting Started - FTP Directory Listing

You also want an ePaper? Increase the reach of your titles
YUMPU automatically turns print PDFs into web optimized ePapers that Google loves.
<strong>Getting</strong> <strong>Started</strong><br />
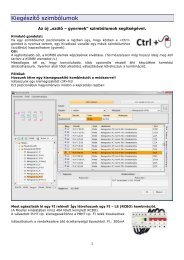
All the components in the schematic diagram are listed, sorted by part number.<br />
On any line you see the main switch Symbol Name '!Mainswitch_3pol' and Reference<br />
Name '-Q1' .<br />
Mark in this line the field which is in the 'Part number' column and then click on the<br />
button 'Assign part number'. In the database selection click on 'T0-2-1/EA/SVB-SW'<br />
and the line will be marked with a ('*'), so that you can see which parts have been<br />
modified. You can change the function text as well. Close the dialog window with 'OK'<br />
and all the changes will be automatically copied to the component.<br />
Hint<br />
86<br />
You can of course also modify the missing entry manually ('Modify<br />
- Component parameters'), but it is faster to use the 'Component<br />
parameters' menu: make a right click on the component and then<br />
click on the 'Part number' field. The database selection dialog<br />
appears again and you can select the desired part.<br />
Control Cabinet Layout<br />
General<br />
The Control cabinet assembly is a true-to-scale drawing of the components in the control<br />
cabinet. All existing components with a part number can be used for the control cabinet<br />
assembly. To create the control cabinet assembly, first turn to sheet 4. Choose<br />
'Options' from the 'Settings' menu: