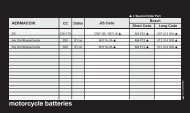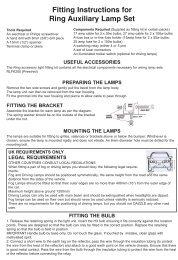
Download instructions here - Halfords
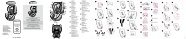
Download instructions here - Halfords
Download instructions here - Halfords

You also want an ePaper? Increase the reach of your titles
YUMPU automatically turns print PDFs into web optimized ePapers that Google loves.
5 Operating Instructions<br />
5.1 Power On / Off<br />
Press the POWER/VOL button to turn the unit on. The buttons on the front of the<br />
unit are illuminated and start up message is briefly displayed on the LCD screen,<br />
and then displays the current mode status. You can also turn on the unit by<br />
pressing the ( ) button on the remote control.<br />
Press and hold the POWER/VOL button on the front panel for more than 1<br />
second or press the ( ) button on the remote to power off the unit. The monitor<br />
is drawn back into the main compartment and the LCD screen displays “BYE<br />
BYE”.<br />
NOTE: The operating voltage range is 10.5V - 16V. The unit will power off<br />
automatically to protect itself, when the voltage is out of the operating range.<br />
5.2 Playing Source Selection<br />
Press the SRC button on the front panel or the MODE button on the remote to<br />
select among the available sources: TUNER, DVD, NAVI, AUX IN, Camera. The<br />
selected playing mode is displayed on the TFT or LCD screen.<br />
5.3 AUX IN Mode<br />
An external peripheral device can be connected to this unit via RCA cables to<br />
the “AUX-IN”.<br />
5.4 Volume Adjustment<br />
To increase or decrease the volume level, turn the POWER/VOL on the front panel or press<br />
the (VOL+/<br />
VOL-) buttons on the remote control. The volume ranges from “0” to “40”. The<br />
default volume is “10” when the unit is powered on each time. Default volume memory setup:<br />
Rotate Power/VOL knob on the front panel to select volume value and then press and hold<br />
the Power/VOL button until you hear a single beep. When you hear the beep, setup is<br />
completed.<br />
5.5 Audio Control Menu<br />
The Audio Control feature allows you to easily adjust your audio system to meet<br />
the acoustical characteristics of your vehicle, which vary depending on the type<br />
of vehicle and its measurements. To get the best possible sound quality from<br />
your new system, be sure to adjust the settings for the speakers as well. Proper<br />
setting of the Fader and Balance enhances the effects of the cabin equalizer.<br />
Accessing the Audio Control Menu<br />
Press the POWER/VOL on the front panel once or press the (SEL)<br />
button on the<br />
remote control to enter the “Audio” menu.<br />
Selecting an Audio Feature for Adjustment<br />
Press the / buttons on the remote to select a item to be adjusted.<br />
Rotate the “Smart Dial ”on the front panel to select a item to be adjusted.<br />
Adjusting an Audio Feature<br />
Press the ( / ) buttons on the remote or rotate the POWER/VOL<br />
clockwise/counterclockwise to adjust the selected feature to the desired setting.<br />
15