TIBCO Spotfire Server 3.2.2 - TIBCO Product Documentation
TIBCO Spotfire Server 3.2.2 - TIBCO Product Documentation
TIBCO Spotfire Server 3.2.2 - TIBCO Product Documentation

You also want an ePaper? Increase the reach of your titles
YUMPU automatically turns print PDFs into web optimized ePapers that Google loves.
Installing <strong>Spotfire</strong> <strong>Server</strong> 3.2<br />
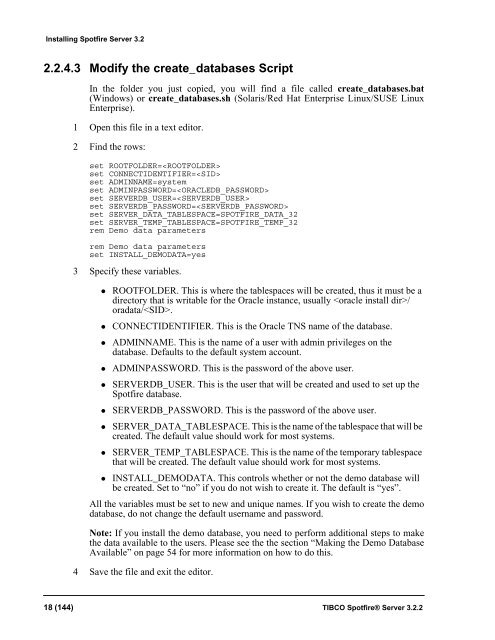
2.2.4.3 Modify the create_databases Script<br />
In the folder you just copied, you will find a file called create_databases.bat<br />
(Windows) or create_databases.sh (Solaris/Red Hat Enterprise Linux/SUSE Linux<br />
Enterprise).<br />
1 Open this file in a text editor.<br />
2 Find the rows:<br />
set ROOTFOLDER=<br />
set CONNECTIDENTIFIER=<br />
set ADMINNAME=system<br />
set ADMINPASSWORD=<br />
set SERVERDB_USER=<br />
set SERVERDB_PASSWORD=<br />
set SERVER_DATA_TABLESPACE=SPOTFIRE_DATA_32<br />
set SERVER_TEMP_TABLESPACE=SPOTFIRE_TEMP_32<br />
rem Demo data parameters<br />
rem Demo data parameters<br />
set INSTALL_DEMODATA=yes<br />
3 Specify these variables.<br />
• ROOTFOLDER. This is where the tablespaces will be created, thus it must be a<br />
directory that is writable for the Oracle instance, usually /<br />
oradata/.<br />
• CONNECTIDENTIFIER. This is the Oracle TNS name of the database.<br />
• ADMINNAME. This is the name of a user with admin privileges on the<br />
database. Defaults to the default system account.<br />
• ADMINPASSWORD. This is the password of the above user.<br />
• SERVERDB_USER. This is the user that will be created and used to set up the<br />
<strong>Spotfire</strong> database.<br />
• SERVERDB_PASSWORD. This is the password of the above user.<br />
• SERVER_DATA_TABLESPACE. This is the name of the tablespace that will be<br />
created. The default value should work for most systems.<br />
• SERVER_TEMP_TABLESPACE. This is the name of the temporary tablespace<br />
that will be created. The default value should work for most systems.<br />
• INSTALL_DEMODATA. This controls whether or not the demo database will<br />
be created. Set to “no” if you do not wish to create it. The default is “yes”.<br />
All the variables must be set to new and unique names. If you wish to create the demo<br />
database, do not change the default username and password.<br />
Note: If you install the demo database, you need to perform additional steps to make<br />
the data available to the users. Please see the the section “Making the Demo Database<br />
Available” on page 54 for more information on how to do this.<br />
4 Save the file and exit the editor.<br />
18 (144) <strong>TIBCO</strong> <strong>Spotfire</strong>® <strong>Server</strong> <strong>3.2.2</strong>