Operating instructions - EWM Hightec Welding GmbH
Operating instructions - EWM Hightec Welding GmbH
Operating instructions - EWM Hightec Welding GmbH

Create successful ePaper yourself
Turn your PDF publications into a flip-book with our unique Google optimized e-Paper software.
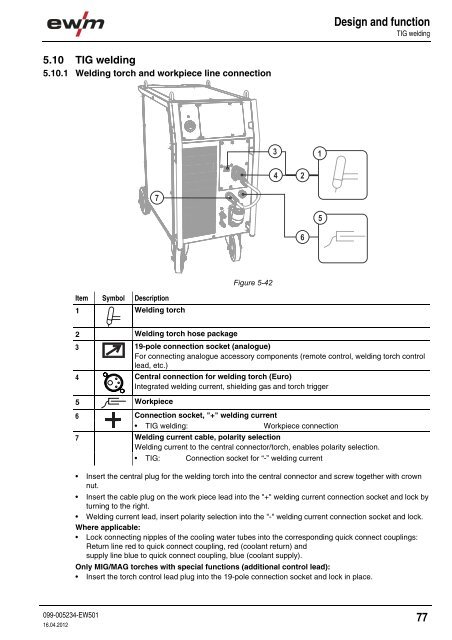
Design and functionTIG welding5.10 TIG welding5.10.1 <strong>Welding</strong> torch and workpiece line connectionItem Symbol Description 01 <strong>Welding</strong> torchFigure 5-422 <strong>Welding</strong> torch hose package3 19-pole connection socket (analogue)For connecting analogue accessory components (remote control, welding torch controllead, etc.)4 Central connection for welding torch (Euro)Integrated welding current, shielding gas and torch trigger5 Workpiece67Connection socket, "+" welding current• TIG welding: Workpiece connection<strong>Welding</strong> current cable, polarity selection<strong>Welding</strong> current to the central connector/torch, enables polarity selection.• TIG: Connection socket for “-” welding current• Insert the central plug for the welding torch into the central connector and screw together with crownnut.• Insert the cable plug on the work piece lead into the "+" welding current connection socket and lock byturning to the right.• <strong>Welding</strong> current lead, insert polarity selection into the "-" welding current connection socket and lock.Where applicable:• Lock connecting nipples of the cooling water tubes into the corresponding quick connect couplings:Return line red to quick connect coupling, red (coolant return) andsupply line blue to quick connect coupling, blue (coolant supply).Only MIG/MAG torches with special functions (additional control lead):• Insert the torch control lead plug into the 19-pole connection socket and lock in place.099-005234-EW50116.04.201277